Showing posts with label cheese. Show all posts

Saturday, 23 July 2016

Spaghetti with Saint Agur Blue Cheese & Hazelnuts

         
     Here I am again with a new recipe for you. I came up with this pasta sauce as we both are in love with pasta dishes, blue cheese & hazelnuts and believe us it is a match made in heaven. There are way too many blue cheese variations (this is a lie, there are never way too many cheeses) to choose from but for this particular dish we used Saint Agur Blue a French blue cheese from the province of Auvergne. This cheese is a very young one (aged only 2 months) and it has a super creamy texture due to the double cream content and also is less salty than other blue cheese. It's like a mild version of the more spicier and pungent Roquefort. Obviously, if you do not find Saint Agur Blue you can use Italian 'sweet' blue cheeses like Gorgonzola Dolce or Dolcelatte. 
         The other main ingredients for this dish are the superbly fragrant and nutty roasted hazelnuts. They add a crunchy texture to the velvety cheesy sauce. Hazelnuts are quick to roast, they only take about 12-13 minutes at 180°C/350°F. If you are roasting them yourself, always keep an eye whilst roasting as nuts can burn quickly due to their high oleic content. So give this a go and am quite sure you will love it and list it on your favourite pasta sauces!! For 2-3 hungry people you will need...


  • 200g Spaghetti


For the sauce

  • 100g (1 cup) Saint Agur blue cheese, crumbled
  • 50g (1/3 cup) Roasted Hazelnuts, chopped/crushed
  • 15g (1 tablespoon) Butter
  • 15g (1 tablespoon) Plain flour 
  • 230ml (1 cup) Whole milk
  • 1 teaspoon honey
  • Pinch grated nutmeg
  • Pinch sea salt
  • Pinch ground white pepper


To Garnish

  • Whole hazelnuts
  • Chopped parsley


How to...

  1. In a small heavy based pan, make the roux (flour/butter mixture) by melting the butter then add the flour and with a balloon whisk stir until the roux turns golden. Add the milk, salt, white pepper and nutmeg and keeping stirring frequently until you get a thick bechamel like sauce. This takes about 10-15 minutes. 
  2. Now lower the heat, stir in the honey and crumbled cheese and keep stirring until all the cheese has melted. In the meantime, cook the spaghetti al dente in plenty of salted boiling water.
  3. Drain the spaghetti, add the sauce to the hot pasta and mix well until all the pasta is coated with the gorgeous creamy sauce.
  4. Plate up and garnish with whole roasted hazelnuts and chopped parsley.
  5. Serve hot.
Enjoy!!
R&A


Thursday, 25 June 2015

Baked Tomato & Cheese Rigatoni

This has been my favourite pasta dish since I was a child and in fact in my family this dish is called Ramon's Pasta. :) I love it so much, the gooey pink sauce, the melted cheese, the sweetness of the tomatoes...heaven!! This recipe has been adapted by my mum from a 1970's cookbook written by Marguerite Patten. I can tell you that if you try this pasta dish, you will go for seconds :) It is quite easy to make and the most "difficult" part of it is making the pink sauce. So, do give it a go and let us know how it turns out for you. 
For 6-8 people you will need...
  • 500g Rigatoni
  • 6 tomatoes, sliced
  • 300g Edam cheese, grated
  • 800ml whole milk
  • 500ml tomato passata
  • 2 teaspoons wholegrain mustard
  • 50g butter
  • 50g plain flour
  • Ground black pepper

How to...

  1. Start by boiling a large salted pot of water. Cook the pasta until nearly al dente...about 9 minutes.
  2. Whilst the pasta is cooking, make a roux by melting the butter and adding the flour on a medium heat. Stir until you get a golden coloured (but not brown) mixture. Add the milk bit by bit whilst stirring continuously until the sauce thickens and you have used all of the milk. Make sure there are no flour lumps. About 10-15 minutes in total. You need a creamy and silky white sauce. 
  3. Preheat the oven at 200°C.
  4. Turn off the heat and add ground black pepper to taste and the passata, stir until you get a pink sauce. Add the mustard and some of the grated cheese (optional), stir again.
  5. Drain the pasta and rinse quickly with cold water to remove any extra starch.
  6. In the large pasta pot, add the pasta (make sure it is not in one big lump), add the pasta and about 75% of the pink sauce. Mix carefully until it is well combined.
  7. Butter or spray a rectangular oven dish and spread the leftover pink sauce on the bottom. Add half of the pasta and pink sauce mixture. now sprinkle most of the cheese and some sliced tomatoes, add more black pepper.
  8. Pour in the rest of the pasta, sprinkle the remainder of the cheese and cover with the sliced tomatoes. Add more black pepper if you like. 
  9. Now, to get better results move the oven rack to the top shelf and bake the pasta for about 30 minutes. You can put the pasta dish under the grill for about 5-10 minutes if you like to crisp up the tomatoes. Serve hot!!
Enjoy!!
R&A


Saturday, 18 April 2015

Manchego, Spanish Paprika & Leeks Mac 'n' Cheese

We had some Manchego cheese and a huge leek in the fridge and both of us were starving Saturday lunchtime. So, I had a look in our pantry and rustled up this recipe quite quickly to be honest. It took me about an hour to prep and cook it. This dish is kind of a Spanish take on the American classic and is very tasty. Do not worry if you do not have Spanish paprika or Spanish sherry, use whatever paprika or sherry you have but if you manage to get the real deal it will definitely be worth it. The Manchego cheese and Spanish paprikas give this dish its piquant, smoky flavours and the leeks provide the sweetness whilst the breadcrumbs provide the crunchy bit. Give it a go and I can guarantee that you will ask for more!! For 4 people (or 2 very hungry people) you will need...
  • 1 large leek, washed and thinly sliced
  • 15g +25g butter
  • 60ml Spanish Dry Sherry
  • 500ml whole milk
  • 25g plain flour
  • ½ teaspoon Pimentón Dulce (Spanish sweet paprika)
  • ½ teaspoon Pimentón Picante (Spanish hot paprika)
  • 1 teaspoon Pimentón Ahumado (Spanish smoked paprika)
  • 250g Pennette or Macaroni
  • 200g Manchego cheese, grated
  • 2 tablespoons breadcrumbs
  • Salt & pepper 

How to...

  1. Start by cooking the pasta until nearly al dente. When cooked rinse with cold water and set aside.
  2. Now, let’s cook the leeks. Add 15g butter to a small frying pan and when melted, add the leeks and cook on medium heat for a 5 minutes. Now, season with salt & pepper and add the sherry. Cook for a further 10 minutes or until the sherry has evaporated and leeks are soft. Turn off the heat and set aside.
  3. Preheat the oven to 180°C/350°F.
  4. For the cheese sauce, add 25g of butter to a medium pan and when melted add the flour and stir for about 3 minutes until golden brown. Add the milk and the 3 types of paprika and stir on a low to medium heat stirring continuously until the sauce thickens. Turn off the heat and add about 150g of the grated cheese. Stir again until the cheese is melted.
  5. Now in the cheese sauce pan add the cooked pasta and cooked leeks. Stir well to mix the pasta with the sauce and pour into a small oven dish (we used a round 20cm diameter earthenware dish). Sprinkle the top with the remaining cheese and the breadcrumbs and more freshly black pepper.
  6. Bake for 30 minutes. Take out of the oven and leave to rest for 15 minutes. Serve!
Enjoy!!
R&A


Saturday, 11 October 2014

Njokki l-forn - Maltese Baked Ricotta Filled Pasta Shapes


When my family visited us this summer, as per usual the food ration package came from Malta with them and this time I told my dad to bring me some Njokki. In Malta we call Njokki (Nyok-key...basically a Maltese version of the word gnocchi) large snail shaped pasta (in fact in Italy they are called Lumaconi-large snails) that originally come from the southern region of  Campania in Italy that in Malta are traditionally filled with a ricotta and egg mixture, soaked in milk, topped with a corned beef-tomato sauce, grated cheese and baked in a hot oven. The result is a very traditional Maltese dish that oozes with cheesiness and tomatoey goodness comes from a very old recipe. My mother always says that is was one of my grandfather's favourite dishes. Preparing this dish took Amanda and myself through a nostalgic trip to our childhood as both of us used to help our mothers and grandmothers fill these pasta shapes and it was definitely one of the highlights of our childhood. If you do not fancy a corned beef sauce you can use any meat you want but just make sure you cook the meat accordingly. You can even leave the meat out for a vegetarian dish. My mother always told me that for this recipe my grandfather used to fill the Njokki and leave them soaking in milk for a couple of hours so as the pasta shells soften but if you are in a rush you can skip this step, we did, and they turned out great!! Now re portions with a large packet of Njokki-Lumaconi we made enough grub for 8 people in fact this was a two-day meal for us (even taking a portion at work with me). You can always freeze the leftovers in tubs. So, for 8 portions, you will need...

1 500g packet Njokki/Lumaconi pasta shapes (see picture)

For the Ricotta mixture

800g fresh ricotta 
3 eggs
½ tablespoons dried or freshly chopped parsley
Salt & freshly ground black pepper, to taste

For the tomato sauce

1 large tin corned beef
2 garlic cloves, crushed
2 tins chopped tomatoes
1 tablespoon vegetable oil
Freshly ground black pepper
750 ml whole milk
Grated mature Cheddar cheese or Edam cheese, to taste

How to...
  1. Start by preparing the ricotta mixture by adding the ricotta, eggs, parsley and seasoning in a large bowl and mix well until you get a consistent mixture. 
  2. When this is done, carefully starting filling the pasta shapes with a teaspoon, make sure you press the filling tightly in the shape (so it won't run away my nanna used to say).
  3. Place the filled pasta shapes in two deep oven trays next to each other (see picture). 
  4. Now gently pour milk until the filled pasta shapes are next to half way submerged. Leave to stand as long as you want (we left them for 15 minutes...we were very hungry). 
  5. Whilst the pasta shapes are soaking prepare the tomato sauce. On a low to medium heat heat the garlic and oil and until garlic turns golden, Add the corned beef and cook for a couple of minutes, add the chopped tomatoes and season well. Simmer for about 20 minutes.
  6. Preheat your oven to 180°C/350°F/Gas Mark 4. 
  7. When the sauce is done, using a ladle or large spoon gently pour sauce of top of the milk drenched pasta shapes. When all the sauce is used shake the dish slowly so as the wonderfully smelling tomato sauce mixes with the creaminess of the milk. Apparently, this is a very important step my mother says.
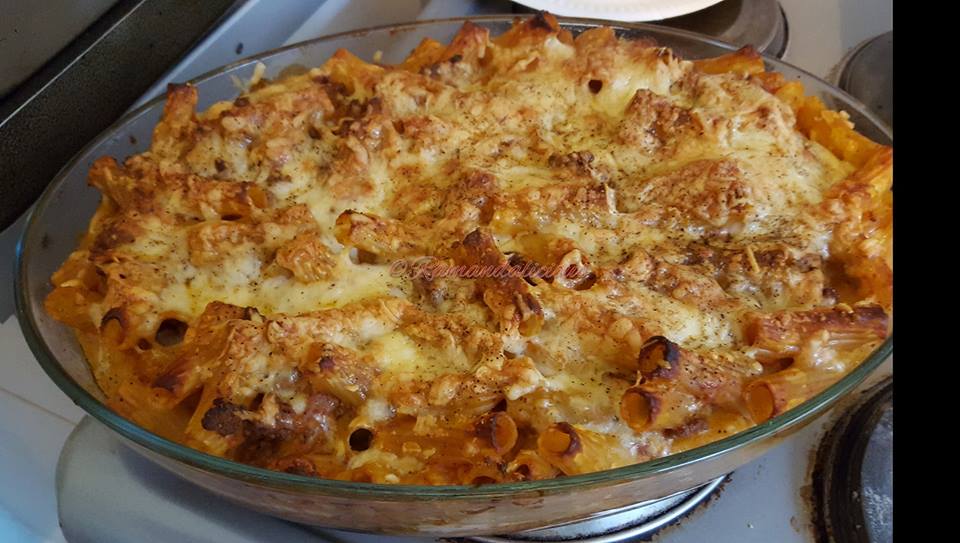
  8. Top with the grated cheese and bake into the hot oven for 50 minutes or until top is nice golden and pasta shells are done.
  9. Take out of the oven and leave to set for about 10 minutes.
  10. Serve warm.
Enjoy!!
R&A

Tuesday, 26 August 2014

Tortelloni Cheese & Peas


Tortellini or tortelloni with cream is quite a famous dish in Malta and is a must on numerous restaurant menus around the Maltese islands. We do like the classic ham, mushrooms & cream but this is another version that we love and thought we'd share it with you all. In this dish, we used whole milk instead of cream but you can use cream as well if you wish. The sweetness of the peas contrasts the sharpness of the Gorgonzola cheese whilst the paprika adds extra flavour. For 3-4 people you will need...
  • 2x 250g Packets tortelloni
  • 100g frozen peas, defrosted
  • 75g Gorgonzola Piccante, cut in cubes
  • 75g Extra mature cheddar, grated
  • Freshly ground pepper
  • ½ teaspoon sweet paprika
  • 2 teaspoons corn flour dissolved in 1 cup whole milk
  • Chopped parsley, to serve

How to...
  1. Cook the tortelloni as per packet directions.
  2. In the meantime, start preparing the sauce by adding all the ingredients into a small pan and stir frequently and slowly until all the cheese has melted. Keep stirring until the sauce bubbles and starts to thicken. Turn off the heat.
  3. Drain the tortelloni cooked al dente and add to the cheesy sauce or viceversa. Stir slowly and serve hot with plenty of chopped parsley sprinkled on top.

Enjoy!!
R&A


Saturday, 26 October 2013

Tartiflette Savoyarde


I first had Tartiflette from my friend Didier's French restaurant. I instantly fell in love with it. It is French cuisine at its best, butter, cream and obviously Reblochon cheese. Reblochon is a French cheese that comes from the Alps region of Haute-Savoie, originally in the Thônes and Arly valleys. It is made from unpasteurized cow's milk and is very soft in texture and nutty in taste. This simple dish is a delectable unique taste of France and the distinctive taste of Reblochon makes it a must for everyone who loves and appreciates French cuisine. Give it a go and am quite sure you will love it. For 4 people you will need...
  • 1 Petit Reblochon (200g), sliced in 1 cm slices
  • 200ml crème fraiche
  • 500g potatoes
  • 150g bacon lardons
  • 1 large onion, sliced
  • Butter & olive oil for frying

  1. Start by cooking potatoes with the skin on. Make sure you do not over cook them. Use a skewer to check if they are cooked. As soon as the skewer goes through take them off the heat. Peel them carefully and slice them in 1cm slices.
  2. Heat some butter and olive oil in a frying pan and fry the onion until translucent and soft. Add the bacon lardons and cook until brown. 
  3. Take the onion/bacon mixture out of the pan and in the same pan fry the potato slices until they are golden.
  4. Preheat the oven to 200°C.
  5. Put half the potato slices in a buttered small oval oven dish  and pour half of the cream and scatter half of the onion/bacon mixture. Repeat the process until you use all the potato slices, cream and onion/bacon mixture.
  6. Now to finish the dish, place the Reblochon slices on top and bake for about 15-20 minutes until the cheese is melted. Serve hot with a glass of good French white wine.
Enjoy!!
R&A

Thursday, 15 August 2013

Pizza Toast


Yesterday we were both tired and we felt like doing a speedy dinner. So we decided to do Pizza Toast!! We have been calling it like this for ages, my brothers and I used to get this prepared by our mom just after we came back from school as a quick snack. Well basically to avoid  the daily 'mom I'm hungry' moan from the three of us :) You can do a myriad amount of fillings when it comes to toasties (closed toast). I must say this is my favourite and Amanda loves it as well known. For me it's like one toastie leads to another as I can never get tired of eating them. Try them out, something different and delicious! You will need...
  • Sliced bread
  • Tomato purée/paste
  • 1 can tuna, drained
  • Green olives, pitted & sliced
  • Cheese slices, like Edam or Cheddar
  • Dried oregano
How to...
  1. Preheat the sandwich toaster.
  2. In the meantime spread the tomato puree on the sandwich bread. Put some tuna, some olives, sprinkle some oregano and cover with a slice of cheese. Cover with another tomato puree covered piece of bread.
  3. Press gently with the palm of your hand and put into the sandwich toaster.
  4. Cook to your liking.
Enjoy!!
R&A

Saturday, 15 June 2013

Tex-Mex Beef Enchiladas

We love Mexican & Tex-Mex food and in fact it features quite frequently  on our menu. (More like an obsession haha. We make our own tortillas too using our tortillera (tortilla press). Burritos, Enchiladas and  Tacos are certainly one of our favourites. I love very hot food and Amanda likes it medium, so I always add more chilli sauce to my tacos. Enchiladas are so delicious as they are baked so you have the delicious golden melted cheddar, that bit of crispy tortilla...oh dear...drooling right now...we love serving them with sour cream and fresh coriander (cilantro) leaves as they add a fresh contrast to the chilli. So give them a go...you will love them...you will need...
  • 400g Lean beef mince
  • 1 red bell pepper, chopped into 1 inch pieces
  • 8 corn or wheat tortillas
  • 100g mature cheddar, grated
  • 1 tbsp vegetable oil
  • 1 teaspoon mild (eg. Ancho) or hot (eg. Habanero) chilli powder
  • 2 teaspoons sweet paprika
  • 1 teaspoon ground cumin
  • 1 teaspoon dried Mexican oregano (regular oregano will do)
  • ½ teaspoon garlic powder
  • Sea salt & ground black pepper.
  • 200ml water
For the sauce
  • 300ml passata
  • 1 garlic clove, crushed
  • Salt & pepper
  • 1 tsp ground cumin
  • 1 tsp oregano
  • 1 tsp hot paprika
  • 1 tsp vinegar
  • 1 tsp vegetable oil
To serve
  • Sour cream
  • Chopped coriander leaves
How to..
  1. Start by preparing the sauce. On low heat, heat the oil and add the garlic, cumin, oregano, paprika and stir well until fragrant. About 45 seconds. Add the passata, vinegar and simmer for about 10-15 minutes. Set aside. Preheat the oven to 200°C.
  2. In a shallow pan on high heat, heat some vegetable oil and add the lean beef mince and brown well until dry. Add the bell pepper, the chilli powder, cumin, garlic powder, sweet paprika, oregano and the water and cook until mixture dries out. Turn off the heat.
  3. Heat the tortillas in the microwave for 45 seconds. Fill the tortilla with the mince mixture, roll them up like pancakes and line them up in a rectangular oven dish. Pour the sauce on top and grate the cheese. Put in the oven and bake for about 20 minutes.
  4. Serve with some sour cream and chopped coriander leaves.
Enjoy!!
R&A


Saturday, 9 June 2012

Maltova a la Maltija - Fine Pasta with Cheese & Bovril

This dish is an old Maltese recipe that used to be given to us during our infancy and childhood. Ahhh what memories!! Mothers and grandmothers alike used to prepare this for us and we used to love it!! I still do :)) It is very easy to prepare...I shared the picture on Facebook earlier and had quite a number of likes for it so I decided to post how I (and my mum and grandma) used to make it :) It was originally done with Maltova infant food and Bovril. If you cannot find Maltova you can use Sabbiolina by Plasmon. Fine couscous will do the job too!! For a vegetarian you can do this by using Marmite, Vegemite or Vecon instead of Bovril!! So these amounts will suffice for 2 or 3 people as it is quite filling! You will need...
  • 150g coarse Maltova (or fine couscous)
  • 3 Cheese triangles
  • 1 level tablespoon Bovril/Marmite/Vegemite
  • 500ml boiling water
How to...
  1. In a pan dissolve the  Bovril/Marmite/Vegemite in the boiling water. Keep stirring until it is all dissolved.
  2. Put the pan on a low heat.
  3. Add the cheese triangles and Maltova and bring to the boil stirring continuously. Make sure you keep stirring or else it will stick to the pan.
  4. Simmer for a few minutes until it reaches a thick consistency.
  5. Serve hot!!
Enjoy!!
R&A

Saturday, 26 November 2011

Chilli Dogs As They Should Be!!


I have always been a fan of chilli. The hotter it is, the better for me. But what is great with chilli is that you can make as spicy, hot or mild as you like. I love hot dogs and love chilli so a Chilli Dog is one of my favourite dishes ever. Go ahead and try these chilli dogs to impress your family or your friends. The amount of chilli powder you put in this chilli is obviously to your taste so adjust it according to your taste. Make sure you use the best hot dogs you can get your hands on, we use Bockwurst but Wudy, Frankfurters or any other large sausage will do. One thing is for sure that if you prepare this chilli once, you will definitely do it again. Any leftover chilli can be used in burritos, enchiladas or served with white rice or tortilla chips as a meal. If you use a spoonful with each hot dog you will have enough chilli for about 16-20 chilli dogs. So go ahead and give this a go...you will love it...you will need...

For the chilli con carne


  • 200g bacon, cut into small pieces
  • 1 large onion, finely chopped
  • 700g minced beef
  • 5 garlic cloves, finely chopped
  • 3 cans chopped tomatoes in juice
  • 2 tablespoons molasses (Treacle) or 100g dark muscovado sugar or Piloncillo
  • 2 tablespoons sweet paprika
  • 2 tablespoons ground cumin
  • 2 teaspoons dried oregano
  • 2 tablespoons chilli powder (or to taste) 
  • 1/2 tablespoon cayenne pepper [Caution - Cayenne pepper is very hot]
  • 1 tablespoon unsweetened cocoa powder
  • Salt & pepper, to taste
  • 300ml beef stock (We used 1 Knorr stock pot in 300ml boiling water)
  • 1 tin red kidney beans, drained and rinsed [optional]
For the dogs
  • Hot dog buns (depends on how many you need)
  • Hot dogs such as Bockwurst, Wudy, Frankfurters or others
To garnish
  • Grated Mature Cheddar cheese
  • Finely chopped raw onion (optional)
How to...

  1. To make the chilli start by frying the onions in about 2 tablespoons vegetable oil and fry over high heat until brown, stirring frequently. 
  2. Add the bacon and garlic. Cook until brownish.
  3. Now add the minced beef and stir well with the onions. Cook the beef over high heat stirring occasionally until browned, about 15 minutes. 
  4. When the beef is cooked, drain any excess liquid fat and add the chopped tomatoes, molasses, sugar or piloncillo (whatever you are using), stock, cocoa powder and all the spices. (Better add the chilli powder and cayenne pepper slowly so you can adjust to your taste...always taste before adding more). 
  5. Stir well and simmer on a medium to low heat for about 90 minutes (or more) until the chilli has a thick consistency. If left too watery it will ruin the buns.
  6. Grill your hot dogs until they are slightly charred. 
  7. Slice open the hot dog buns, place a hot dog on, spoon some chilli on the dog, add grated Cheddar and chopped onions (if used) and enjoy!!! We dare you to stop at one dog :)
Enjoy!!
R&A

Saturday, 5 November 2011

Fusilli Pasta Bake with Breadcrumb Topping

We are big fans of creating dishes with whatever we have in our cupboards & fridge. These dishes usually turn out to be a great success and most of all very very tasty. Like this one for example, I decided to give the usual plate of pasta a twist by adding a couple of ingredients like breadcrumbs and grated hard cheese and then put it in the oven to get a nice crunchy pasta dish. It is very simple to prepare, so just give it a go...you will need...
  • 300g fusilli
  • 500ml tomato passata
  • 2 red chillies, deseeded and sliced [optional]
  • 1 small onion, finely chopped
  • 2 garlic cloves, finely chopped
  • Half teaspoon sugar
  • 1 tsp dried oregano
  • Ground black pepper, to taste
  • 100g grated Kefalotiri or Parmigiano cheese
  • Extra virgin olive oil
  • Handful of pangrattato or stale breadcrumbs
How to...
  1. Preheat the oven to 180°C.
  2. Add a tbsp of olive oil to a pan and fry the onion until soft and transparent, about 5 minutes (preferably covered). Add the chillies and garlic and stir fry for a further 2-3 minutes.
  3. Add the passata, sugar, oregano and ground black pepper. Stir well and simmer for about 10 minutes.
  4. In the meantime cook the fusilli al dente. Make sure you do not overcook the pasta.
  5. When the sauce & pasta are cooked, drain the pasta and put back in the pasta pot. Add the sauce, a good amount of extra virgin olive oil and about 2 tbsp of grated cheese. Mix well but slowly, not to break the fusilli.
  6. Pour slowly into a small ovenproof container. Cover the pasta with a handful of breadcrumbs and the remainder of the cheese.
  7. Put in the preheated oven for about 20-25 minutes or until the breadcrumbs & cheese are golden brown.
Enjoy!!
R&A

Friday, 26 November 2010

Imqarrun il-Forn - Maltese Style Baked Pasta

.

So, this morning my Canadian [with Maltese roots] friend Steven Tanti at work asked me if I have a Baked Pasta recipe....of course I do I answered...so now I am posting this traditional Maltese recipe which in Malta we call Imqarrun. This dish is one the favourite in Maltese cuisine and everyone has its own touches and special ingredients, in fact this our take on Imqarrun. It is just that little lighter, I guess!! :) One of the originals recipes has chopped hard boiled eggs in it, whilst they are are great addition, we only use eggs to bind the pasta mixture. Oh well, enough said and here is the recipe. You will need...
  • 500g Rigatoni/Tortiglioni/Penne
  • 700ml Tomato Passata
  • 500g Lean Minced Beef
  • 4 eggs
  • 1 onion, chopped
  • 2 garlic cloves, crushed
  • 250g Edam or Cheddar cheese, grated
  • Vegetable Oil
  • 1 level tsp mixed herbs [optional]
  • Salt & Pepper to taste
  1. Heat the oil and fry the onion until soft and transparent.
  2. Add the minced meat and cook until brown. Remove any excess fat from the pan.
  3. Add the passata and herbs, if used. Simmer for about an hour on medium heat, stirring the sauce occasionally. [If you are in a hurry cook for 30 minutes on high heat, but the slower the cooking the better the sauce]
  4. In the meantime cook the pasta in boiling water. [Tip: if the pasta packet says 12 minutes, cook it for 10 minutes instead to avoid having a soggy pasta dish]
  5. Preheat the oven to Gas Mark 5 [200°C].
  6. When pasta is done, drain the water and leave the pasta in the pan [make sure you use a big enough pan].
  7. Add the sauce to the pasta and crack the 3 eggs in the pasta/sauce mixture. Mix in the eggs very gently to avoid damaged the pasta shapes.
  8. Put in a baking dish about 30cm & 15cm and sprinkle the cheese on top.
  9. Bake in the oven for about 35 minutes or until the cheese is melted, bubbly and golden.
  10. When cooked, leave to set for about 10 minutes and serve hot.
Enjoy!!
R & A