Showing posts with label vegetarian. Show all posts

Saturday, 23 July 2016

Spaghetti with Saint Agur Blue Cheese & Hazelnuts

         
     Here I am again with a new recipe for you. I came up with this pasta sauce as we both are in love with pasta dishes, blue cheese & hazelnuts and believe us it is a match made in heaven. There are way too many blue cheese variations (this is a lie, there are never way too many cheeses) to choose from but for this particular dish we used Saint Agur Blue a French blue cheese from the province of Auvergne. This cheese is a very young one (aged only 2 months) and it has a super creamy texture due to the double cream content and also is less salty than other blue cheese. It's like a mild version of the more spicier and pungent Roquefort. Obviously, if you do not find Saint Agur Blue you can use Italian 'sweet' blue cheeses like Gorgonzola Dolce or Dolcelatte. 
         The other main ingredients for this dish are the superbly fragrant and nutty roasted hazelnuts. They add a crunchy texture to the velvety cheesy sauce. Hazelnuts are quick to roast, they only take about 12-13 minutes at 180°C/350°F. If you are roasting them yourself, always keep an eye whilst roasting as nuts can burn quickly due to their high oleic content. So give this a go and am quite sure you will love it and list it on your favourite pasta sauces!! For 2-3 hungry people you will need...


  • 200g Spaghetti


For the sauce

  • 100g (1 cup) Saint Agur blue cheese, crumbled
  • 50g (1/3 cup) Roasted Hazelnuts, chopped/crushed
  • 15g (1 tablespoon) Butter
  • 15g (1 tablespoon) Plain flour 
  • 230ml (1 cup) Whole milk
  • 1 teaspoon honey
  • Pinch grated nutmeg
  • Pinch sea salt
  • Pinch ground white pepper


To Garnish

  • Whole hazelnuts
  • Chopped parsley


How to...

  1. In a small heavy based pan, make the roux (flour/butter mixture) by melting the butter then add the flour and with a balloon whisk stir until the roux turns golden. Add the milk, salt, white pepper and nutmeg and keeping stirring frequently until you get a thick bechamel like sauce. This takes about 10-15 minutes. 
  2. Now lower the heat, stir in the honey and crumbled cheese and keep stirring until all the cheese has melted. In the meantime, cook the spaghetti al dente in plenty of salted boiling water.
  3. Drain the spaghetti, add the sauce to the hot pasta and mix well until all the pasta is coated with the gorgeous creamy sauce.
  4. Plate up and garnish with whole roasted hazelnuts and chopped parsley.
  5. Serve hot.
Enjoy!!
R&A


Saturday, 9 July 2016

Goats' Cheese, Cherry Tomato & Tapenade Tart


   So, we love goats' cheese, tomato and olives...hmmm...so I came up with this super quick tart that both of demolished within minutes of it coming out of the oven. It came out so tasty, flaky, crispy...well perfect! I made our own tapenade but you can find it already made or you could even substitute it with pesto if you like (do not use the same quantity though as it has a stronger taste. We also used a mixture of coloured cherry tomatoes (red, purple & yellow) but you can use only red ones if you cannot find multicoloured ones. Oh yes, the goats' cheese, although it is not a melty cheese, it give this tart the delicious unique flavour that goats' cheese has. I also used a ready made puff pastry sheet but you can also make your own obviously but ready made pastry is fine if you're in a hurry.  
      Tapenade usually is a bit oily and runny and this ruin your tart by making the pastry too soggy, so what I have done I just added some pumpkin seed to the mixture so they can act as a thickener. If pumpkin seed are hard to come by, you can also use sunflower seed. Whatever seed you use, they will give your tapenade a nutty taste to your tart. So, give this a go and am quite sure you will love it and so will your family and friends. You will need...

For the tapenade
  • 4 tablespoon green pitted olives
  • 5 giant capers or 1 tablespoon small capers
  • 1 tablespoon pumpkin seed
  • 1 teaspoon dried basil
  • Pinch dried oregano
  • 2 garlic cloves, chopped
  • 5 tablespoons (75ml) extra virgin olive oil
  • Sea salt & freshly ground black pepper
For the tart
  • 1 ready made puff pastry sheet
  • 150g multicoloured cherry tomatoes, cut in half (red ones only will do)
  • 125g soft goats' cheese, sliced or crumbled
  • Rocket (Arugula) leaves
  • Extra virgin olive oil

How to...
  1. Start by preheating the oven to 200°C.
  2. Next up let's prepare the tapenade by blending all the ingredients in a food processor or stick blender (that's what I used) until you get a homogeneous smooth mixture. 
  3. Unroll the pastry sheet onto a baking sheet or large baking tray covered with greaseproof paper. I trickled some olive oil before I put my pastry on.
  4. Spread the tapenade evenly on the pastry leaving about an inch from each side. Top up with the split cherry tomatoes, add the goats' cheese, add some olive oil and bake in the hot oven for about 25 minutes.
  5. After 25 minutes take out of the oven, let cool down for 5 minutes and add rocket/arugula leaves and serve warm.
Enjoy!!
R&A


Wednesday, 28 October 2015

Pumpkin & Spanish Paprika Soup


Autumn/Fall is has been with us for a while now and pumpkins are bountiful at this time of year. So as per usual I came up with another delicious and tasty soup. You can do this soup by using the flesh from your pumpkins that you may have carved for Halloween. The sweetness of the pumpkin flesh and the unmistakeable taste of Spanish paprika make this soup an explosion of flavour on your palate with every spoonful. If you do not have Spanish paprika stocked in, you can use regular paprika but make sure it is the sweet variety. You can prepare this soup as a starter at a dinner party or as a delightful supper accompanied by buttered rustic bread. If you want to make this soup vegan just omit the butter and used a little bit more oil. So, go on, give it a go and we hope you enjoy it as much as we did! For 4-6 people you will need...

  • 850g pumpkin, chopped into 1 inch pieces
  • 1 large potato, diced
  • 1 medium white onion, chopped
  • 1 small red onion, chopped
  • 2 garlic cloves, chopped
  • 2 teaspoons sweet Spanish paprika
  • Few celery leaves [optional]
  • Freshly ground black pepper
  • 1 ½ litres [7 cups] boiling water
  • 2 vegetable stock gel pots [or cubes]
  • 15g Butter & 1 tablespoon olive oil, for frying
  • Flaked almonds, to serve
  • Pumpkin seeds, to serve

How to...

  1. In a large stock pot, heat the oil and butter on medium heat and fry the onions for about 5-7 minutes until soft and translucent.
  2. Now add the garlic and cook for a further 2-3 minutes.
  3. Add the pumpkin, potato, paprika, celery leaves [if using] and stock gel pots or cubes. Give it a good stir and season with freshly ground black pepper. 
  4. Pour in the boiling water and stir well, bring to a boil. Now reduce heat and simmer, covered, for 45 minutes to an hour.
  5. Turn off the heat and let cool down a bit before blending with a stick blender or in a jug blender until you get a velvety consistency.
  6. Ladle into soup bowls and sprinkle with the flaked almonds & pumpkin seeds. Serve hot.


Enjoy!!
R&A


Thursday, 25 June 2015

Baked Tomato & Cheese Rigatoni

This has been my favourite pasta dish since I was a child and in fact in my family this dish is called Ramon's Pasta. :) I love it so much, the gooey pink sauce, the melted cheese, the sweetness of the tomatoes...heaven!! This recipe has been adapted by my mum from a 1970's cookbook written by Marguerite Patten. I can tell you that if you try this pasta dish, you will go for seconds :) It is quite easy to make and the most "difficult" part of it is making the pink sauce. So, do give it a go and let us know how it turns out for you. 
For 6-8 people you will need...
  • 500g Rigatoni
  • 6 tomatoes, sliced
  • 300g Edam cheese, grated
  • 800ml whole milk
  • 500ml tomato passata
  • 2 teaspoons wholegrain mustard
  • 50g butter
  • 50g plain flour
  • Ground black pepper

How to...

  1. Start by boiling a large salted pot of water. Cook the pasta until nearly al dente...about 9 minutes.
  2. Whilst the pasta is cooking, make a roux by melting the butter and adding the flour on a medium heat. Stir until you get a golden coloured (but not brown) mixture. Add the milk bit by bit whilst stirring continuously until the sauce thickens and you have used all of the milk. Make sure there are no flour lumps. About 10-15 minutes in total. You need a creamy and silky white sauce. 
  3. Preheat the oven at 200°C.
  4. Turn off the heat and add ground black pepper to taste and the passata, stir until you get a pink sauce. Add the mustard and some of the grated cheese (optional), stir again.
  5. Drain the pasta and rinse quickly with cold water to remove any extra starch.
  6. In the large pasta pot, add the pasta (make sure it is not in one big lump), add the pasta and about 75% of the pink sauce. Mix carefully until it is well combined.
  7. Butter or spray a rectangular oven dish and spread the leftover pink sauce on the bottom. Add half of the pasta and pink sauce mixture. now sprinkle most of the cheese and some sliced tomatoes, add more black pepper.
  8. Pour in the rest of the pasta, sprinkle the remainder of the cheese and cover with the sliced tomatoes. Add more black pepper if you like. 
  9. Now, to get better results move the oven rack to the top shelf and bake the pasta for about 30 minutes. You can put the pasta dish under the grill for about 5-10 minutes if you like to crisp up the tomatoes. Serve hot!!
Enjoy!!
R&A


Saturday, 18 April 2015

Manchego, Spanish Paprika & Leeks Mac 'n' Cheese

We had some Manchego cheese and a huge leek in the fridge and both of us were starving Saturday lunchtime. So, I had a look in our pantry and rustled up this recipe quite quickly to be honest. It took me about an hour to prep and cook it. This dish is kind of a Spanish take on the American classic and is very tasty. Do not worry if you do not have Spanish paprika or Spanish sherry, use whatever paprika or sherry you have but if you manage to get the real deal it will definitely be worth it. The Manchego cheese and Spanish paprikas give this dish its piquant, smoky flavours and the leeks provide the sweetness whilst the breadcrumbs provide the crunchy bit. Give it a go and I can guarantee that you will ask for more!! For 4 people (or 2 very hungry people) you will need...
  • 1 large leek, washed and thinly sliced
  • 15g +25g butter
  • 60ml Spanish Dry Sherry
  • 500ml whole milk
  • 25g plain flour
  • ½ teaspoon Pimentón Dulce (Spanish sweet paprika)
  • ½ teaspoon Pimentón Picante (Spanish hot paprika)
  • 1 teaspoon Pimentón Ahumado (Spanish smoked paprika)
  • 250g Pennette or Macaroni
  • 200g Manchego cheese, grated
  • 2 tablespoons breadcrumbs
  • Salt & pepper 

How to...

  1. Start by cooking the pasta until nearly al dente. When cooked rinse with cold water and set aside.
  2. Now, let’s cook the leeks. Add 15g butter to a small frying pan and when melted, add the leeks and cook on medium heat for a 5 minutes. Now, season with salt & pepper and add the sherry. Cook for a further 10 minutes or until the sherry has evaporated and leeks are soft. Turn off the heat and set aside.
  3. Preheat the oven to 180°C/350°F.
  4. For the cheese sauce, add 25g of butter to a medium pan and when melted add the flour and stir for about 3 minutes until golden brown. Add the milk and the 3 types of paprika and stir on a low to medium heat stirring continuously until the sauce thickens. Turn off the heat and add about 150g of the grated cheese. Stir again until the cheese is melted.
  5. Now in the cheese sauce pan add the cooked pasta and cooked leeks. Stir well to mix the pasta with the sauce and pour into a small oven dish (we used a round 20cm diameter earthenware dish). Sprinkle the top with the remaining cheese and the breadcrumbs and more freshly black pepper.
  6. Bake for 30 minutes. Take out of the oven and leave to rest for 15 minutes. Serve!
Enjoy!!
R&A


Friday, 20 March 2015

Vegan Nutty Avocado & Mango Mousse

I love vegan desserts, they are so light and scrumptious. Here is another creation of ours that we made as an end of the week treat. As usual, it turned out absolutely divine. I added a tablespoon of crunchy peanut butter to add a wee bit of a crunchy texture. Needless to say the avocado added a luscious creaminess to the mousse that went down a treat. The mango and maple syrup (or honey if not vegan) added sweetness and the vanilla extract added a wonderful aroma to this delight. Give it a go and you will love it. For 4 servings you will need...
  • 1 large avocado, stoned and roughly chopped
  • 1 large mango, flesh roughly chopped
  • 1 heaped tablespoon crunchy peanut butter
  • 1 tablespoon maple syrup or agave syrup (or honey if not vegan)
  • 1 teaspoon natural vanilla extract
How to...
  1. Put all the ingredients into a food processor and process until you get a smooth consistency.
  2. Transfer into ramekins and put into the fridge for about 30 minutes before serving (optional).
  3. Serve!!
Enjoy!!
R&A


Thursday, 19 March 2015

Raw Carrot, Cucumber & Tomato Salad

As promised our previous blogpost, here is the recipe for the salad that we served with our Turkey & Cumin Burgers. It is very quick to prepare...just some dicing to do. :) Amanda came up with the idea of a salad with our burgers and this salad is basically the tasty result of what we had in our fridge. I used Spanish paprika and Mexican oregano but if not available you can use normal sweet paprika and regular dried oregano. It is a completely vegan & vegetarian salad and can be served with anything,..as a side dish, as a quick lunch or even as a tasty and refreshing sandwich filler. Also, the small the diced vegetables the better in our opinion. For 2-3 servings you will need...
  • 1 carrot, grated
  • ½ cucumber, deseeded & diced
  • 2 tomatoes, deseeded & diced
  • 1 spring onion, finely chopped
  • 1-2 small gherkins, finely chopped
  • 1 celery stalk, diced
  • ½ tsp Spanish sweet paprika (use sweet paprika if not available)
  • Pinch dried tarragon
  • ½ tsp dried dried chives
  • Pinch Mexican oregano (use regular oregano if not available)
  • Sea salt & freshly ground black pepper

How to...
  1. In a medium sized bowl mix all the ingredients with a spoon. Transfer the salad into a fine sieve and let it rest on top of the bowl for a couple of minutes. This will get the excess moisture out of the salad. 
  2. After a couple of minutes, discard the drained liquid and serve.

Enjoy!!
R&A

Saturday, 14 March 2015

Pastizzi

Pastizzi are ever so popular in Malta. There are so good. My dad used to buy loads of these on a Sunday morning. They are made with flaky all butter puff pastry and filled with a variety of two fillings, with peas or with ricotta cheese. Unfortunately pastizzi are not available here in the UK so I decided to make my own on a Sunday morning and surprise my wife which as every Maltese person is a big fan. She was so surprised :) The hardest bit is always the pastry which honestly nobody can perfectly replicate the one one buy from Maltese pastizzerias [Pastizzi shops]. I used ready-made all butter puff pastry which turned out to be a success...luckily...my favourite pastizzi back in Malta where from Roger's Bakery at Zejtun. He used to sell these from his van on  a Sunday morning by the village church, he also sells frozen ones from the shop. So if you are a Maltese immigrant do give these a go...they are really worth all the work :) You will need...

For the Pastizzi tal-Piżelli - Pea ones

  • 300 g dried marrowfat peas
  • 1 onion, finely chopped
  • Oil for frying
  • Salt & pepper
  • 1 tsp Bicarbonate of soda
  • 1 egg beaten, to use as egg wash
  • 500 g all butter puff pastry


Method


  1. Soak the peas overnight. Wash them in plenty of salted water. Put the peas in a pan and cover generously gently with water, add a teaspoon of bicarbonate of soda. Cook the peas until they’re very soft. Drain well and set aside.
  2. Preheat the oven at 200°C.
  3. In the meantime, fry the onions in oil until soft and transparent. Add the onion to the cooked peas, mix well and season to taste.
  4. Roll out the puff pastry thinly and cut out circles about 10cm in diameter. Egg wash the edges. Put about a teaspoon of the mixture onto each of the circles in the middle. Pick up the pastry circle from two edges and seal the edges together. Egg wash and bake in the preheated oven for about 20 minutes or until the pastry is well golden.
  5. Serve hot.


For the Pastizzi ta' l-irkotta - Ricotta ones

  • 300 g ricotta
  • 2 eggs
  • Parsley, finely chopped [optional]
  • 1 egg beaten, to be used as egg wash
  • 500 g all butter puff pastry
  • Salt & Pepper


Method

  1. Mix well the ricotta, eggs, parsley and salt & pepper.
  2. Roll out the puff pastry thinly and cut out circles about 10cm in diameter. Egg wash the edges. Put about a teaspoon of the mixture onto each of the circles in the middle. Pick up the pastry circle from two edges and seal the edges together. Egg wash and bake in the preheated oven for about 20 minutes or until the pastry is well golden.
  3. Serve hot.


Enjoy!!!
R&A


Thursday, 16 October 2014

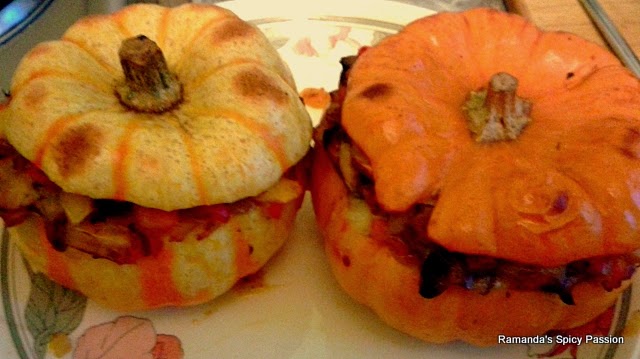
Baby Pumpkins Stuffed with Camembert, Vegetables & Bacon

I was at the supermarket and came across these cute baby pumpkins that were called Munchkin pumpkins. I could not resist buying a couple of them and I started thinking instantly on how am I going to cook them. After doing some research I came up with this idea. It turned out incredibly tasty, creamy, salty, sweet, crunchy, crispy...just wonderful. As we were cooking this on a week night I obviously relied on Amanda to help us with the preparation. In fact, to make sure that everything is cooked evenly, everything should be chopped finely and basically the same size. If you want to turn this recipe into a vegetarian one omit the bacon and to turn it vegan, omit the bacon and cheese and use vegetable oil instead of butter. So, Halloween is upon us once again and pumpkin recipes are on high demand, so I will try and come up with a couple more before the spooky night!! Give this a go and you will definitely not be sorry, they are delicious! For two baby pumpkins you will need...
  • 2 Baby pumpkins or small Butternut squash
  • 6 mushrooms, finely sliced
  • 1 carrot, finely diced
  • 1 small onion, finely diced
  • 1 red pepper, finely diced
  • 1 green chilli, finely diced
  • 1 celery stick, finely diced
  • Some pumpkin/butternut squash flesh, finely diced
  • 3 fresh sage leaves
  • Vegetable oil or butter
  • Salt & pepper
  • 175g bacon, finely diced
  • 150g Camembert, sliced
  • Dry sherry

 How to...
  1. Heat oil or butter together with the sage leaves,
  2. Add vegetables and cook covered on medium heat until soft, 
  3. Now remove sage leaves, add bacon and mushrooms and cook on higher heat until mushrooms are wilted and all liquid has disappeared. Add salt, pepper and some dry sherry. Cook, stirring frequently until all alcohol has evaporated. Turn off heat.
  4. Add Camembert slices at the bottom of the pumpkin/squash and top with the filling. Add some extra Camembert on top of the filling, cover with pumpkin lid and bake at 180 deg for 50 minutes to an hour.
  5. Serve hot!!
Enjoy!!
R&A


Monday, 29 September 2014

Mujaddara - Arabic Lentils, Rice & Onions - مجدرة

Well what can we say, I made this dish as a quick and cheap end of the month dinner and we fell in love with it....wow...sooo tasty!!! Simple, easy and quick to make I just hope you do try it. Obviously I added some spices to it but they are optional as this dish is quite simple as I said. This recipe is quite old and in fact, the first recorded recipe for Mujaddara appears in Kitab al-Tabikh, a cookbook compiled in 1226 by al-Baghdadi in Iraq. It was indeed known as a dish for the poor and there is a saying in the Eastern Arab world which says, "A hungry man would be willing to sell his soul for a dish of Mujaddara." I added Advieh (which is not an Arabic spice mix but Persian) but you can add Baharat a very popular Arabic spice mix or none at all. It is completely up to your taste! It is vegetarian, although some variations are served with meat but not this one. You can also make it vegan by omitting the yoghurt at the end. So for 3-4 people you will need...
  • 3 onions, chopped
  • 1 onion, sliced
  • 1 cup brown or green lentils
  • 1 cup long grain rice
  • ½ cups cold water
  • 3 tablespoons vegetable oil
  • 2 teaspoons salt
  • 1 teaspoon Advieh* or Baharat** spice mixture (optional) 
  • 1 teaspoon Harissa paste (optional)
  • Sesame seeds, to garnish
  • Greek (thick) yoghurt, to serve
*To make Advieh spice mixture : Mix 1 teaspoon ground cinnamon, 1 teaspoon ground nutmeg, 1 teaspoon ground rose petals, 1 teaspoon ground cardamom, 1/2 teaspoon ground cumin in an airtight glass jar and store in a dry cupboard.

**To make Baharat spice mixture : Mix 2 teaspoons paprika, 2 teaspoons ground cumin, 1 teaspoon black pepper, 1 teaspoon ground coriander, ½  teaspoon ground cinnamon, ½ teaspoon ground nutmeg, ¼ teaspoon ground cardamom, ¼ teaspoon ground cloves in an airtight glass jar and store in a dry cupboard.

How to...
  1. In a small pan heat 2 tablespoons of oil and fry the chopped onions together with the Advieh or Baharat if using on medium heat stirring occasionally until soft and brown. Set aside.
  2. In a medium (5 litre) pot add the lentils and water, bring to the boil, lower heat and simmer covered for 15 minutes.
  3. Now add the cooked onions, rice, salt and Harissa paste. Stir well and simmer covered on medium heat for 20 minutes, stirring frequently to avoid rice from sticking to the pot. 
  4. In the meantime, heat the remaining oil in the same pan that you cooked the chopped onions in and cook the sliced onion until caramelized (stirring frequently).
  5. When everything is cooked, serve the lentil/rice/onions mixture hot, some caramelised onions on top, sprinkle some sesame seeds and a couple of spoonfuls of yoghurt.

Enjoy!!
R&A


Saturday, 30 August 2014

Shiitake Mushroom & Asparagus Risotto

"Well, that was worth the lifetime wait" That is what I said as soon as I finished my last spoonful of this risotto. The reason behind that saying was the fact that I never had a proper risotto before and also I had never cooked one before yesterday. For some strange reason I never felt confident enough to cook a risotto, always thinking that I'm going to mess it up. But hey, as they say, I nailed it!! I was browsing as usual and found this recipe which I adapted to our own taste. The recipe says to use dry white wine but we used a good Spanish dry sherry, which has the same colour and dryness as white wine but a fruitier crisper taste, in my opinion, but if you do not have it feel free to use a dry white wine. This recipe is completely vegetarian as well. I actually found out that the secret to the perfect risotto is patience, in fact you have stir calmly for nearly 20 minutes but do not be put off by this, it is certainly worth the effort. So here it goes, for 4 people you will need...
  • 1.5 litres boiling water
  • 2 vegetable stock pots (or cubes)
  • 250g (1 ½ cups) Arborio rice
  • 150g asparagus, ends discarded and chopped into 3 pieces
  • 60g dried Shiitake mushrooms, soaked in boiling water for about an hour
  • 1 onion, finely chopped
  • 120ml (½ cup) Spanish dry Sherry
  • 1 tablespoon olive oil
  • 60g (½ cup/½ stick) butter
  • 50g grated Parmigiano Reggiano
How to...
  1. In a pan add the boiling water and vegetable stock pots. Bring to the boil and throw in the asparagus and simmer for 4 minutes. Take out of the stock and put into ice cold water to stop the cooking process completely. Drain and set aside.
  2. Now prepare the mushrooms. Start by discarding the steams and slicing the mushroom caps thinly. Heat the olive oil in a small pan and add the mushrooms, sauté for 5 minutes stirring frequently. Set aside. 
  3. In a large heavy based frying pan or pan (I prefer a frying pan because it spreads the heat evenly during cooking) heat up half the butter and add the onion and cook covered on medium to low heat until soft and transparent. When onion is cooked, increase the heat to medium, add the rice and cook, stirring frequently for about a minute. 
  4. Now add the sherry and simmer whilst stirring until it is absorbed, this will only take about a minute. Now add a cup of the vegetable stock whilst constantly stirring until all stock has been absorbed by the rice, this takes about 2 minutes.
  5. From now on, keep adding the remaining stock ½ cup at a time, always adding the next one when the previous one has been completely absorbed by the rice. Keep doing this until you used all the stock or until rice is looking creamy. It is very important that you keep stirring the rice constantly to ensure an even absorption. This will take about 20 minutes. 
  6. When done, take off the heat, stir in slowly the remaining butter and half the cheese. Now stir in carefully the cooked asparagus and Shiitake mushrooms. Serve immediately with extra grated Parmigiano.
Enjoy!!
R&A


Tuesday, 26 August 2014

Tortelloni Cheese & Peas


Tortellini or tortelloni with cream is quite a famous dish in Malta and is a must on numerous restaurant menus around the Maltese islands. We do like the classic ham, mushrooms & cream but this is another version that we love and thought we'd share it with you all. In this dish, we used whole milk instead of cream but you can use cream as well if you wish. The sweetness of the peas contrasts the sharpness of the Gorgonzola cheese whilst the paprika adds extra flavour. For 3-4 people you will need...
  • 2x 250g Packets tortelloni
  • 100g frozen peas, defrosted
  • 75g Gorgonzola Piccante, cut in cubes
  • 75g Extra mature cheddar, grated
  • Freshly ground pepper
  • ½ teaspoon sweet paprika
  • 2 teaspoons corn flour dissolved in 1 cup whole milk
  • Chopped parsley, to serve

How to...
  1. Cook the tortelloni as per packet directions.
  2. In the meantime, start preparing the sauce by adding all the ingredients into a small pan and stir frequently and slowly until all the cheese has melted. Keep stirring until the sauce bubbles and starts to thicken. Turn off the heat.
  3. Drain the tortelloni cooked al dente and add to the cheesy sauce or viceversa. Stir slowly and serve hot with plenty of chopped parsley sprinkled on top.

Enjoy!!
R&A


Monday, 11 August 2014

Pineapple & Coconut Kebabs

Watching afternoon TV, I felt like a sweet treat but remembered that I did actually promise myself not to have sugary treats during weekdays and so far I have stuck to it. So, we had a giant pineapple sat on the kitchen floor (that is where we leave it to ripen) and thought that is quite sweet. Obviously, for myself munching on just freshly chopped pineapple is not enough so I came up with these sweet and delicious kebabs. Very quick and easy to prepare and cook you will have a great healthy, sweet treat in minutes. You can used canned pineapple chunks if you like but believe me fresh ripe pineapple is so so good, so do try and get your hands on a fresh pineapple. They are also great to grill on the BBQ to finish a great meal. Give them a go...for 8 kebabs you will need...

  • 32 large pieces fresh ripe pineapple
  • 6 tablespoons desiccated coconut
  • ¼ teaspoon mixed spice
  • ¼ teaspoon ground cinnamon
  • 8 bamboo skewers

How to... 
  1. In a bowl or plate mix the coconut, mixed spice and cinnamon well. 
  2. Roll the pineapple pieces in the coconut/spice mixture and put 4 pineapple pieces on every skewers.
  3. Grill on a hot grill pan or BBQ for a couple of minutes on each side until slightly charred.
  4. Serve.
Enjoy!!
R&A


Saturday, 2 August 2014

Summery Millet Salad

I made this salad to take with me at work as my lunch and I must say it was wonderful and so tasty. You can also do this with quinoa or couscous if you like. It is super-easy and super-quick to rustle up, cooking the millet grain is the longest cooking time for this recipe (about 20 minutes). This recipe is vegetarian but for a vegan version just omit the eggs. I adore eggs so I did put 2 hard boiled eggs in my salad but feel free to do one instead or none as I said before none. Anyway, do give it a go and if you have not tried millet grain before do try it, it is so good and I love its fluffy texture. You can do this for a light lunch or even as a side for your dinner (maybe a good steak). You can also take it with you to a BBQ. The following amounts are for one portion so double or quadruple the ingredients for a larger serving. For one portion you will need...
  • 60g millet grain, washed
  • 1 or 2 hard boiled eggs, chopped (optional)
  • 1 tomato, diced
  • 1tbsp sliced jalapenos
  • 6 green olives
  • 2 tsp capers, drained
  • 3 sundried tomatoes, chopped (optional)
  • ½ teaspoon dried mint
  • A couple of fresh basil leaves
  • Salt & pepper, to taste
  • Sweet paprika, to taste
  • Extra virgin olive oil, to taste
How to..
  1. Start by cooking the millet by just adding it in plenty of boiling water. Simmer for 20 minutes and drain in a sieve. Whilst still in the sieve rinse the cooked millet grain under a running cold water tap to cool it down. 
  2. When cool enough add all the other ingredients, including the salt, pepper, sweet paprika and olive oil to your taste and stir carefully to combine. 
  3. This is now ready to serve.

Enjoy!!
R&A

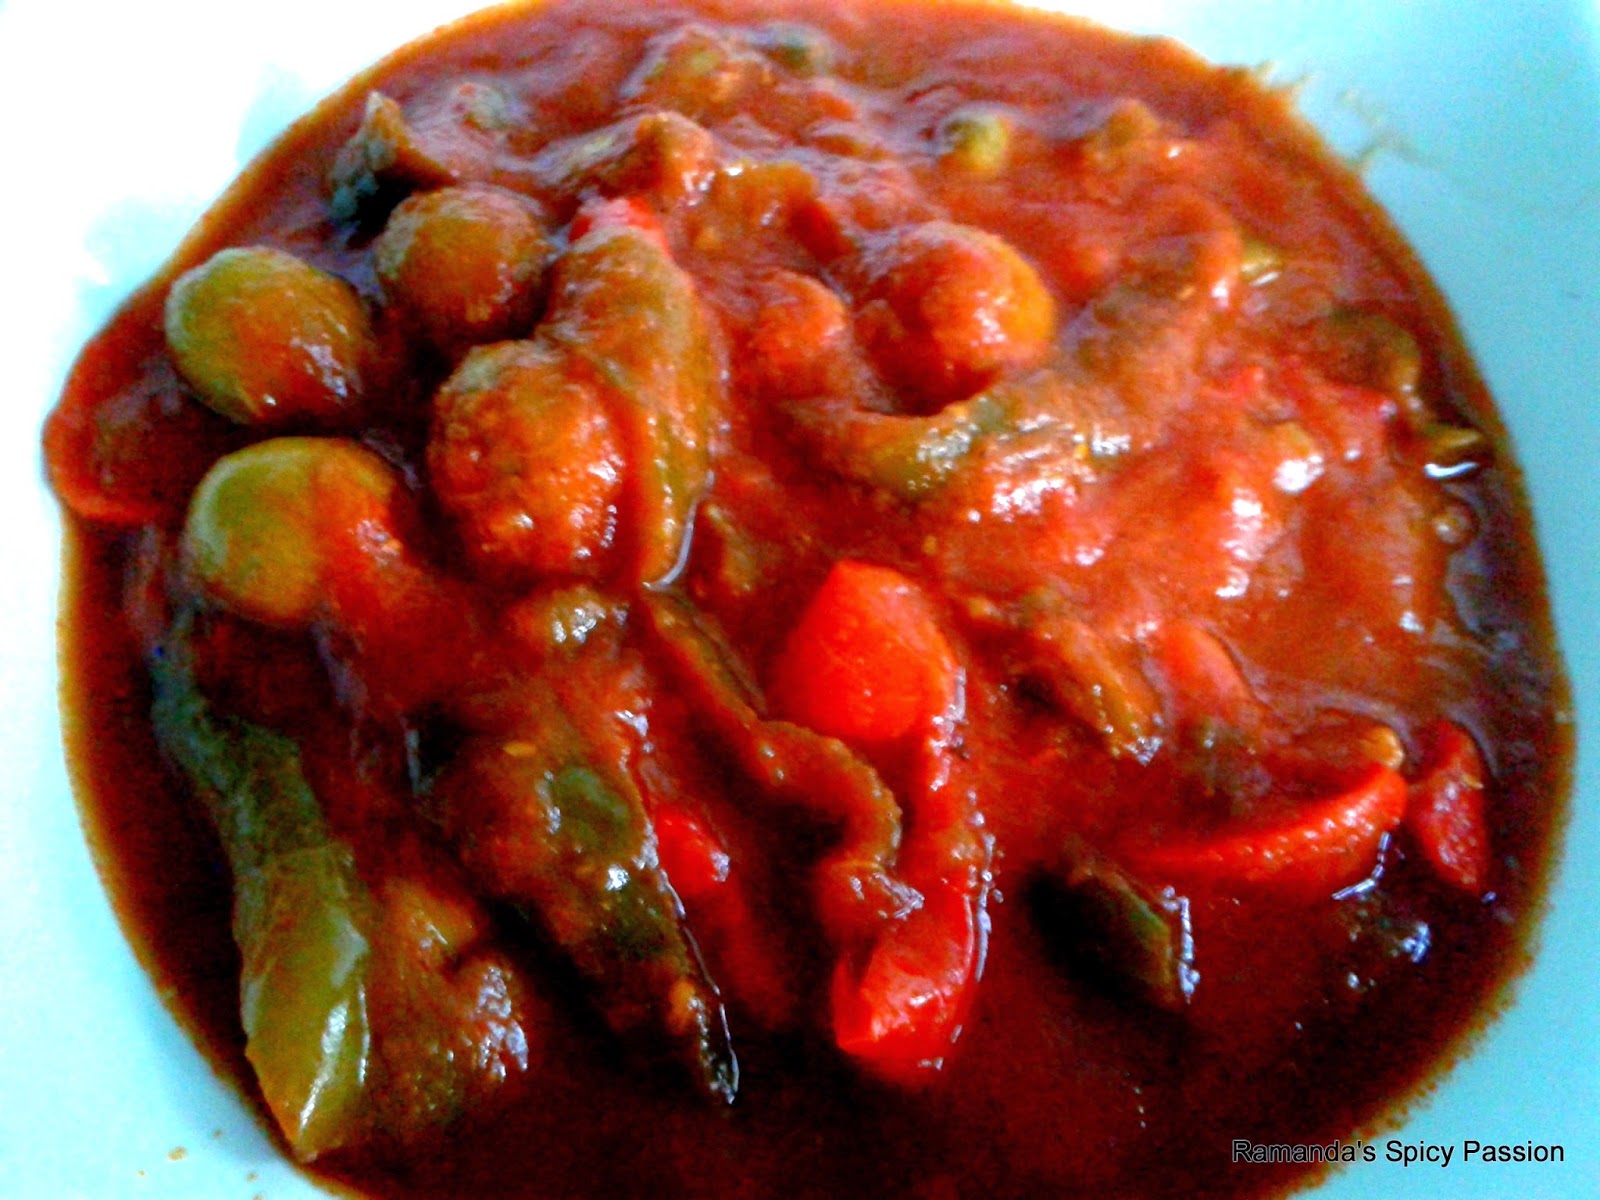
Bzar biz-zalza - Peppers in Tomato Sauce Maltese Style

This recipe is definitely a Maltese classic. A summer classic dish that can be eaten hot or cold and usually eaten with Maltese bread and/or fried fish, mainly Lampuki [Dolphin Fish or Dorado in English]. We love it and whenever we cook it, it reminds Amanda of when her mother used to prepare fried Lampuki and this pepper sauce. My dad love it a lot as well...to be fair, every Maltese person does I guess!! This dish is a relative of the Sicilian dish Peperonata. Give it a go and as I said you can serve it as a side dish or as a delicious vegetarian dish on its own and eat it with some nice crusty bread or tortillas even....preferably Maltese obviously...for 4 people you will need...
  • 3 Green peppers, de-seeded & sliced
  • 3 Red peppers, de-seeded & sliced
  • 700 ml tomato passata
  • 1 teaspoon sugar
  • 2 garlic cloves, finely chopped
  • Handful whole green olives
  • 3 teaspoons capers
  • ½ teaspoon dried mint
  • 4 Fresh basil leaves
  • Salt & pepper
  • Extra virgin olive oil
How to..
  1. In a medium sized pan heat some olive oil & the garlic and fry until golden brown. 
  2. Then add the peppers and cook for about 5 minutes, stirring occasionally.
  3. Now add the rest of the ingredients and give it a good stir and simmer on low/medium heat until the peppers are cooked through. We left ours simmer gently for about 3 hours (The longer the simmer, the tastier the sauce...gives it more flavour) but you can simmer for an hour on medium heat always stirring occasionally.
  4. Serve hot or cold with bread/tortillas or as a side dish.
Enjoy!!
R&A


Monday, 21 July 2014

Strawberry & Goat Cheese Salad - Salade Fraises et Chèvre

Amanda and myself were browsing for ideas for our weekly menu and we wanted a fresh summery salad. After gathering lots of ideas, Amanda came across a vlogger that used strawberries in her salad and we said why not...let's have a go! A summer salad with the most famous summer fruit of them all...the juicy strawberry! To accompany it some creamy and mellow French goat cheese. As dressing nothing too complicated...just some extra virgin olive oil and some balsamic vinegar. We had it as a light supper but it can easily be eaten as a quick lunch as well! Give it a go...it was a combination made in heaven. For 2 salads as suppers you will need...
  • 1/2 Iceberg lettuce, washed and chopped roughly or any salad leaves
  • 1 French Goat cheese, sliced [about 150g]
  • 6-8 large strawberries, sliced
  • 1 large ripe avocado, sliced
  • Toasted flaked almonds
  • Fresh basil leaves
  • Extra Virgin Olive oil
  • Balsamic vinegar
How to...
  1. Start by toasting the almond flakes in a small dry pan, stir them occasionally to make sure they do not get burnt, about 5 minute. now divide the lettuce between two plates. 
  2. Lay the strawberries, goat cheese and avocado on top of the lettuce. 
  3. Sprinkle the toasted flaked almonds and put a couple of basil leaves. 
  4. Dress with the olive oil and balsamic vinegar and serve.
Enjoy!!
R&A

Sunday, 20 July 2014

Raw All Natural Chocolate Truffles

Now I know that some of the ingredients in this recipe are not that common but if you find them, do try them out. They are so decadent and moreish. If you cannot find the seeds, you can use ground almonds instead but I cannot assure the outcome because I have never tried it that way I'm afraid! These treats are highly nutritious as well as flaxseed, hemp seed and sesame seeds are packed with nutritive value.  They are also suitable for a vegan and/or a vegetarian diet. I know I am a meat-eater myself but it is incredible how much variation of diets and food variations there are out there. Since we were younger we were always exposed to various diets and always tried new foods from every corner of the world. The recent craze about seeds and raw food is definitely not new to myself but I love learning about new diets and options that before where maybe laughed at or frowned upon. But do be adventurous in your kitchen, after all, some great recipes were created by accident!! I also added 2 long pepper to add a certain kick (feel free to click on the link to find out about this great spice) but you can leave it out if cannot find it or even throw in a couple of black peppercorns! So feel free to try these delicious truffles. For 12 truffles you will need...
  • 2 tbsp hemp seed
  • 2 tbsp flax seed (linseed)
  • 2 tbsp sesame seed
  • 2 long pepper (optional)
  • 4 tbsp unsweetened cocoa powder
  • 4 tbsp maple syrup
  • 2 tbsp crunchy peanut butter
  • 2 tbsp water
  • Desiccated coconut, to coat

How to...

  1. Put hemp seed, flax seed, sesame seed and long pepper in a spice grinder or food processor and grind to a fine powder. Put in a mixing bowl, add rest of the ingredients and mix well until well combined. 
  2. Form the ‘dough’ into small balls and roll into the coconut. 
  3. Put on a plate with some baking paper and put into the freezer for 20 minutes. Alternatively put in the fridge for a couple of hours before serving. Serve.
Enjoy!!
R&A

Tuesday, 3 December 2013

Figs & Walnuts

This snack is a real delicious treat if you feel like something sweet and crunchy at the same time. Amanda's mum used to prepare these for her as she loves them a lot and are one of Amanda's favourite treats. Dried figs are very common in Malta and we were chuffed to find them at Asda. Without doubt, Figs and walnuts is one of those matches made in heaven. apart from preparing them to snack on, they can be served as starter with some Parma ham or as dessert after a good meal. You will need...


  • 1 Packet of dried figs
  • Walnut halves


Snip the woody part off the fig using scissors, slice the fig lengthwise, do not go all the way and put a walnut half in the middle of it. Press gently with your fingers and serve.

Enjoy!!
R&A

Saturday, 23 November 2013

Spinach, Carrot & Ricotta Timbales

I created these as a light lunch with some ingredients that we had left over in the fridge and pantry. They turned out so tasty and we could've eaten at least two more each. They are not that hard to prepare. The only tricky bit is rolling the bread slices and layering the ramekins, so not really rocket science. We do love a kick in our dishes so I put some Scotch Bonnet hot sauce in there but this is optional. You can even add a milder hot sauce maybe like Tabasco. Completely vegetarian, you can serve them as a starter, light lunch or even party food to impress family and friends. For four ramekins you will need...

  • 125g ricotta
  • Grated half carrot
  • 60g cooked spinach
  • Salt & pepper
  • Hot sauce
  • ¼ tsp paprika
  • Pinch garlic granules
  • 1 egg, beaten
  • 1 teaspoon oregano
  • 10g salted butter
  • Oil spray or butter, for greasing
  • 4 slices of white sandwich bread


  1. Preheat the oven to 180°C.
  2. Using a sieve, squeeze out all the moisture out of the spinach. In a bowl add all the ingredients except the butter, bread & oregano. Mix them well until well blended. Set the mixture aside.
  3. Grease well 4 ramekins, we used oil spray.
  4. Remove the crusts from the bread slices and flatten each slice with a rolling pin, make sure it’s very thin. Using a glass or cookie cutter cut a circle disc off the centre of each of the flattened bread slices and place the disc at the bottom of the ramekin. With the remaining pieces of bread, line up the ramekins’ sides tightly and fill each ramekin with about a tablespoon of the mixture, divide the mixture between the 4 ramekins.
  5. Divide the butter into 4 equal pieces and put a piece of butter on top of the filling in each ramekin. Now chop the crusts finely and sprinkle on the ramekins. Gently press down with your hand to create a seal. Sprinkle some dried oregano on top.
  6. Bake in the oven for about 15-20 minutes or until top is golden.
  7. Take out of the oven and leave to set for 10 minutes. Now either serve warm in the ramekin or invert on a baking sheet and bake for a further 10 minutes to get a crispy crust all around.

Enjoy!!

R&A

Tuesday, 12 November 2013

Chilli Beans, Corn & Chilli Wraps

I had a couple of these wraps for lunch this week. I always vary my lunch and I very rarely have the same lunch twice. Usually I come up with something in the morning, considering I am an early bird and always wake up before my alarm clock. I go through my pantry, fridge and food cupboards and see what I can come up with. I must say I do love my spicy food and this recipe is quite hot so if you want a milder version just omit the fresh chilli pepper. I used canned chilli beans which I really love as they are delicious and a good spicy alternative to baked beans. I also like to take everything at work with me and freshly prepare them at the start of lunchtime but you can always pre-prepare them at home. It's a great idea and do not be scared of using tinned chilli beans as they are not that hot :) For 4 wraps you will need...

  • 290g can Chilli Beans 
  • 1/2 can of sweet corn
  • 1 fresh red chilli, sliced
  • Watercress (or other salad)
  • Sour cream or Hummus if vegan
  • Wheat Tortillas

  1. Mix the beans and corn in a microwavable bowl and heat for about 2 minutes. 
  2. Warm each tortilla for about 40 seconds each, sprinkle some watercress, add two or three tablespoons of the bean & corn mixture, add some red chilli slices, a couple of dollops of sour cream, wrap up and eat. Easy!! :)


Enjoy!!
R&A