Saturday, 19 May 2012

Guisantes a la Murciana - Peas Murcia Style


This dish comes from the Spanish region of Murcia and it is an absolute delight. It is a simple enough dish to start a great dinner party with. They are very easy to prepare and so so tasty. The chorizo, Serrano ham and pimentón (paprika) makes this dish so...well Spanish! Give them a go and you will definitely try them again!! You will need (for 4 people)...


  • 400g fresh or frozen peas
  • 75g chorizo, diced
  • 75g Serrano ham, chopped
  • 1 small onion, finely chopped
  • 1 teaspoon sweet paprika
  • 1 tablespoon flour
  • 2 hard boiled eggs
  • 250ml vegetable stock
  • Olive oil
  • Sea salt
Method

  1. Start by frying the onion with a pinch of salt in some olive oil. Cook until soft and transparent.
  2. In the meantime, cook the peas in plenty boiling water until cooked. Drain and set aside.
  3. To the cooked onion, add the chorizo, Serrano ham, paprika and flour. Stir well and cook for a few minutes until the flour is slightly toasted.
  4. Now add the peas and stir well into the ham & chorizo mixture. Add the vegetable stock and bring to the boil.
  5. Ladle into bowls and chop the hard boiled egg onto each serving.
Enjoy!!
R&A

Capotouille (Mediterranean Style Vegetable Stir-fry)


This dish came to be when as usual I was hungry and raided the fridge and pantry and came up with this dish. It is so tasty and delicious that I will certainly be doing it again. Basically it is a melange of two classic Mediterranean dishes, the French Ratatouille and the Sicilian Caponata, hence the name Capotouille. It is a totally vegetarian dish and ever so healthy and also very filling. It might seem complicated because of all the ingredients but believe me it is not. The colours and different textures make this dish also a visual feast and a delicious treat for your palate. You can serve it as a main dish with crusty bread  and a couple of morsels of smoked sausage like Maltese sausage or Spanish chorizo or also as accompaniment to grilled meat or fish. Can also be served hot or cold. So give it a go, you will need...

  • 1 green bell pepper, thinly sliced
  • 1 red bell pepper, thinly sliced
  • 2 large courgettes, thinly sliced
  • 6 small spring onions, tops removed and sliced in 4 pieces
  • 2 tomatoes, cut in 8 pieces
  • 10 baby plum tomatoes
  • 2 celery stalks, thinly sliced
  • 4 cloves garlic, crushed
  • Handful green olives
  • 1 teaspoon sea salt
  • 2 tablespoons smoked paprika
  • 2 teaspoons tomato purée
  • 2 teaspoons dried oregano
  • Few mint leaves
  • Few basil leaves
  • Bunch of parsley, finely chopped
  • 4 tbsp Olive oil
Note: If the peppers and courgettes are grilled beforehand they will give this dish a delicious char-grilled taste.

How to...
  1. Start by finely chopping the basil, mint and parsley together. Set aside.
  2. Put the olive oil in a shallow frying pan and turn on the heat.
  3. Add all the remaining ingredients to the pain and stir slowly to combine all the vegetables and spices. 
  4. Now add the fresh herbs and stir them in.
  5. Cook on medium heat, stirring frequently for about 20-25 minutes or until vegetables are soft but not soggy.
  6. Turn off the heat and serve with some nice crusty bread or as a side dish.
Enjoy!!
R&A

Saturday, 12 May 2012

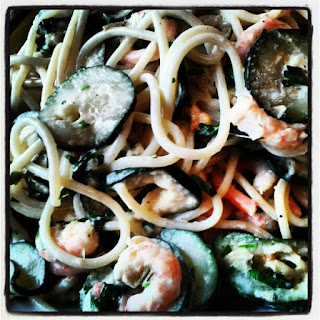
Spaghetti con gamberi, zucchine e panna - Spaghetti with prawns, courgettes & a touch of cream

This idea came to me so quickly whilst on my way back home from work. So popped to the supermarket and bought some nice courgettes and some nice fresh prawns. We decided to go with spaghetti but as usual you can use any type of pasta you prefer. If you do not have or find fresh prawns, don't worry use frozen ones, but try and get the biggest ones you find not the small ones as they taste like nothing! You can also call this as a type of surf & turf pasta. So give this a go and we quite sure you will do it again!! You will need...


  • 300g spaghetti
  • 250g prawns, cooked and peeled
  • 2 courgettes, thinly sliced
  • 4 small spring onions, chopped
  • 75ml white wine
  • small bunch of parsley, finely chopped
  • 100ml single cream/panna/fresh cream
  • Sea salt & freshly ground black pepper, to taste
  • 2 tbsp olive oil
Method

  1. Heat the olive oil in a shallow frying pan and when oil is warm, add the spring onions and courgettes. Add a some sea salt and stir slowly and cook until courgettes are soft and cooked, about 15 minutes stirring frequently.
  2. Meanwhile cook the spaghetti.
  3. Add the wine and let it evaporate. Now add the prawns and cream, lower the heat and just warm the cream up (do not let it boil). About 2-3 minutes.
  4. Switch off the heat and add the mixture to the cooked & drained pasta. Add the parsley and mix well.
  5. Plate & serve with extra chopped parsley!
Enjoy!!
R&A


Sunday, 1 April 2012

Tunisian Ojja


When we went to Tunisia I soon realised that Tunisians love their eggs...they use them in a myriad number of dishes. One of them was Ojja. I used to have this dish everyday for breakfast. It's delicious...some crusty bread and you will not even need a fork to eat it :) The peppers, spices and harissa really give this dish its unique North African flavours. Harissa is basically a Tunisian chilli paste which is very hot, so if you want to do a mild version of it, you can omit it but it takes away the Tunisian touch off it though haha. Harissa is stocked in supermarkets and it is well worth keeping a stock of it if you like your chilli, it can be found in tubes or cans [see picture]. To quicken the cooking time, grill the peppers, peel the burnt skin off and chop them into slices. You can also prepare the tomato sauce in advance and freeze it till needed. I will explain below how to prepare everything but if you are in a hurry or feel lazy you can use pre-grilled peppers in jars or ready made tomato sauce. So, you will need...

  • 4 medium sized eggs
  • 300ml tomato passata or chopped tomatoes
  • 2 bell pepper, split in half and deseeded
  • 1 teaspoon harissa, or to taste
  • A pinch of ground coriander
  • A pinch of ground cumin
  • 2 small garlic cloves, sliced
  • Olive oil
  • Crusty bread, to serve
How to...
  1. Start by adding the chopped garlic and olive oil in a pan. Heat them on a lower heat until the garlic starts turning golden. Now add the tomato passata or chopped tomatoes very carefully, so as the oil does not spit and burn your hands. Stir well and let it simmer for about 10 minutes (if using passata) or 20 minutes (if using chopped tomatoes). When done, set aside.
  2. Whilst the sauce is simmering, switch on the grill on high heat and put the halved peppers underneath it  skin side up. Leave them until they are charred and completely burned. Now carefully turn upside down and grill the other side for a couple of minutes. Turn off the grill and carefully take them out, let them cool slightly and peel all the burnt skin off. Now chop them in slices and then in half. Set aside.
  3. In a separate shallow frying pan, add some olive oil and the peppers. Switch the heat on medium and cook for about 2 minutes. Now add the tomato and garlic sauce, stir in the harissa and spices and cook for a few minutes. 
  4. Now make 4 'holes' in the sauce and carefully crack 4 eggs in them, make sure you leave the yolk intact. Lower the heat, cover the frying pan and cook until the eggs are cooked through, just as you like them. Make sure you leave the yolk runny though.
  5. Serve hot with crusty bread and make sure you mop up all the delicious spicy sauce.
Enjoy!!
R&A

Sunday, 18 March 2012

Our recipes in your own language!!

Hello all!! We have not blogged anything in a while...We do apologise but at the moment I am concentrating a lot on my studies, but we are always here to answer any questions you need to ask us. Please do so by leaving comments under our recipes, especially if you tried any of our recipes (whether you like them or not!) We appreciate any comments. We do promise to put some new delicious recipes as soon as I can manage a break from my studies! This post is mainly to let all you fans all over the world know that as from today (18/03/2012), our blog can be translated in 54 different languages (Thank you Google Translate©) All you have to do is use the tool at the top right hand corner of the website. Whilst we hope that you continue using our blog we take this opportunity to THANK YOU, again for all you support. So until our next post...Bon Appétit!!

Sunday, 29 January 2012

Strawberry & Maple Syrup Salad

This fruit salad is gorgeous. Maybe it is not strawberry season but you can find strawberries all over the place in supermarkets. Anyhow this is just one of our favourite quickly homemade desserts. We used pure Canadian maple syrup which we get straight from Canada, thanks to our dear friend Steven :)) You can enjoy it with vanilla ice-cream, whipped cream or on its own. If you do not have maple syrup you can always use golden syrup...although it does not taste the same! The combination is just delicious. You will need...


  • 1 punnet of fresh strawberries, trimmed & halved
  • 2 peaches, peeled & stones removed
  • 1 banana, sliced
  • 2 tablespoons raisins or sultanas
  • Pure maple syrup, to taste
Method

  1. Mix the fruit slowly in a bowl so as not not to break up the fruit.
  2. Pour the maple syrup whilst mixing with the other hand, so as all the fruit is covered in the gorgeous syrup.
  3. Serve with vanilla ice-cream, whipped cream or on its own.
Enjoy!!
R&A

Scrumptious Potato Cakes


I mastered these potato cakes from leftover mashed potatoes but if you do not have any leftover mashed potatoes, no problem at all! You can quickly boil two large potatoes and mashed them with some butter...it's important that you do not add any milk to the mash as this will make the cakes very soft and they will crumble very easily when you try and lift them...even when cooked. These cakes turned up so tasty and most of all filling! So make sure you give these a go! They are suitable for vegetarians. You can serve them with a nice fresh crisp green salad and a dollop of mayonnaise! You will need....

  • 2 large potatoes, boiled
  • 1 small red onion, finely chopped
  • 1 small sweet red pepper, finely chopped
  • 1 teaspoon fresh basil leaves, finely chopped
  • 1 tablespoon fresh parsley, finely chopped
  • 3 tablespoons grated hard cheese like Kefalotiri, Parmesan or Grana Padano
  • Pinch of sweet or hot paprika
  • Ground black pepper, to taste
  • Pinch of salt
  • 15g butter (to mash the potatoes)
  • 1 tablespoon vegetable oil
  • 1 egg, beaten
  • 3/4 tablespoons plain flour
  • 3/4 tablespoons golden breadcrumbs
Method

  1. Heat the oil in a small frying pan and add the onion and red pepper. Fry them on medium heat until soft, cover for a few minutes if necessary...about 5-8 minutes.
  2. Whilst the pepper and onion are cooking, mash the potatoes with the butter, leaving them a bit lumpy this will give the cakes  a nice coarse texture.
  3. Preheat the oven to 200°C.
  4. When the onion & pepper are done, add to the mashed potatoes together with the remaining ingredients. Mix well to combine all the ingredients. Set aside.
  5. Now place the beaten egg in a saucer, the flour in a plate and the breadcrumbs on another plate. Shape the potato mixture into 4 cakes. Now carefully first dip each one first in the beaten egg, then into flour and then into the breadcrumbs until well coated.
  6. Carefully place on a grease-proof paper lined oven dish and bake in the preheated oven for about 20-25 minutes.
  7. Serve with a fresh green salad and some mayonnaise (or any other condiment) to dip them in!!
Enjoy!!
R&A

Sunday, 1 January 2012

Zebbug Mimli - Stuffed Olives The Maltese Way

This recipe is another old Maltese recipe that comes from Amanda's grandma. Use the biggest green pitted olives you come across. Once you start nibbling on these olives, you will not stop...guaranteed!!! These olives have been a staple finger food at any party....whether it is a holy communion, christening, wedding, birthday or any kind of family party. In Malta you can always buy them ready made but nothing comes close to homemade ones. They are very easy to prepare as you throw everything in a food processor and mix slowly whilst trickling  down olive oil or sunflower oil. So for about 800g-1kg large pitted olives you will need...

  • 800g-1kg pitted large green olives
  • 1 large can tuna chunks in sunflower oil, drained
  • 1 tin anchovy fillets in olive oil [50g], not drained
  • A handful of dried breadcrumbs (optional)
  • 3 garlic cloves
  • Olive oil or sunflower oil
How to...
  1. Put the tuna, anchovies with the oil, breadcrumbs and garlic in a food processor and process on low speed. Whilst processing trickle down the oil through the open bit of the food processor [obviously never switch the processor on unless the lid is firmly closed...most of them do not switch on unless you lock the lid]. Add as much oil as you want until you get a smooth paste. Not too dry but not too moist.
  2. When the mixture is done, start filling the olives one by one. If you have a good piping bag use it to fill them up. But if you do not, don't worry, you can use a teaspoon. Get a teaspoonful of filling and press the filling down with the back of the teaspoon until you deem the olive filled :)
  3. Serve with some cheese and/or salami or with whatever you like.
Enjoy!!
R&A


Thursday, 22 December 2011

Gallettini - Plain Biscuits


These biscuits are so quick and easy to make. This version is plain, they are basically like Rich Tea or Morning Coffee biscuits. You can always cover them with melted chocolate. We love dunking them in tea or coffee...yummmm....this is an old Maltese recipe (about 50 years old). They are so crispy and they smell so nice whilst they are in the oven and most of all they are delicious in their simplicity. Give them a go...these amounts make around 30 biscuits. You will need...
  • 110g plain flour
  • 100g sugar
  • 100g cornflour
  • 1 tsp baking powder
  • 100g butter, cut into cubes
  • 1 egg, beaten
  • Extra flour for dusting
How to...
  1. Preheat the oven at 175°C.
  2. Sieve all the dry ingredients in a large bowl. Stir to combine.
  3. Rub the butter/margarine cubes into the flour with your fingertips, until the mixture resembles fine breadcrumbs.
  4. Add the beaten egg, and mix well with a wooden spoon or spatula until you get a dough. If the dough is sticky add a bit more plain flour.
  5. Knead well on a lightly floured surface until you get a smooth dough. Roll the dough thinly and cut into round shapes using a glass or other shapes if you want.
  6. Carefully put the shapes on a tray covered with baking paper.
  7. Bake the biscuits for 15 minutes. Keep checking on them because if they are too thin they will burn.
Enjoy!!!!
R&A

Market Fresh Soup


We love going to the market and have a look at the fragrant smelling fresh produce available. On our one of many trips to the market a few weeks ago we came across a giant parsnip and some beautiful red beets and decided to make a soup inspired by these 2 delicious root vegetables. To get a great taste, it is best to split the veg in half and roast them in an oven before scooping the flesh out and blending, but you can always boil them!!  In this recipe we boil the veg in the stock. if you have some soup left over, you can always freeze it in plastic covered bowls. As usual, for a vegetarian version  omit the bacon steak. So try and give this soup a go you will love it!!! You will need...

  • 500g beetroot, cut in quarters
  • Large onion, sliced
  • 3 small potatoes, quartered
  • 700g parsnips, roughly chopped
  • 1 kg pumpkin or butternut squash, diced
  • 100g bacon steak, diced (optional)
  • 3 chicken stock pots or cubes
  • 2 bay leaves
  • Ground black pepper
  • ½ teaspoon nutmeg
  • 1 teaspoon dried thyme
  • 4 tablespoons double cream (optional)
  • Extra virgin olive oil, to serve
  • Grated Parmesan, to serve
How to...
  1. In a large deep pan, fry the onion and bacon (if using) in some olive oil until the onion is soft and transparent and the bacon is cooked. 
  2. When onion & bacon are cooked, add the beets, potatoes, parsnips, pumpkin/butternut squash, stock pots or cubes, bay leaves, nutmeg, thyme & black pepper to taste and cover with enough water (about 1.5/2 litres). Bring to the boil on high heat and then lower the heat and simmer until the veg is firm but not soft. 
  3. Alternatively you can bake the veg in a 220 degrees preheated oven for 35 minutes and add them to the onion/bacon mixture. Then add stock etc and simmer for less time!
  4. Turn off the heat, leave to set for about 15 minutes. 
  5. If using a blender, ladle the soup into a blender and blend, slowly pouring in the acream (if using). You can always use a hand held blender and add the cream and blend in the pot!
  6. Ladle into bowls and serve with a drizzle of olive oil, grated cheese or double cream.
Enjoy!!
R&A

Saturday, 26 November 2011

Beef Mince & Swede Pies


We love pies and when we created this pie it became an instant hit with both of us. It was so tasty. Steamed veg and succulent minced beef encased into puff or shortcrust pastry, whichever you prefer. We used pre-made pastry, we use it all the time as mostly puff pastry is very time consuming to prepare. Swede is a very interesting vegetable and is very underrated. It is actually called Rutabaga but here in the UK it is referred to as Swede which is short for Swedish turnip...another name that is used for this root vegetable. I find it very sweet and peppery in taste. This recipe makes about 5 large pies. Love it! Try out this pie...it's delicious...you will need...
  • 500g minced beef
  • 1 large onion, diced
  • 500g swede, diced
  • 5 small carrots, diced
  • 3 medium potatoes, diced
  • 1 Beef Oxo cube or 1 Knorr Beef Stock Pot
  • Worcestershire sauce
  • 1 tsp dried mixed herbs
  • 1 tbsp tomato puree
  • 1 tsp vegetable oil
  • Ground black pepper, to taste
  • 500ml thick gravy, 8 tsp gravy granules in 500ml boiling water
  • 1kg ready-made puff or shortcrust pastry or 300g pastry if doing 1 large deep-filled pie
  • 1 egg beaten, for egg-wash
  • Flour for dusting
How to...
  1. Preheat the oven to 200°C.
  2. Put the diced swede, carrots and potatoes in a large steamer and steam for about 20 minutes or until soft but not mushy. Alternatively, boil them until a toothpick or fork goes easily through the veg. When done remove from the heat and set aside to cool slightly.
  3. In the meantime, in a large pan fry the onion on medium heat in the oil until soft and transparent (about 8 minutes). Add the minced beef, tomato puree, Worcestershire sauce (to taste), ground black pepper, Oxo cube (crumbled) and the mixed herbs. Give the pan a good stir and cook until the beef turns brownish (about 20 minutes), stirring occasionally.
  4. When both veg and beef mixture are cooked, add the veg to the meat mixture, add the gravy and stir well until all the ingredients are combined well. Set aside.
  5. Lightly flour a working surface and roll out the pastry.  At this stage, if doing a large deep-filled pie you only need 300g pastry to line the pie dish and cover the top. If doing the single pies, cut around the rolled pastry with an inverted dinner plate so as you have a round shape. Spoon some pie mixture in the middle of the circle and close it to obtain a semi circular pie (as in the picture).
  6. Pinch the ends well and brush with the egg wash. Prick the pies with a fork or scissors to let the steam out during cooking.
  7. Put the pies, two at a time, in the preheated oven and bake for about 20-25 minutes until the pies are golden.
Enjoy!!
R&A

Penne alla Carbonara


This is how a proper Carbonara should be. This is a rustic pasta dish that comes from Rome although its origin is questionable as some Italians say it came from the Umbria region, some say it comes from the Lazio region and some say that it was invented by an inventor from Naples from the Campana region. Anyway, whatever the provenance it is a very tasty dish and a very quick and easy way to flavour your pasta. We used penne but spaghetti go very well with this type of sauce as well. If you do not have pecorino Romano you may use Grana padano or Parmegiano Reggiano. Make sure you use free range eggs so you get a lovely yellowy colour. The original recipe uses guanciale which similar to pancetta only that guanciale comes from the cheek of the pig (guancia means cheek in italian hence the name) and pancetta comes from the belly of the animal (pancia means belly in italian hence the name). Give it a go! For 4 people you will need...
  • 300g penne
  • 4 egg yolks + 1 whole egg
  • 100g grated pecorino Romano
  • 150g Guanciale or pancetta, diced
How to...
  1. Start by cooking the pasta al dente. 
  2. Cook the guanciale or pancetta in a hot pan (no oil is required as guanciale and/or lardons have enough fat on them) until crispy.
  3. When the pasta is cooked, drain it but leave a little cooking liquid with the pasta to avoid having a dry pasta dish. Cover and set aside.
  4. Start making the sauce by whisking the egg yolks and one whole egg in a bowl. Whisk until they are combined well. Add the cheese and combine well with the eggs. Now add the guanciale or pancetta. Mix again and add everything to the cooked pasta.
  5. Mix slowly until all the pasta is covered with the sauce and serve.
Enjoy!!
R&A

Chilli Dogs As They Should Be!!


I have always been a fan of chilli. The hotter it is, the better for me. But what is great with chilli is that you can make as spicy, hot or mild as you like. I love hot dogs and love chilli so a Chilli Dog is one of my favourite dishes ever. Go ahead and try these chilli dogs to impress your family or your friends. The amount of chilli powder you put in this chilli is obviously to your taste so adjust it according to your taste. Make sure you use the best hot dogs you can get your hands on, we use Bockwurst but Wudy, Frankfurters or any other large sausage will do. One thing is for sure that if you prepare this chilli once, you will definitely do it again. Any leftover chilli can be used in burritos, enchiladas or served with white rice or tortilla chips as a meal. If you use a spoonful with each hot dog you will have enough chilli for about 16-20 chilli dogs. So go ahead and give this a go...you will love it...you will need...

For the chilli con carne


  • 200g bacon, cut into small pieces
  • 1 large onion, finely chopped
  • 700g minced beef
  • 5 garlic cloves, finely chopped
  • 3 cans chopped tomatoes in juice
  • 2 tablespoons molasses (Treacle) or 100g dark muscovado sugar or Piloncillo
  • 2 tablespoons sweet paprika
  • 2 tablespoons ground cumin
  • 2 teaspoons dried oregano
  • 2 tablespoons chilli powder (or to taste) 
  • 1/2 tablespoon cayenne pepper [Caution - Cayenne pepper is very hot]
  • 1 tablespoon unsweetened cocoa powder
  • Salt & pepper, to taste
  • 300ml beef stock (We used 1 Knorr stock pot in 300ml boiling water)
  • 1 tin red kidney beans, drained and rinsed [optional]
For the dogs
  • Hot dog buns (depends on how many you need)
  • Hot dogs such as Bockwurst, Wudy, Frankfurters or others
To garnish
  • Grated Mature Cheddar cheese
  • Finely chopped raw onion (optional)
How to...

  1. To make the chilli start by frying the onions in about 2 tablespoons vegetable oil and fry over high heat until brown, stirring frequently. 
  2. Add the bacon and garlic. Cook until brownish.
  3. Now add the minced beef and stir well with the onions. Cook the beef over high heat stirring occasionally until browned, about 15 minutes. 
  4. When the beef is cooked, drain any excess liquid fat and add the chopped tomatoes, molasses, sugar or piloncillo (whatever you are using), stock, cocoa powder and all the spices. (Better add the chilli powder and cayenne pepper slowly so you can adjust to your taste...always taste before adding more). 
  5. Stir well and simmer on a medium to low heat for about 90 minutes (or more) until the chilli has a thick consistency. If left too watery it will ruin the buns.
  6. Grill your hot dogs until they are slightly charred. 
  7. Slice open the hot dog buns, place a hot dog on, spoon some chilli on the dog, add grated Cheddar and chopped onions (if used) and enjoy!!! We dare you to stop at one dog :)
Enjoy!!
R&A

Saturday, 5 November 2011

Pork & Fennel Sausages

These sausages are inspired by the great Antonio Carluccio. When we tried them, they were so delicious. Try to find the best minced pork you can get your hands on and also use a good red wine. We used a good red Chianti. Italian sausages...Italian wine :) The secret in getting good sausages is to mix the meaty mixture for a long time by hand!!! This makes sure that all the ingredients are infused into the meat. As with all sausages you can grill them, BBQ them, fry them...whatever you desire. When they were done I dipped them in some pre-made Caponata but if you cannot find it a good red bell pepper sauce like Ajvar will do just fine or ketchup or whatever you fancy!! To prepare about 12 sausages you will need...
  • 1kg minced pork
  • 1 red chilli, de-seeded & chopped
  • 1 garlic clove, finely chopped
  • 1 tsp fennel seeds, crushed
  • 120ml red wine (We used Chianti)
  • 4 tbsp Extra virgin olive oil
  • Salt & freshly ground black pepper, to taste
How to...
  1. Mix all the ingredients in a bowl and mix them well by hand. 
  2. Shape them up into 12 equally sized sausages.
  3. Heat a pan with some olive oil and fry them until done from both sized, about 10 minutes or until cooked through. You can also grill them.
  4. Serve them with any sauce you like.
Enjoy!!
R&A

Romanian Aubergine Dip - Salata de Vinete


This Romanian speciality is an aubergine based dip or spread that is usually served on toast with sliced tomatoes. It is very tasty and easy to prepare. It is great served as a snack or starter to your meals. It is very popular in Romania. To prepare it you will need...
  • 1 large aubergine
  • 1 small onion, finely chopped
  • Pinch of salt
  • 2 tablespoons mayonnaise
  • Sliced tomatoes, to serve
  • Salad, to serve
  • Toasted bread, to serve
How to...
  1. Prick the aubergine with a fork in various places.
  2. Grill it until the skin is charred from all sides.
  3. When done, peel it carefully and scoop the flesh out on a chopping board. Chop the aubergine flesh very finely. Put in a bowl, add the onion, salt & mix well. Add the mayonnaise and mix again.
  4. Toast a couple of slices of bread and spread it over. Serve with sliced fresh tomatoes if you wish.
Enjoy!!
R&A

Fusilli Pasta Bake with Breadcrumb Topping

We are big fans of creating dishes with whatever we have in our cupboards & fridge. These dishes usually turn out to be a great success and most of all very very tasty. Like this one for example, I decided to give the usual plate of pasta a twist by adding a couple of ingredients like breadcrumbs and grated hard cheese and then put it in the oven to get a nice crunchy pasta dish. It is very simple to prepare, so just give it a go...you will need...
  • 300g fusilli
  • 500ml tomato passata
  • 2 red chillies, deseeded and sliced [optional]
  • 1 small onion, finely chopped
  • 2 garlic cloves, finely chopped
  • Half teaspoon sugar
  • 1 tsp dried oregano
  • Ground black pepper, to taste
  • 100g grated Kefalotiri or Parmigiano cheese
  • Extra virgin olive oil
  • Handful of pangrattato or stale breadcrumbs
How to...
  1. Preheat the oven to 180°C.
  2. Add a tbsp of olive oil to a pan and fry the onion until soft and transparent, about 5 minutes (preferably covered). Add the chillies and garlic and stir fry for a further 2-3 minutes.
  3. Add the passata, sugar, oregano and ground black pepper. Stir well and simmer for about 10 minutes.
  4. In the meantime cook the fusilli al dente. Make sure you do not overcook the pasta.
  5. When the sauce & pasta are cooked, drain the pasta and put back in the pasta pot. Add the sauce, a good amount of extra virgin olive oil and about 2 tbsp of grated cheese. Mix well but slowly, not to break the fusilli.
  6. Pour slowly into a small ovenproof container. Cover the pasta with a handful of breadcrumbs and the remainder of the cheese.
  7. Put in the preheated oven for about 20-25 minutes or until the breadcrumbs & cheese are golden brown.
Enjoy!!
R&A

Pumpkin & Sausage Casserole


I was browsing the net for Halloween recipes and came across this one. We did this casserole on Halloween weekend and loved it. It is so comforting and warm. Pumpkins around Halloween are very very cheap so we make sure we buy the biggest one for as cheap as £1. Make sure you use good quality sausages (for all our followers in Malta, Maltese sausages will do just fine)...we used Pork & Apple sausages. You can top it up with a dollop of sour cream or why not serve it with some mashed potatoes. So give it a go...you will need...
  • 50g butter
  • 6 medium sized good quality sausages
  • 1 onion, finely sliced
  • 3 banana shallots [small elongated shaped shallots], finely chopped
  • 2 garlic cloves, finely chopped
  • 1 tsp dried sage
  • 800g diced pumpkin
  • 1 tbsp white wine vinegar
  • 1 tsp sugar
  • 1 can chopped tomatoes
  • 1 tbsp tomato puree in 100ml boiling water
  • 400g can Cannellini beans, drained & rinsed
  • 400ml chicken stock or 1 cube 400ml boiling water
  • Salt & ground black pepper, to taste
  • 2 tbsp chopped parsley, to serve
  • 4 tbsp sour cream, to serve

How to...

  1. Preheat the oven to 180°/Gas mark 4.
  2. Heat half the butter and fry the sausages on medium heat until browned, about 4-5 minutes.
  3. Add the remaining butter and add the onions, shallots and fry for a further 3 minutes until softened. Add the garlic and sage and cook for a further 3 minutes always on medium heat.
  4. Add the pumpkin and tomato puree with water. Stir the mixture thoroughly but slowly. Add the vinegar and increase the heat to high and heat until nearly all the liquid has evaporated.
  5. Add the sugar, beans, chopped tomatoes, stock, salt & pepper. Stir well and bring the pot to boil.
  6. Turn off the heat and put into a large casserole. Put in the oven for about an hour or until the pumpkin is soft and cooked.
  7. Ladle into bowls and top with a dollop of sour cream and chopped parsley or mashed potatoes.

Enjoy!!
R&A


Saturday, 1 October 2011

Roast Tomato Soup


I watched James Martin do this soup and fell in love with the idea. This soup is so delicious that it can even be enjoyed cold!! We loved it. It bursts with flavours…the better tomatoes you can get the better soup you will produce. The olive oil quality does its part as well so make sure you use a good quality one. You can serve it with some crème fraîche, crispy croutons, grated Parmesan and/or some fresh hand torn basil leaves. It is very easy to prepare. The trickiest part is peeling the roasted tomatoes…make sure you let them cool well as you can easily scald your fingers. So you will need…

Serves 4

·         800g tomatoes, cut in half
·         3 tbsp runny honey
·         2 sprigs fresh thyme
·         1 onion, thinly sliced
·         2 garlic cloves, chopped
·         8 tbsp extra virgin olive oil
Freshly grated Parmesan, to serve

Method


  1. Preheat the oven to 230 °C.
  2. Put the tomatoes on a baking tray, drizzle with the honey and about 2 tbsp of the olive oil. Roast for about 20 minutes.
  3. When roasted, set the tomatoes aside to cool. When cool enough, carefully peel off the skins, then chop the tomatoes and thyme leaves. Set aside.
  4. Heat 2 tbsp of the olive oil in a saucepan, add the onion, cover with a lid and cook for about 4 minutes or until transparent and soft. Add the garlic and fry for a further 3 minutes. Turn off the heat.
  5. Throw the tomatoes, thyme, about 75ml water and the remaining 4 tbsp olive oil into a blender or food processor and blend until smooth.
  6. Season with salt & pepper.
  7. Reheat the soup if necessary, ladle into the bowls and serve with whatever you fancy. We prefer parmesan ;)

Enjoy!!
R&A

Sunday, 25 September 2011

Blue Cheese Dip

This is one of our favourite dips ever. Once we start digging in we can never stop. Dips are so easy to prepare as basically you just throw everything in the food processor and there you have it...yum yum!!! So give this a try and impress your friends. Make sure you do not put too much onion!! Serve this with grissini (breadsticks), raw veg, crackers, galletti (water biscuits) or whatever you fancy. So, you will need...

  • 150g blue cheese, cut in cubes
  • 250g quark cheese or ricotta
  • ¼ small onion, finely chopped
  • Pinch ground white pepper
  • 1 tbsp. extra virgin olive oil
  • Juice of half a lemon
Method

  1. Just whiz up all the ingredients in a food processor until smooth.
  2. Tip the dip into a bowl and serve.
  3. If refrigerating make sure that you cover the bowl with cling film first!
Enjoy 
R&A

Saturday, 9 July 2011

Our Mushrooms in Garlic

A favourite with all mushroom lovers, it is now officially a favourite with Amanda as well [which usually is a mushroom loather] :) I was so surprised that she liked it...well actually she loved them!! They are very easy to prepare. We usually serve them with our Full English Breakfast but they can be served as a starter to any meal. The amount of mushrooms we used was for 2 people but mushrooms basically disappear whilst cooking so adapt the ingredients as you wish :) We also used White Closed Cap mushrooms but you can use white mushrooms or even Portobello mushrooms. Do not use Oyster or Enoki mushrooms as they are quite delicate and you will ruin their taste plus their texture will not be that pleasant. You will need...
  • 350g white mushrooms, quartered
  • 25g unsalted butter
  • 2 small garlic cloves, finely chopped
  • Handful of fresh parsley, finely chopped
  • 1 tbsp Light soy sauce
  • 1 tbsp brandy
How to...
  1. Melt the butter in a pan and add the garlic and fry until fragrant & golden.
  2. Add the quartered mushrooms, parsley , soy sauce and brandy. Give them a careful stir and put a lid on. Simmer for about 2 minutes on a medium heat.
  3. Remove the lid and stir carefully again. Let simmer uncovered until sauce is reduced and mushrooms are cooked, about 10 minutes.
  4. Plate and serve.
Enjoy!!
R&A


Tuesday, 5 July 2011

Cherry & Watermelon Salad

As summer is showing all the sun & heat, there is nothing better than a nice chilled fruit salad. A fruit salad is the easiest thing to do ever and you can use any fruit that is in season but these two particular summer fruits are two of my favourites. My personal touch are a couple of fresh basil leaves which give it a wonderful taste. Also if you fancy it a drop or two of balsamic vinegar. Yummm!!! You will need...

  • 1 slice watermelon
  • A handful of cherries
  • 3 small fresh basil leaves
  • Drop or two balsamic vinegar
Method

  1. Remove all seeds from the watermelon and cut into bite-size pieces.
  2. Wash the cherries and split them in half and remove the stones.
  3. Put the fruit into a container and add the hand torn basil leaves and balsamic vinegar if using.
  4. Slowly mix everything up. Cover the bowl and chill until ready to serve.
Enjoy!!!
R&A

Friday, 24 June 2011

Kohl mit Würstchen - Cabbage with Frankfurter Sausages

This is such a tasty dish that I have been enjoying for years as it was one of my mum's favourites. It is a classic German dish. Germans love their sausages and cabbage. This is my take on the dish. Very easy to prepare with few ingredients you will have a dish that you can serve as a main course, side or a snack. We served the cabbage and sausages with mashed potatoes and had it as a meal. Give it a go and you will surely do it again...

  • 1 Savoy cabbage or normal cabbage
  • 3 slices unsmoked back bacon
  • 5 Frankfurter sausages
  • Vegetable oil
  • Salt & pepper
Method

  1. Wash the cabbage and cut it in quarters. Remove the core and boil until cooked and soft. Drain and set aside.
  2. Cut the bacon into strips. Heat the oil and fry the bacon until browned and crispy.
  3. Add the sausages to the cooked bacon and cook for a few minutes. Add the cabbage to the pan and cook on high heat mixing well. Season with salt & pepper. Serve!!
Enjoy!!
R&A


Tuesday, 21 June 2011

Bigilla - Maltese Bean Dip


Bigilla is one Malta's favourite dips. It is very easy to prepare. I remember the Bigilla vendor in Malta with his tiny van running around the villages I grew up in...he always had his voice shouting ''Tajba u tgħali'' (Warm & delicious) on repeat on his cassette player! :) The most time consuming bit of the whole process boiling the beans. This dip is prepared with Ful Medames which hail from North Africa, originally Egypt although the beans used in the original old recipe where called Ful Ta' Ġirba [Djerba beans] which were very similar to Ful Medames but smaller and darker. They basically taste the same. This recipe is to make about half a kilo of Bigilla. You can freeze any extra Bigilla for future use...or, I use it as a spread to make one of my favourite sandwiches which is tomato paste, olive oil, bigilla & Maltese peppered cheeselets. Here is what you will need...

  • 500g Ful Medames, soaked in water overnight
  • 8 garlic cloves, each cut in 4 pieces
  • Extra virgin olive oil, abundant
  • Small bunch of fresh parsley
  • 1 red chilli, chopped (optional)
  • Chilli sauce, to taste (optional)
How to...
  1. Put the soaked beans in a pan and cover with fresh cold water. Bring to the boil on high heat, lower the heat and simmer partially covered for an hour or until the beans are fairly soft. Drain and set aside to cool down.
  2. Put the beans, parsley, garlic and chilli sauce (if using) in a food processor and blend well until smooth. While the processor is on add the olive oil until you get a smooth consistency. You can put as much olive oil as you want.
  3. Serve in bowls with extra chilli sauce and olive oil. Serve with crackers, grissini (breadsticks) or spread on crusty bread.
Enjoy!!
R&A