Friday, 20 March 2015

Vegan Nutty Avocado & Mango Mousse

I love vegan desserts, they are so light and scrumptious. Here is another creation of ours that we made as an end of the week treat. As usual, it turned out absolutely divine. I added a tablespoon of crunchy peanut butter to add a wee bit of a crunchy texture. Needless to say the avocado added a luscious creaminess to the mousse that went down a treat. The mango and maple syrup (or honey if not vegan) added sweetness and the vanilla extract added a wonderful aroma to this delight. Give it a go and you will love it. For 4 servings you will need...
  • 1 large avocado, stoned and roughly chopped
  • 1 large mango, flesh roughly chopped
  • 1 heaped tablespoon crunchy peanut butter
  • 1 tablespoon maple syrup or agave syrup (or honey if not vegan)
  • 1 teaspoon natural vanilla extract
How to...
  1. Put all the ingredients into a food processor and process until you get a smooth consistency.
  2. Transfer into ramekins and put into the fridge for about 30 minutes before serving (optional).
  3. Serve!!
Enjoy!!
R&A


Thursday, 19 March 2015

Raw Carrot, Cucumber & Tomato Salad

As promised our previous blogpost, here is the recipe for the salad that we served with our Turkey & Cumin Burgers. It is very quick to prepare...just some dicing to do. :) Amanda came up with the idea of a salad with our burgers and this salad is basically the tasty result of what we had in our fridge. I used Spanish paprika and Mexican oregano but if not available you can use normal sweet paprika and regular dried oregano. It is a completely vegan & vegetarian salad and can be served with anything,..as a side dish, as a quick lunch or even as a tasty and refreshing sandwich filler. Also, the small the diced vegetables the better in our opinion. For 2-3 servings you will need...
  • 1 carrot, grated
  • ½ cucumber, deseeded & diced
  • 2 tomatoes, deseeded & diced
  • 1 spring onion, finely chopped
  • 1-2 small gherkins, finely chopped
  • 1 celery stalk, diced
  • ½ tsp Spanish sweet paprika (use sweet paprika if not available)
  • Pinch dried tarragon
  • ½ tsp dried dried chives
  • Pinch Mexican oregano (use regular oregano if not available)
  • Sea salt & freshly ground black pepper

How to...
  1. In a medium sized bowl mix all the ingredients with a spoon. Transfer the salad into a fine sieve and let it rest on top of the bowl for a couple of minutes. This will get the excess moisture out of the salad. 
  2. After a couple of minutes, discard the drained liquid and serve.

Enjoy!!
R&A

Turkey & Cumin Burgers

We found a version of this recipe online and decided to adapt it and we instantly fell in love with these wonderful tasty burgers. We discovered that turkey mince is so lean, delicious and surprisingly light!! Apart from turkey obviously these burgers have cumin as one of the main ingredients and it goes really well with the tasty turkey mince. This time I had my burgers with Danish blue cheese instead or regular cheese and it turned out to be a match made in heaven but feel free to use any cheese you prefer such as Cheddar, Edam, Emmental or Maasdam, We also made a refreshing raw carrot & tomato salad to go with it. I will post the recipe of this salad in my next blogpost. In the meantime do give these burgers a go. For 6 burgers you will need...
  • 1 egg
  • 2 cloves garlic, minced
  • 3 tablespoons light soy sauce
  • 3 tablespoons Worcestershire sauce
  • 2 teaspoons ground cumin
  • 1 teaspoon Dijon mustard
  • 1 teaspoon paprika
  • ¼ teaspoon hot paprika
  • ¼ teaspoon sea salt
  • 4 tablespoons dried breadcrumbs (we used Panko)
  • 500g minced turkey

To serve

  • 6 burger buns, split and toasted
  • 30g Danish blue cheese, crumbled

How to...
  1. In a large mixing bowl, mix all the burger ingredients well. (I use my hand so all the flavours infuse equally into the meat. (Always make sure your hands are clean, alternatively you can wear disposable gloves or use a spoon).
  2. Shape into 6 equally shaped burger patties.
  3. Cook on a hot grill or BBQ for about 5 minutes on each side or until there is no pink in the middle anymore.
  4. Serve on the toasted buns, sprinkle some crumbled Danish blue cheese. Our carrot & tomato salad will go very well with these burgers...definitely tried and tested. :)

Enjoy!!
R&A

Sunday, 15 March 2015

Divine Meatballs in Tomato Sauce

Spaghetti meatballs is one of my favourite pasta dishes. I love its meatiness, its tomatoey goodness. Absolutely divine!! This dish is an Italian-American classic and "It is widely believed that spaghetti with meatballs was an innovation of early 20th-century Italian immigrants in New York City; the National Pasta Association (originally named the National Macaroni Manufacturers Association) is said to be the first organization to publish a recipe for it, in the 1920s" - Wikipedia. Usually meatballs are done with 2 or 3 different types of minced meat, namely beef, pork and veal but I decided to do ours using lean beef mince and they turned out super delicious and very tasty. You can serve them the classic way (with pasta) or else with some crusty bread. Instead of spaghetti this time we used Fusilli lunghi bucati which are long thin fusilli shapes tubes, For 12 meatballs you will need...


For the meatballs...

  • 500g lean beef mince
  • 1 egg
  • 1 cup breadcrumbs (I used Panko)
  • ½ cup grated parmesan
  • 1 tbsp dried parsley
  • 1 tbsp dried oregano
  • ½ tsp salt
  • ½ tsp ground black pepper
  • 2 garlic cloves, minced
  • ½ cup water
For the tomato sauce...

  • 500ml tomato passata
  • 1 tin plum tomatoes
  • 1 tbsp tomato paste dissolved in 200ml boiling water
  • 1 small onion finely chopped
  • 2 garlic cloves, minced
  • ¼ tsp dried basil
  • 1 tsp sugar           
  • Salt & pepper
  • Olive oil
How to...
  1. Preheat the oven to 200°C.
  2. Now start preparing the meatballs. In a large mixing bowl add all the meatball ingredients apart from the water and mix well (I use my clean hands, this way the flavours infuse better into the meat). Gradually start adding the water bit by bit until you get a wet but not too much mixture.
  3. Shape into 12 meatballs (about 60g each) and place on a baking tray lined with greaseproof paper. Put into the preheated oven for about 15 minutes.
  4. In the meantime start the tomato sauce. Heat about 2 tablespoons olive oil and add the onion and garlic and cook until translucent, add the rest of the ingredients and some extra-virgin olive oil, bring to the boil and simmer for about 10 minutes. Take the meatballs out of the oven.
  5. Now lower the heat add the meatballs to the tomato sauce and simmer covered for about 45 minutes on low heat. Stir only once.
  6. Serve hot with pasta or bread and extra grated parmesan.
Enjoy!!
R&A


Saturday, 14 March 2015

Marmitako Euskera - Basque Fresh Tuna Stew

Marmitako in Basque means 'from the pot' and is also the name for this tuna and potato based stew. Using the freshest tuna possible this stew will turn into a gorgeous unique stew. In this recipe I use Choricero peppers which are dried red Spanish peppers that come from Spain but if you do not have them do not worry just omit them. I also made my own fish stock but you can use any fish stock cubes or stock pots you have available. I must admit that both Amanda and myself loved this recipe and will definitely give it another go. Fresh tuna is one of my favourites when it comes to fish and being the main ingredient in this wonderful dish made this an instant favourite!! Just because I love flags, here is the Basque flag :) For six people you will need...

  • 500g fresh tuna, cut into chunks
  • 500g potatoes cut into chunks
  • 1 red or yellow pepper, diced
  • 1 green pepper, diced
  • 2 choricero peppers, soaked in boiling water for 1 hour, flesh scraped (optional)
  • 2 tomatoes, peeled, deseeded and chopped
  • 3 garlic cloves, finely chopped
  • 2 small onions, finely chopped
  • 1.5 litres fish stock
  • A pinch of cayenne pepper
  • 75ml white wine
  • 240ml (1 cup) tomato passata
  • Salt & pepper, to taste
  • Olive oil, to serve

For the fish stock...
  • 2 litres water
  • 1 large fish head or 2 small ones
  • 1 onion, sliced
  • 1 spring onion, chopped
  • 1 tsp dried parsley
  • A pinch dried thyme
  • 1 bay leaf

How to...
  1. If making your own stock, put all the ingredients in a pot and bring to a boil. When it boils, skim the foam that will float on top of the stock. Simmer for 20-25 minutes. Turn off the heat and strain through a fine sieve.
  2. Now onto the stew. In a saucepan, add onions, garlic, red pepper, green pepper and tomatoes, cook until soft about 10-15 minutes on medium high heat stirring occasionally. Now add the wine and when the wine has evaporated, add the passata and choricero pepper flesh (if using). Turn off the heat and blend with a stick blender or in a blender and set aside.
  3. In the meantime, in a large pan add the strained stock, cayenne pepper and salt & pepper. Bring to boil and add the potatoes. Cook for 15 minutes. Add tomato/pepper mixture and stir well. Simmer for a further 10 minutes.  Add tuna chunks, stir once and simmer for about 5 minutes. Do not overcook the tuna as it will crumble and ruin the stew. Turn off heat and set aside to sit for about 15 minutes before serving.
  4. Serve warm with crusty bread.
Enjoy!!
R&A


No Bake Chocolate & Biscuit Layered Cake


I was introduced to this delicious cake by my mother-in-law. Sometimes, she used to make this for us when we used to go visit her. I love it and always asked for seconds!! Lately I was craving for it as I haven't had it for years so I asked my mother-in-law for the recipe. I decided I would like to share it with you on our blog. It is very quick and easy to prepare. I used Morning Coffee biscuits but I believe Rich Tea biscuits would work too. Also my mother-in-law used to use tinned Nestle Cream but I could not find it here in England so I used extra thick double cream. Give it a go and am quite sure your family and friends would love it. For a 21cm/8 inches square cake you will need...
  • 2 packets Morning Coffee biscuits
  • 150g cooking milk chocolate 
  • 150g unsalted butter, diced
  • 250ml instant coffee (at room temperature)
  • 300ml Extra thick double cream
  • Unsweetened cocoa powder, to decorate
How to...

  1. Start by melting the chocolate and butter at bain marie or on a double boiler. I used a pyrex bowl on a pan of boiling water and heat stirring gently on a low heat until both chocolate and butter have melted. See photos. Set aside to cool a bit.


  2. Now layer the biscuits evenly until you cover the bottom of the dish and moisten the biscuits sparingly with the coffee.
  3. Now pour some of the chocolate/butter mixture and make sure it covers the biscuits.Put another layer of biscuits and sprinkle with the coffee once again. 
  4. Now spread a layer of cream (about a third of the cream) and keep repeating Step 3 until you use all the biscuits and chocolate mixture. 
  5. Now to finish, spread the remainder of the cream evenly on top and sprinkle with the cocoa powder.
  6. Put in the fridge for a couple of hours at least to set. 
  7. Cut into portions and serve!
Enjoy!!
R&A


Pastizzi

Pastizzi are ever so popular in Malta. There are so good. My dad used to buy loads of these on a Sunday morning. They are made with flaky all butter puff pastry and filled with a variety of two fillings, with peas or with ricotta cheese. Unfortunately pastizzi are not available here in the UK so I decided to make my own on a Sunday morning and surprise my wife which as every Maltese person is a big fan. She was so surprised :) The hardest bit is always the pastry which honestly nobody can perfectly replicate the one one buy from Maltese pastizzerias [Pastizzi shops]. I used ready-made all butter puff pastry which turned out to be a success...luckily...my favourite pastizzi back in Malta where from Roger's Bakery at Zejtun. He used to sell these from his van on  a Sunday morning by the village church, he also sells frozen ones from the shop. So if you are a Maltese immigrant do give these a go...they are really worth all the work :) You will need...

For the Pastizzi tal-Piżelli - Pea ones

  • 300 g dried marrowfat peas
  • 1 onion, finely chopped
  • Oil for frying
  • Salt & pepper
  • 1 tsp Bicarbonate of soda
  • 1 egg beaten, to use as egg wash
  • 500 g all butter puff pastry


Method


  1. Soak the peas overnight. Wash them in plenty of salted water. Put the peas in a pan and cover generously gently with water, add a teaspoon of bicarbonate of soda. Cook the peas until they’re very soft. Drain well and set aside.
  2. Preheat the oven at 200°C.
  3. In the meantime, fry the onions in oil until soft and transparent. Add the onion to the cooked peas, mix well and season to taste.
  4. Roll out the puff pastry thinly and cut out circles about 10cm in diameter. Egg wash the edges. Put about a teaspoon of the mixture onto each of the circles in the middle. Pick up the pastry circle from two edges and seal the edges together. Egg wash and bake in the preheated oven for about 20 minutes or until the pastry is well golden.
  5. Serve hot.


For the Pastizzi ta' l-irkotta - Ricotta ones

  • 300 g ricotta
  • 2 eggs
  • Parsley, finely chopped [optional]
  • 1 egg beaten, to be used as egg wash
  • 500 g all butter puff pastry
  • Salt & Pepper


Method

  1. Mix well the ricotta, eggs, parsley and salt & pepper.
  2. Roll out the puff pastry thinly and cut out circles about 10cm in diameter. Egg wash the edges. Put about a teaspoon of the mixture onto each of the circles in the middle. Pick up the pastry circle from two edges and seal the edges together. Egg wash and bake in the preheated oven for about 20 minutes or until the pastry is well golden.
  3. Serve hot.


Enjoy!!!
R&A


Saturday, 7 February 2015

Reduced Sugar Ovaltine & Dates Cake

Hello all hope you are all well!! So, after a sabbatical month of not blogging, here we are with a new recipe for you all. Apparently Ovaltine cake is a wartime classic here in Britain and here is our take on this cake recipe. I reduced the amount of sugar and increased the amount of dried fruit. I also used rice milk instead of dairy milk and the cake turned out surprisingly light. You can, of course, use cow's milk. It turned out so good and because it is not overly sweet I cheekily spread some proper butter on a slice of this tasty cake whilst it was still warm. Heaven!! The ingredients down here are for a small cake so feel free to double the amounts for a larger cake.  Give it a go...very easy to prepare. For a small cake you will need...
  • 170g self-raising flour
  • 40g caster sugar
  • 70g chopped dried dates
  • 3 tablespoons Ovaltine
  • Pinch of salt
  • ½ teaspoon baking powder
  • ½ teaspoon bicarbonate of soda
  • 1 cup (240ml) rice milk (or cow's milk)

How to...
  1. Pre-heat oven to 180°C/350°F.
  2. In a medium sized mixing bowl sieve the flour, baking powder, bicarb, salt, Ovaltine and sugar. Mix them well with a wooden spoon.
  3. Add the chopped dates and rice milk and mix well until you get a runny batter.
  4. Pour into a silicon mould or a lightly greased small loaf tin.
  5. Bake into the preheated oven for 50 minutes.
  6. Serve warm with or without butter.

Enjoy!!
R&A

Monday, 22 December 2014

Beer Battered Fish & Chips with a Cherry Tomato Salad

Fish & Chips is the heart of Britain, a dish that is ever so popular in Britain and all the British colonies including Malta. Myself personally am not a big fan of deep fried foods and in fact I have fish and chips maybe once a year and Amanda does not like it all. Having said that I decided to make our own delicious fish and chips. I decided to do this because we bought a whole dogfish from my friend Ash at Penny's Fisheries and got some beer as a Xmas so fish, beer, flour...Eureka! Home-made fish and chips!! The secret to a good crispy, not soaked in oil fish is the temperature of the oil and by using cold beer. I used John Smith's Extra Smooth bitter but any beer will do in my opinion! I use a thermometer to get the perfect oil temperature but if you do not have a thermometer, the easiest, and safest, method is to stick the end of a wooden spoon into the oil. If you see bubbles form around the wood and they start to float up, your oil is hot enough to cook with. It is also important not to overcrowd the frying pan and also make sure the temperature is high again before deep frying the next batch. The following recipe is enough for 4 medium fish fillets. You will need...

For the batter
  • 220g self raising flour
  • 330ml John Smith's Extra Smooth bitter

For the cherry tomato salad
  • A handful of cherry tomatoes, cut in half (we used yellow and red ones)
  • 2 tablespoons green olives, roughly chopped
  • 1 garlic clove, crushed
  • 1 teaspoon capers, roughly chopped
  • 2 spring onions, chopped
  • 1 teaspoon mint sauce
  • Salt & pepper
  • Extra virgin olive oil

  • 4 boneless dogfish fillets (you can use other fish like cod, haddock, pollock etc.)
  • Extra flour for dusting
  • 1 litre vegetable oil

How to...
  1. Start by preparing the tomato salad. To do this just combine all the ingredients in a bowl and stir well. Set aside.
  2. Heat the oil to 180°C (see note in bold in the description above).
  3. Prepare the fish by dusting the fillets with flour, shake any excess. 
  4. Prepare the batter by adding the beer to the flour in a medium sized bowl and whisk gently until you get a thick batter. Dip the fish fillets into the batter and cover in batter completely. 
  5. Deep fry into the hot oil for 6-8 minutes (depending on the thickness of the fish) until golden and puffy. Using tongs or a slotted spoon take the fish out of the oil, making sure you drain any excess oil and put on absorbent kitchen paper. Keep in a warm place until you cook the other fish. Always make sure that the oil is back to 180°C as if the oil is not hot enough the fish and batter will absorb a lot of oil. You do not want that.
  6. Serve the fish hot with some tomato salad and chips.

Enjoy!!
R&A 


Spaghetti al Nero di Seppia - Spaghetti with Cuttlefish

Hello all, I know I have not blogged any recipes lately but I was quite busy working towards a career change! Oh yes...quite happy and excited about the new job starting in January but until then I have two weeks off and hopefully I will post some delicious recipes that we have prepared lately. One recipe that we made and loved is the classic Italian recipe Spaghetti al Nero di Seppia which basically is spaghetti in a black sauce!! Yes a black sauce which is the result of the addition of the cuttlefish's ink to the cuttlefish sauce. Try it out, if you have not got a fishmonger close-by, you can buy sachets of cuttlefish ink online...I do! They are very cheap as well. This pasta sauce is very fast and easy to prepare...just make sure that cuttlefish you are using is fresh. So for 2-3 people you will need...
  • 200g spaghetti
  • 600g cleaned cuttlefish (including tentacles), cut into small pieces
  • 2 garlic cloves, finely chopped
  • 100ml (½ cup) white wine
  • 2 sachets cuttlefish ink or 1 fresh cuttlefish ink sac
  • 2 tablespoons chopped fresh parsley (or 1 tablespoon dried parsley)
  • Extra virgin olive oil
How to...
  1. Heat about 2 tablespoons of extra virgin olive oil together with the garlic in a small pan. Cook until the garlic is aromatic and golden.
  2. Now add the cuttlefish and parsley and stir well. Cook on medium heat for about 15 minutes. Increase the heat on high and add the wine and cook until the wine has evaporated (at this point you can cook the pasta and drain it). Reduce the heat to medium again and add the cuttlefish ink sachets. Stir well. If using the fresh cuttlefish ink sac, add the whole and break it carefully with a wooden spoon. Heat thoroughly.
  3. Add the sauce to the pasta and serve with extra chopped parsley and extra virgin olive oil.
Enjoy!!
R&A


Saturday, 8 November 2014

Ottini - Maltese Number 8 Shaped Biscuits

These Maltese biscuits were one of my favourites whilst growing up and to be honest they still are as I grew to miss them whilst living here in England. So obviously I had to make them. The recipe is very similar to Qagħaq tal-Ġunġlien (Maltese Biscuit Rings with Sesame Seeds) with some ingredient changes and also, this time I used a food processor. Needless to say there was less mess in the kitchen and took less time to prepare!! It is quite easy to shape a number 8, actually easier than you had thought. Also, when I bake my OCD kicks in and I always have to weigh the prepared dough and divide its weight into equal and even shapes haha. Using this method I always get equally shaped (well approximately) finished products. So if you miss these biscuits like I do, here is how I made 10 of them first thing on a Saturday morning. You can dunk these in hot tea or coffee, that's how we like them :) You will need...
  • 250g plain flour
  • 85g caster sugar
  • 1 ½  teaspoons baking powder
  • 1 egg
  • ½  teaspoon ground aniseed
  • Pinch ground cloves
  • 90g salted butter, at room temperature, cut into cubes
  • 1 tablespoon vegetable oil
  • 2 tablespoons water
  • 1 tablespoon orange flower water - Ilma zahar (if not available add another tablespoon of water)
  • Grated zest of 1 orange
  • Sesame seeds
How to...
  1. Preheat the oven to 180°C.
  2. If you are using a food processor, start by adding the flour, sugar, spices and baking powder into the food processor and pulse for a few minutes. If not using a processor add the dry ingredients in a large bowl and mix well. Add the butter and blend until all butter has been incorporated into the flour. If using your hands, mix the butter in with your fingertips until mixture resembles fine breadcrumbs.
  3. In a small bowl beat the egg and mix in the orange zest, water, orange flower water and oil. Mix well. Add to the dry ingredients whilst food processor is running and blend until the dough comes together. Again if using your hands, add the wet ingredients to the dry ingredients mix well until you get a soft dough.
  4. Divide the dough into 10 equal sized balls (about 50g each), a bit bigger than golf balls and roll into thin long sausage like shapes, about 30cm long. Shape into a number 8 and carefully transfer into a plate with sesame seeds turning over to cover both sides with the seeds. Place on a tray lined with greaseproof paper and bake in the preheated oven for about 20-22 minutes.
  5. Let cool down and serve with tea or coffee.
Enjoy!! 
R&A


Thursday, 30 October 2014

Egg Fried Rice with Lap Cheong 腊肠 (Chinese Sausage)

We invented this dish when we were introduced to Lap Cheong aka Chinese sausage by our friends. Chinese sausage is so delicious, so sweet, meaty and juicy...we fell in love with it. Stir-fried rice is quite famous with everyone and is very easy to prepare and indeed, since this dish is a stir-fried rice based dish it is quite easy to prepare. It always makes me laugh whenever I cook this dish as I'll be like, so, some of this some of that and voilà...dinner is served!! I must admit that I could eat as much as I can of this dish and I do find it hard to stop! We prefer to use Basmati or Jasmine rice instead of plain rice as it is more fragrant and adds further flavour to the dish. Also the secret to perfect fried rice is to cook the fried rice into batches. I cook ours in two batches. Use a bowl to measure the amount. We usually do a bowl of cooked rice per person. To serve this dish as main course for 2-4 people you will need...
  • 250g uncooked rice (we use Basmati or Jasmine but plain rice will do)
  • 500ml boiling water
  • 4 Lap Cheong (Chinese sausages)
  • Half a leek or 2 spring onions, cleaned and cut into Julienne strips
  • 2 small carrots, cut into Julienne strips
  • Handful of frozen peas, defrosted
  • Handful canned sweetcorn
  • 2 eggs
  • 4 tablespoons vegetable oil
  • 1 teaspoon Chinese five spice powder
  • Oyster sauce, to taste
  • Dark soy sauce, to taste
  • Sesame oil, to taste
How to...
  1. Cook the rice either in a rice steamer or on the hob. To cook the perfect rice on the hob, add the rice to a medium sized heavy based pan and add the boiling water. Stir with a fork and bring to a boil. When it boils, lower the heat to low and simmer covered for 10-12 minutes. Do not open the lid. This is called the absorption method. When rice is cooked, wash with cold water, drain and set aside.
  2. Meanwhile, steam the sausages for 20 minutes, slice into bite size pieces and set aside. Do not throw away the boiling water used to steam the sausages. Add the leeks and carrots to the boiling water from underneath the sausages and blanch for about 2 minutes. Drain and set aside.
  3. Prepare the egg omelettes. Beat one egg and pour it in a hot small non stick frying pan (we use a 6-7 inch pan), turning gently so as to cover the bottom of the pan. Cook for a few minutes and turn over to cook the other side. Remove from the pan, roll into a roll and cut into strips. Repeat with the other egg.  You can do them both in one go if you have a larger pan obviously. 
  4. Heat  2 tablespoons of vegetable oil in a wok or frying pan until hot. Add 2 sausages (cut into pieces), half of the blanched veg and stir well. Add a bowl of cooked rice, keep stirring frequently or else the rice will stick. Cook for about 3-5 minutes. Add the peas, half a teaspoon of Chinese five spice powder, soy sauce and sesame oil to taste and stir well.Cook for a further 3 minutes. Now add the egg omelette strips, give it one last stir and serve hot maybe with some more soy sauce or sesame oil.
  5. Repeat until you use all the rice and ingredients.

Enjoy!!
R&A


Saturday, 18 October 2014

Coronation Chicken

Coronation Chicken was invented by Constance Spry and Rosemary Hume, both principals of the Cordon Bleu Cookery School in London, whilst preparing dishes for the banquet of the coronation of Queen Elizabeth II in 1953. I decided to do some research on this recipe and adapted a couple of recipes that I found online. This is the best version I have found, an absolute delight. Considered as a retro recipe here in the United Kingdom, it tried to make its comeback as a pre-prepared sandwich filling available at major supermarkets. It definitely goes without saying that the supermarket stuff is rubbish and having made our own Coronation chicken it is definitely galaxies away from the real thing. It is quite easy to prepare, boil chicken, let cool, take meat off the chicken and mix all the ingredients. Cool and enjoy!! Do try it, you can serve it as a salad, served with boiled rice, pilaf rice, naan bread, indeed as a sandwich filling...anything you like really. You can refrigerate the leftover and believe me it will definitely taste better. You will need...
  • 1 whole chicken, 1½ kg 
For the chicken
  • 1 tsp salt
  • 1 cinnamon stick
  • 6 black peppercorns
  • Thumb-sized piece of ginger, sliced
  • 1 bay leaf
  • Pinch of saffron strands
For the sauce
  • 200 ml  mayonnaise
  • 300 ml Greek yoghurt (or other thick yoghurt)
  • Chopped fresh coriander
  • 5 tbsp good quality mild mango chutney (I use Geeta's)
  • 50 g soft dried apricots, finely chopped
  • 20g raisins
  • 3 tbsp curry powder
  • 2 ½  tsp Worcestershire sauce
  • 1 tsp freshly grated ginger
  • Flaked almonds, to serve
How to...
  1. Start by cooking the chicken, put the chicken in a large pot, add the salt, cinnamon, peppercorns, ginger. bay leaf and saffron. and cover with water. Simmer gently for about 2 hours 15 minutes (basically boiled chicken cooking time is 30 minutes per 454g (1 pound) plus an extra 30 minutes). When cooked, take the chicken out of the pot and leave to cool completely. When cool, remove the meat off the carcass and make sure that any large meat pieces are chopped into small bite size pieces.
  2. In a small dry frying pan, toast the curry powder (to remove any bitterness) for a about 1-2 minutes. Set aside.
  3. In a large mixing bowl, add the chutney, raisins and apricots and mix well. Now add the toasted curry powder, Worcestershire sauce, grated ginger, mayonnaise and Greek yoghurt and mix well again. Add the chopped coriander & diced chicken and fold in gently. Chill the mixture in the fridge for at least an hour.
  4. Before serving sprinkle with the flaked almonds. Serve with basmati rice or some delicious Peshwari naan bread.
Enjoy!!
R&A

Thursday, 16 October 2014

Baby Pumpkins Stuffed with Camembert, Vegetables & Bacon

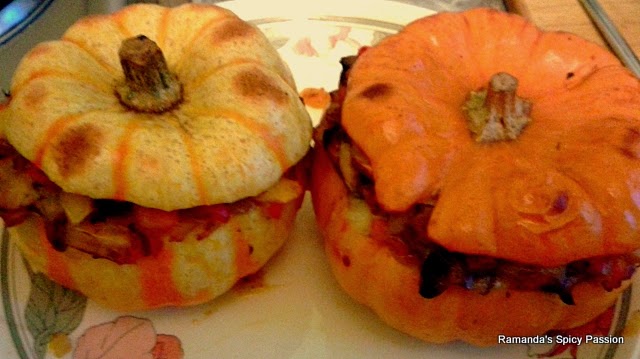
I was at the supermarket and came across these cute baby pumpkins that were called Munchkin pumpkins. I could not resist buying a couple of them and I started thinking instantly on how am I going to cook them. After doing some research I came up with this idea. It turned out incredibly tasty, creamy, salty, sweet, crunchy, crispy...just wonderful. As we were cooking this on a week night I obviously relied on Amanda to help us with the preparation. In fact, to make sure that everything is cooked evenly, everything should be chopped finely and basically the same size. If you want to turn this recipe into a vegetarian one omit the bacon and to turn it vegan, omit the bacon and cheese and use vegetable oil instead of butter. So, Halloween is upon us once again and pumpkin recipes are on high demand, so I will try and come up with a couple more before the spooky night!! Give this a go and you will definitely not be sorry, they are delicious! For two baby pumpkins you will need...
  • 2 Baby pumpkins or small Butternut squash
  • 6 mushrooms, finely sliced
  • 1 carrot, finely diced
  • 1 small onion, finely diced
  • 1 red pepper, finely diced
  • 1 green chilli, finely diced
  • 1 celery stick, finely diced
  • Some pumpkin/butternut squash flesh, finely diced
  • 3 fresh sage leaves
  • Vegetable oil or butter
  • Salt & pepper
  • 175g bacon, finely diced
  • 150g Camembert, sliced
  • Dry sherry

 How to...
  1. Heat oil or butter together with the sage leaves,
  2. Add vegetables and cook covered on medium heat until soft, 
  3. Now remove sage leaves, add bacon and mushrooms and cook on higher heat until mushrooms are wilted and all liquid has disappeared. Add salt, pepper and some dry sherry. Cook, stirring frequently until all alcohol has evaporated. Turn off heat.
  4. Add Camembert slices at the bottom of the pumpkin/squash and top with the filling. Add some extra Camembert on top of the filling, cover with pumpkin lid and bake at 180 deg for 50 minutes to an hour.
  5. Serve hot!!
Enjoy!!
R&A


Sunday, 12 October 2014

Lamb Liver Risotto with Sage & Marsala

This was our second time cooking risotto and as the first time it was a success! It turned out delicious. I love liver and the combination with fresh sage and the Marsala wine that it is cooked with made this recipe taste wonderful. If you do not have Marsala use red wine, the taste will change but will definitely turn out as good. All you need for a perfect risotto is patience, it takes between 20-30 minutes to cook a good risotto and you have to keep stirring all the way to make sure the rice soaks up all the stock. So do have a go at the recipe. For 4 people you will need...
  • 1.5 litres boiling water
  • 2 vegetable stock pots (or cubes)
  • 300g Arborio rice
  • 250g lamb liver, cut into small pieces
  • 6 fresh sage leaves
  • 1 carrot, finely chopped
  • 1 celery stick, finely chopped
  • 1 onion, finely chopped
  • 100ml Marsala wine
  • 2 tablespoons olive oil
  • 60g (½ cup/½ stick) butter
  • 60g grated Parmigiano Reggiano
  • Salt & freshly ground black pepper
How to...
  1. Start by preparing the stock. In a large pan dissolve the stock pots or cubes in the boiling water, bring back to the boil and turn off the heat.
  2. In an other small pan put 50g of the butter and the sage leaves and heat up until the butter has melted. Add the chopped liver, season with salt & pepper, stir well and cook for about 5 minutes stirring occasionally. 
  3. Now add the Marsala to the liver and cook on high heat until all liquid has disappeared. Remove from heat, remove the sage leaves and set aside.
  4. In a large heavy based frying pan or pan (I prefer a frying pan because it spreads the heat evenly during cooking), add the olive oil, carrot, onion and celery and cooked covered on low to medium heat until soft, about 10-15 minutes. 
  5. Now add the rice turn the heat to medium and toast the rice for a couple of minutes stirring continuously
  6. Add a cup of the vegetable stock whilst constantly stirring until all stock has been absorbed by the rice, this takes about 2 minutes. 
  7. From now on, keep adding the remaining stock ½ cup at a time, always adding the next one when the previous one has been completely absorbed by the rice.
  8. After you have used half of the stock, stir in the cooked livers and continue adding the remainder of the stock until all stock has been used. This process took me about 25-30 minutes.
  9. After all the stock is absorbed, stir in the grated parmesan and the last 10g of butter. Serve immediately!!
Enjoy!!
R&A

Saturday, 11 October 2014

Njokki l-forn - Maltese Baked Ricotta Filled Pasta Shapes


When my family visited us this summer, as per usual the food ration package came from Malta with them and this time I told my dad to bring me some Njokki. In Malta we call Njokki (Nyok-key...basically a Maltese version of the word gnocchi) large snail shaped pasta (in fact in Italy they are called Lumaconi-large snails) that originally come from the southern region of  Campania in Italy that in Malta are traditionally filled with a ricotta and egg mixture, soaked in milk, topped with a corned beef-tomato sauce, grated cheese and baked in a hot oven. The result is a very traditional Maltese dish that oozes with cheesiness and tomatoey goodness comes from a very old recipe. My mother always says that is was one of my grandfather's favourite dishes. Preparing this dish took Amanda and myself through a nostalgic trip to our childhood as both of us used to help our mothers and grandmothers fill these pasta shapes and it was definitely one of the highlights of our childhood. If you do not fancy a corned beef sauce you can use any meat you want but just make sure you cook the meat accordingly. You can even leave the meat out for a vegetarian dish. My mother always told me that for this recipe my grandfather used to fill the Njokki and leave them soaking in milk for a couple of hours so as the pasta shells soften but if you are in a rush you can skip this step, we did, and they turned out great!! Now re portions with a large packet of Njokki-Lumaconi we made enough grub for 8 people in fact this was a two-day meal for us (even taking a portion at work with me). You can always freeze the leftovers in tubs. So, for 8 portions, you will need...

1 500g packet Njokki/Lumaconi pasta shapes (see picture)

For the Ricotta mixture

800g fresh ricotta 
3 eggs
½ tablespoons dried or freshly chopped parsley
Salt & freshly ground black pepper, to taste

For the tomato sauce

1 large tin corned beef
2 garlic cloves, crushed
2 tins chopped tomatoes
1 tablespoon vegetable oil
Freshly ground black pepper
750 ml whole milk
Grated mature Cheddar cheese or Edam cheese, to taste

How to...
  1. Start by preparing the ricotta mixture by adding the ricotta, eggs, parsley and seasoning in a large bowl and mix well until you get a consistent mixture. 
  2. When this is done, carefully starting filling the pasta shapes with a teaspoon, make sure you press the filling tightly in the shape (so it won't run away my nanna used to say).
  3. Place the filled pasta shapes in two deep oven trays next to each other (see picture). 
  4. Now gently pour milk until the filled pasta shapes are next to half way submerged. Leave to stand as long as you want (we left them for 15 minutes...we were very hungry). 
  5. Whilst the pasta shapes are soaking prepare the tomato sauce. On a low to medium heat heat the garlic and oil and until garlic turns golden, Add the corned beef and cook for a couple of minutes, add the chopped tomatoes and season well. Simmer for about 20 minutes.
  6. Preheat your oven to 180°C/350°F/Gas Mark 4. 
  7. When the sauce is done, using a ladle or large spoon gently pour sauce of top of the milk drenched pasta shapes. When all the sauce is used shake the dish slowly so as the wonderfully smelling tomato sauce mixes with the creaminess of the milk. Apparently, this is a very important step my mother says.
  8. Top with the grated cheese and bake into the hot oven for 50 minutes or until top is nice golden and pasta shells are done.
  9. Take out of the oven and leave to set for about 10 minutes.
  10. Serve warm.
Enjoy!!
R&A

Monday, 29 September 2014

Mujaddara - Arabic Lentils, Rice & Onions - مجدرة

Well what can we say, I made this dish as a quick and cheap end of the month dinner and we fell in love with it....wow...sooo tasty!!! Simple, easy and quick to make I just hope you do try it. Obviously I added some spices to it but they are optional as this dish is quite simple as I said. This recipe is quite old and in fact, the first recorded recipe for Mujaddara appears in Kitab al-Tabikh, a cookbook compiled in 1226 by al-Baghdadi in Iraq. It was indeed known as a dish for the poor and there is a saying in the Eastern Arab world which says, "A hungry man would be willing to sell his soul for a dish of Mujaddara." I added Advieh (which is not an Arabic spice mix but Persian) but you can add Baharat a very popular Arabic spice mix or none at all. It is completely up to your taste! It is vegetarian, although some variations are served with meat but not this one. You can also make it vegan by omitting the yoghurt at the end. So for 3-4 people you will need...
  • 3 onions, chopped
  • 1 onion, sliced
  • 1 cup brown or green lentils
  • 1 cup long grain rice
  • ½ cups cold water
  • 3 tablespoons vegetable oil
  • 2 teaspoons salt
  • 1 teaspoon Advieh* or Baharat** spice mixture (optional) 
  • 1 teaspoon Harissa paste (optional)
  • Sesame seeds, to garnish
  • Greek (thick) yoghurt, to serve
*To make Advieh spice mixture : Mix 1 teaspoon ground cinnamon, 1 teaspoon ground nutmeg, 1 teaspoon ground rose petals, 1 teaspoon ground cardamom, 1/2 teaspoon ground cumin in an airtight glass jar and store in a dry cupboard.

**To make Baharat spice mixture : Mix 2 teaspoons paprika, 2 teaspoons ground cumin, 1 teaspoon black pepper, 1 teaspoon ground coriander, ½  teaspoon ground cinnamon, ½ teaspoon ground nutmeg, ¼ teaspoon ground cardamom, ¼ teaspoon ground cloves in an airtight glass jar and store in a dry cupboard.

How to...
  1. In a small pan heat 2 tablespoons of oil and fry the chopped onions together with the Advieh or Baharat if using on medium heat stirring occasionally until soft and brown. Set aside.
  2. In a medium (5 litre) pot add the lentils and water, bring to the boil, lower heat and simmer covered for 15 minutes.
  3. Now add the cooked onions, rice, salt and Harissa paste. Stir well and simmer covered on medium heat for 20 minutes, stirring frequently to avoid rice from sticking to the pot. 
  4. In the meantime, heat the remaining oil in the same pan that you cooked the chopped onions in and cook the sliced onion until caramelized (stirring frequently).
  5. When everything is cooked, serve the lentil/rice/onions mixture hot, some caramelised onions on top, sprinkle some sesame seeds and a couple of spoonfuls of yoghurt.

Enjoy!!
R&A