Saturday, 15 June 2013

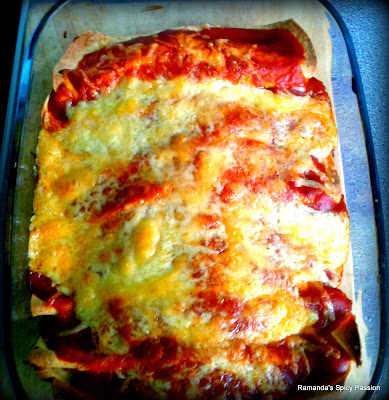
Tex-Mex Beef Enchiladas

We love Mexican & Tex-Mex food and in fact it features quite frequently  on our menu. (More like an obsession haha. We make our own tortillas too using our tortillera (tortilla press). Burritos, Enchiladas and  Tacos are certainly one of our favourites. I love very hot food and Amanda likes it medium, so I always add more chilli sauce to my tacos. Enchiladas are so delicious as they are baked so you have the delicious golden melted cheddar, that bit of crispy tortilla...oh dear...drooling right now...we love serving them with sour cream and fresh coriander (cilantro) leaves as they add a fresh contrast to the chilli. So give them a go...you will love them...you will need...
  • 400g Lean beef mince
  • 1 red bell pepper, chopped into 1 inch pieces
  • 8 corn or wheat tortillas
  • 100g mature cheddar, grated
  • 1 tbsp vegetable oil
  • 1 teaspoon mild (eg. Ancho) or hot (eg. Habanero) chilli powder
  • 2 teaspoons sweet paprika
  • 1 teaspoon ground cumin
  • 1 teaspoon dried Mexican oregano (regular oregano will do)
  • ½ teaspoon garlic powder
  • Sea salt & ground black pepper.
  • 200ml water
For the sauce
  • 300ml passata
  • 1 garlic clove, crushed
  • Salt & pepper
  • 1 tsp ground cumin
  • 1 tsp oregano
  • 1 tsp hot paprika
  • 1 tsp vinegar
  • 1 tsp vegetable oil
To serve
  • Sour cream
  • Chopped coriander leaves
How to..
  1. Start by preparing the sauce. On low heat, heat the oil and add the garlic, cumin, oregano, paprika and stir well until fragrant. About 45 seconds. Add the passata, vinegar and simmer for about 10-15 minutes. Set aside. Preheat the oven to 200°C.
  2. In a shallow pan on high heat, heat some vegetable oil and add the lean beef mince and brown well until dry. Add the bell pepper, the chilli powder, cumin, garlic powder, sweet paprika, oregano and the water and cook until mixture dries out. Turn off the heat.
  3. Heat the tortillas in the microwave for 45 seconds. Fill the tortilla with the mince mixture, roll them up like pancakes and line them up in a rectangular oven dish. Pour the sauce on top and grate the cheese. Put in the oven and bake for about 20 minutes.
  4. Serve with some sour cream and chopped coriander leaves.
Enjoy!!
R&A

Monday, 10 June 2013

Amanda's Potato Salad

I remember when back in Malta we used to do a lot of BBQ's at our place or our friends' place and we (well Amanda) always used to prepare this delicious potato salad for everyone. It was our specialty and everyone loved it. My brother was one of its massive fans. Needless to say that it will be a great accompaniment to every BBQ dish whether it's a delicious steak or some crispy grilled veggies. It also can be made up to to 2 days in advance and stored covered tightly in the fridge. Give it a go and you will definitely try it again! You will need...

  • 500g potatoes
  • 1 hard-boiled egg, chopped
  • 180ml (1/2 cup) mayonnaise
  • 2 tsp white vinegar
  • 1 small white onion, finely chopped
  • 1 tbsp chopped fresh parsley

Method
  1. Peel the potatoes and chop them up into equal pieces (so they cook evenly). Bring a pan of water to the boil and add the chopped potatoes and simmer for about 5 minutes or until a toothpick or skewer goes through. Drain, set aside and let it cool down to room temperature (we spread them on a tray and put them by an opened window to speed up the cooling process).
  2. In a blender or food processor, add the mayonnaise, egg and vinegar and blend until you get a smooth mixture. Transfer it into a large bowl. Add the potatoes and chopped onion to the large bowl and mix slowly until the all the potatoes are covered in the mayonnaise mixture.
  3. Sprinkle with the chopped parsley just before serving.

Enjoy!!
R&A

Sunday, 9 June 2013

Iraqi Lamb & Aubergine Stew - Merqat Kharuf Baytinjan - خروف العراقي والحساء الباذنجان

Yet another Arabic recipe. This sweet and tangy stew is delicious. It comes from Iraq and the two ingredients that definitely make the difference are the pomegranate molasses also known as pomegranate sauce and the Baharat spice blend. The pomegranate molasses is basically reduced pomegranate juice and you can buy it from Middle Eastern markets/shops or the world food aisle at the supermarket (in England). The Baharat spice blend is a complex spice blend that varies from family to family, shop to shop and/or country to country that can be bought online but we do our own. We also used fresh local lamb bought from our butcher as it is tastier and more tender but frozen lamb would do just fine. So do give it a go. You will need...
  • Coarse salt
  • 1 large Aubergine (about 600g), sliced crosswise 1/2 inch thick
  • 1/4 cup (60ml) plus 2½ tbsp vegetable oil
  • Half leg of fresh lamb, cut in large pieces
  • Freshly ground pepper
  • 1 large white onion, chopped
  • 1/2 cup (about 120ml) pomegranate molasses/sauce
  • 1/2 cup (about 80g) dried yellow split peas, soaked in cold water for 12 hours
  • 4 dried red chillies
  • 2 tsp baharat spice blend (see recipe below)
  • 2 tsp ground coriander
  • 8 small pita breads, warmed, to serve
Baharat spice blend 
  • 2 tsp smoked paprika
  • 2 tsp ground cumin
  • 1 tsp freshly ground black pepper
  • 1 tsp ground coriander
  • 1/2 tsp ground cinnamon
  • 1/2 tsp ground nutmeg
  • 1/4 tsp ground cardamom
  • 1/4 tsp ground cloves        

Mix the spices in an airtight jar and store in a dry and dark place.

Method

1.  Put the aubergine cubes in a colander & sprinkle with the rock salt & leave for about 30 minutes until the bitter juices run out.
2.  Meanwhile, in a large pot, heat 2 tablespoons of the oil. Season the lamb with salt and pepper and cook over high heat, turning once, until well browned, about 5 minutes per side. Add the onion and cook over moderate heat, stirring, until softened, 10 minutes. Add 3 litres of water, the pomegranate molasses, split peas, dried chillies, baharat and coriander and bring to a boil. Reduce the heat to low and simmer for 45 minutes, skimming and stirring a few times.
3.  Rinse the aubergine and pat dry. In a large non-stick pan, heat 11/2 tbsp of the oil. Fry the aubergine in 3 batches, adding more oil if necessary. Add the aubergine to the lamb and simmer over low heat, stirring, until the lamb is tender, about 45 minutes.
4.  Transfer the lamb onto a plate and remove the meat from any bones and cut into 1-inch pieces. Boil the stew over high heat, skimming, until the liquid has reduced to about 750ml, this will take about 40 minutes or less.
5.  Return the lamb to the stew, season with salt and pepper and give it a good stir. Serve with the pita bread or boiled rice.

Enjoy!!
R&A

BBQ T-Bone Steak with Potatoes & Cherry Tomatoes

BBQ season is upon us! In my honest opinion nothing beats a good cut of beef on the BBQ. T-Bone steak is  my favourite cut because being on the bone, leaves it so succulent and it basically it's a combination of beef fillet and sirloin steak. When I cook it, I usually do not serve a lot with it a lot of stuff but this time I decided to marinate it and accompany it with a quick potato & cherry tomato 'stir-fry'. We used a good quality BBQ sauce to marinade the steak in, which gave it its smoky caramelised taste. SO if you feel like something different on your BBQ, give this a go! :) For 2 people you will need...


  • 2 T-Bone steaks, about 500g each
  • Good quality BBQ sauce or marinade


For the stir-fry


  • 1 large potato, diced and parboiled
  • A handful of cherry tomatoes
  • 2 tbsp BBQ sauce
  • 2 sprigs of fresh thyme or 1/2 tsp dried thyme
  • Salt & pepper
  • 2 Tbsp vegetable oil


Method


  1. Marinate the steak the day before and leave it in the fridge. The longer the marination time the better the taste.
  2. Prepare the stir-fry. In a wok or a deep frying pan, heat the oil and add the potato, cherry tomatoes, thyme and salt & pepper to taste. Stir fry for a couple of minutes and lower the heat. Add the BBQ sauce and toss to coat the veg. Mix well and cook for another couple of minutes.
  3. You can serve this stir-fry hot or cold.
  4. Before cooking the steak, get the steak out of the fridge and leave to rest, it is important that before cooking the steak gets to get to room temperature so it cooks evenly! Fire up the BBQ or grill pan if you like and oh high heat, cook the steak to your liking. If you have a meat thermometer, rare meat is cooked at about 48°C, medium rare is cooked at about 51°C and medium at about 54°C. I strongly suggest you do not cook the cut of meat well done as it will dry it out. When done cooking let the steak to rest for 5-10 minutes.
  5. Serve with the hot or cold stir fry!!


Enjoy!!
R&A

Monday, 3 June 2013

Zorza Gallega - Marinated Diced Pork Loin Galician Style

Zorza is a very famous dish in the Northwest Spanish region of Galicia. Basically, it is similar to the meat mixture used in the production of chorizo. One of the differences is that for Zorza the meat is chopped in coarser pieces. The impressively delicious taste of this pork dish comes from the long marination period. It is usually left to marinade for 24 hours in the fridge. The ingredients are quite basic but I did use proper Spanish pimentón (paprika) which gives the dish its distinctive red colour and above all a delicious flavour. If not available you can use normal paprika but make sure it is fresh as 'old' paprika tends to lose its flavour. Worth mentioning also the fact that Zorza is traditionally served with deep fried diced potatoes and fried eggs. One thing is for sure that your family and friends will love it no matter how it is served. We recently prepared a lot of it and we took it to a Spanish fiesta and our friends (Spanish and not) loved it and the Zorza was the first of the tapas to disappear from our table!! So do give this a go. The amounts below are for 6 people (if served as a meal) or 10 people or more if served as a range of tapas!!
  • 1 kg pork loin, chopped into small dice (about 0.5 cm cubes)
  • 3 tbsp sweet pimentón (paprika)
  • 1/2 tbsp hot pimentón (paprika)
  • 4 garlic cloves, crushed
  • 1 tbsp dried oregano
  • 4 tbsp olive oil
  • 2 tsp fine sea salt
  • A large zip-lock bag
TWO TIPS
  1. Make sure the meat is cut in equal pieces so as it cooks evenly.
  2. If using 1 kg of meat cook it in two batches.
How to...
  1. Put the meat and all the remaining ingredients in a large zip-lock bag, partially close and let all the air out. Now close the bag entirely and start mixing the meat and the ingredients by gently massaging the back. Keep doing this for about 10 minutes until the meat turns red and all the other ingredients are mixed in.
  2. Put in the fridge and leave to marinade for 24 hours.
  3. When it's time to cook your Zorza, heat up a wok or a  shallow pan on high heat and carefully start stir-frying the Zorza quickly, make sure your stir continuously to avoid it from sticking to the pan. Zorza takes less than 10 minutes to cook.
  4. Serve warm with deep fried potatoes (cut the same size of the meat) and a fried egg per person. You can also put in a bowl for everyone to help yourself when you do your Spanish fiesta. Tapas are awesome!!!
Enjoy!!
R&A

Sunday, 2 June 2013

Chicken Marsala

It was our first time doing this recipe and we loved it, actually Amanda adored it. The recipe, is presumably Southern Italian, considering it uses Marsala wine, an exceptionally wonderful aromatic fortified wine that hails from the Italian city of Marsala, Sicily. It is in the same line of Sherry, Madeira and Port and its creation as a fortified wine dates back to the late 18th century. Anyhow, this recipe is very quick and easy to prepare, quite foolproof I must say. To keep the chicken breast moist and succulent we turned the chicken breast into cutlets. This makes the chicken breast cook quicker. So give it a go and am quite sure you will love it :) You will need...
  • 4 large chicken breasts or 8 drumsticks
  • 400g white mushrooms, sliced
  • 4 spring onions, sliced
  • 120ml (1/2 cup) Marsala wine
  • 100ml single cream
  • Olive oil or vegetable oil
  • Salt & pepper
How to...
  1. Heat some oil on medium heat in a large frying pan and cook the chicken turning occasionally, for 10 minutes. Add half of the Marsala and cover with a lid. Turn twice until they are golden from both sides and meat juices are running clear. This process takes about 15-20 minutes.
  2. Now take the chicken out of the pan and keep warm (we leave them in the oven on the lowest temperature possible (which usually is about 50-60°C). Add the mushrooms, spring onions and the rest of the Marsala. Cook until the mushrooms wilt down (make sure you do not over cook them as they will turn into a sloppy mush), this will take around 5 minutes. Keep stirring frequently.
  3. Turn off the heat and stir in the cream. 
  4. Time to plate up, put a chicken on a plate (make sure they are still warm), top up with a large spoonful of mushrooms and pour over some sauce. Serve with roast veg & mashed potatoes.
Enjoy!!
R&A

Saturday, 1 June 2013

Nicoise Salad - Salade Niçoise


Salade niçoise comes from southern France and it is one of our favourite salads. The main ingredients that make up this wonderful salad are tuna and anchovies. We always try to find fresh tuna but sometimes here in England is hard to find and when you find it, it can be very expensive. So we use good quality canned tuna fillets. Also it is usually made with niçoise olives, which are small black olives but any small black olives will do if these are not available. As per every salad there is a myriad versions of the actual recipe so it very hard to find out exactly what goes in a proper salade niçoise. Cucumber, preserved artichoke hearts, radishes, new potatoes, raw green peppers, sweet shallots are all different vegetables that are used...depends where you get the recipe from! Hard boiled eggs are a must as well. Our version for a substantial meal for two people is as follows...

For the salad
  • About 100g mixed salad leaves
  • 2 ripe but firm tomatoes, sliced
  • 8 new potatoes, boiled
  • 2 hard boiled eggs, quartered
  • A handful of black olives
  • 100g French fine green beans, cooked
  • 2 tuna steaks (about 150g each, grilled to your liking and left to cool down slightly) or 2 cans of tuna chunks
  • 8 anchovy fillets
For the dressing
  • Red wine vinegar
  • Extra virgin olive oil
  • Salt & pepper
  1. This has to be the easiest method ever. Just arrange all the salad ingredients onto the serving plates, leaving the tuna and anchovies for last.
  2. Mix the dressing ingredients in a small bowl. The amounts are entirely up to you.
  3. Dress the tuna and salad leaves.
  4. Serve.

Enjoy!!
R&A

Wednesday, 29 May 2013

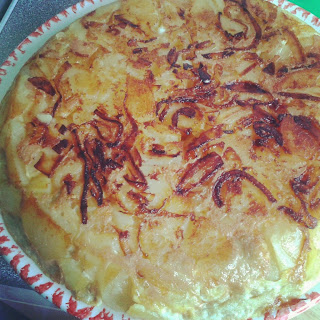
Tortilla con Patatas - Spanish Tortilla

Spanish tortilla easily makes it my top 10 easy delicious recipes of all time. My mum used to do this for us as a snack after we came back from school. All you need is 3 ingredients, eggs, potatoes and onions. It is definitely a Spanish staple and one of the most famous dishes in Spain. In fact nearly at the start of every Spanish meal there is a tortilla cut into small portions for everyone to nibble on. :) Try it out and you will definitely do it again...the ingredients listed below are for 4 people (or more if served as an appetiser).


  • 8 large eggs, beaten
  • 2 red onions, sliced
  • 10 small potatoes, parboiled and sliced
  • Olive oil, for frying

Method


  1. Heat about 1 cm of olive oil in a large deep frying pan and fry the onion slices until soft and transparent.
  2. Add the sliced potatoes and cook for about 5-10 minutes.
  3. Lower the heat and pour the beaten eggs on the potato/onion mixture. Make sure you distribute the eggs evenly.
  4. Cover and cook gently until the eggs are set. If eggs are still a bit runny on top, put under a hot grill for 30 seconds or so.
  5. Now here comes the tricky bit, get a large serving plate (we use a large pizza plate) and put it on top of the pan. Holding the plate and pan tightly invert them upside down (use a tea towel to hold the pan as it could be hot) so as the tortilla transfers itself to the plate. 
  6. Serve warm or cold. :)


Enjoy!!

R&A


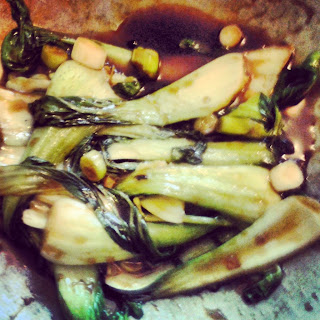
Pak Choi with Sichuan pepper & Oyster sauce

I would like to share this quick recipe that I prepared at 6 o'clock in the morning as part of my pack up. It is super quick and if like us, you stock up on Asian ingredients, it will be done even faster. It is spicy so you can adapt the ingredients to your taste, you can eat this as part of a typical Chinese communal meal or as a meal on its own with boiled rice. Give it a go and you will try it again. Sichuan pepper can be found in Asian stores or online. These ingredients are for 1 person but you can multiply the ingredients...
  • 2 baby Pak Choi, leaves split in half lengthwise
  • 1 red chilli, sliced
  • 2 garlic cloves, finely chopped
  • 1/2 tsp fresh ginger root, minced (or 1/4 tsp ground ginger)
  • 5 Sichuan peppercorns
  • 1 star anise
  • 1 tsp dark soy sauce
  • 2 tbsp oyster sauce
  • 1 tbsp vegetable or groundnut oil 
  • 3 spring onions, sliced


Method

  1. In a wok heat the oil and fry the ginger, chilli, star anise, garlic and Sichuan peppercorns until fragrant, about a minute. (Make sure you do not burn the garlic)
  2. Add the Pak Choi, soy sauce and oyster sauce and stir fry for a couple of minutes until the leaves are partially wilted but not soggy.
  3. Turn off the heat and sprinkle the chopped spring onions.
  4. Remove and discard the star anise and serve hot!!


Enjoy!!
R&A

Farfalle with Courgettes, Aubergines & Anchovies

We loved this pasta dish. It is quite quick and easy to prepare...proper foolproof! Aubergines and zucchine are two of my favourite vegetables, I could eat them with anything, anytime. The anchovies (as per usual) disappear whilst cooking but they enhance the flavour of this dish substantially. Good quality olive oil finishes off this dish impeccably. So give it a go.You will need...

  • 350g farfalle (or other short pasta)
  • 1 aubergine (about 400g), sliced into strips
  • 2 large zucchine (about 400g), sliced into strips
  • 3 tbsp olive oil
  • 1 clove garlic, crushed
  • 1 red chilli, sliced
  • 1 onion, chopped
  • 1 60g can anchovy fillets in olive oil
  • Grated Parmesan cheese, to serve (optional)

Method

  1. Drain the oil from the anchovy into a large pan and heat it up.
  2. Cook the onion, chilli and garlic until onion is soft and transparent. Add the zucchine and aubergine slices and cook until they are soft.
  3. In the meantime cook the pasta and drain.
  4. Into the pan with the veg, stir in the anchovies.
  5. Add the pasta and 3 tbsp olive oil and stir carefully (not to break the pasta).
  6. Serve warm with grated Parmesan cheese.

Enjoy!!
R&A

Monday, 27 May 2013

Cottage Pie

The term Cottage Pie has been around for centuries and the actual name is known to have been around since 1791. Incidentally, this year was when potatoes started being introduced as an edible crop which was available to the poor.  Initially made with leftover meat, this pie took its name from the meaning of the term cottage, which actually means a humble residence for farmers. (Ref: Wikipedia) Cottage Pie has been a favourite in our family for decades and have been loving it since I was a child as my mum prepared it frequently. So this is our take on a classic British dish. Needless to say it is very easy to prepare, I mean the meat mixture is not rocket science and boiling potatoes is quite a low ability task. So this recipe does go with the easy ones. It is the ultimate comforting food and you will definitely ask for seconds. You will need...(this amount of ingredients will make a medium pie)

For the meat mixture
  • 500g lean beef mince
  • 1 onion, finely chopped
  • 2 carrots, finely diced
  • 1 celery stick, finely diced
  • 250ml prepared gravy (I use Bisto Best), this acts as a thickening agent
  • ½ teaspoon dried mixed herbs
  • ½ teaspoon hot paprika
  • ½ tablespoon tomato paste
  • 1 beef stock pot/cube
  • Ground black pepper, to taste
  • 1 tablespoon Worcestershire sauce (or to taste)
  • 25g butter, for frying
For the mashed potatoes
  • 750g potatoes, boiled
  • 40g butter
  • A splash of milk, (you want the mash to be quite firm)
  • 1/2 tsp ground nutmeg (optional)
  • Sweet paprika, to garnish
  • Ground black pepper, to garnish
How to...
  1. Start by preparing the mashed potatoes. Boil the potatoes and add the butter, milk and ground nutmeg (if using) and mash to the desired consistency. Set aside.
  2. Prepare the meat mixture. In a large frying pan, on a moderate heat, heat the butter until it melts and starts sizzling, then add the onions, carrots, celery and mixed herbs. Cover and cook, stirring frequently, for about 10 minutes or until onions, carrots & celery are soft. Add some black pepper if you want to at this stage (We do!).
  3. Add the beef mince and stir in to mix in with the vegetables. Now add the tomato paste, Worcestershire sauce, beef stock pot/cube more black pepper, hot paprika and cook uncovered until the meat is done and all the liquid has nearly gone.
  4. When meat is cooked add the prepared gravy and stir in well. Lower the heat and simmer until the meat mixture for a minute or two. 
  5. In the meantime preheat the oven to 180°C.
  6. To assemble your cottage pie, you just pour the meat mixture in a deep pie or casserole dish, level the mixture withe back of a spoon and cover with the mashed potato. Use a palette to level the mash on top of the meat mixture. Try and seal it well to prevent it from leaking. You can also prick some holes into the mashed potato topping so as steam can escape.
  7. Sprinkle with sweet paprika and ground black pepper and bake in the oven for about 25 minutes.
  8. Take it out of the oven and leave to cool down for about 15 minutes. It is now ready to serve. 
Enjoy!!
R&A

Friday, 24 May 2013

Sfiha (Arabic Pizza) صفيحه باللحمه

This recipe which hails from the Middle East, namely Lebanon, Syria and Palestine, is one of my favourites. It is also known as Arabic Pizza. The mixture of spiced meat is just to die for. These are basically like small meat pizzas with spiced meat. As base we use bread dough which turns nice and fluffy when cooked but ready-made pizza dough is fine. The meat mixture was genuinely made with ground mutton but nowadays it is made with ground lamb or ground beef or a mixture of both. So do give this recipe a go as everyone will love it. You will need...


  • 600g ready-made bread or pizza dough
  • 500g ground lamb or beef
  • 2 onions, finely chopped
  • 1 tsp ground allspice
  • 1 tsp ground cinnamon
  • 1 tsp mixed herbs
  • 1 tsp fine sea salt
  • 1 tsp ground black pepper
  • 3 tbsp tomato paste
  • 2 tbsp vegetable oil
  • 70g pine nuts
Method

  1. Preheat the oven to 230°C.
  2. Roll the dough into two baguette shaped rolls and cut it into slices (about 1 inch thick per slice) or see Note below. Set the slices aside and leave them to rise for about 15 minutes.
  3. In the meantime, prepare the meat mixture. Start by frying the onions in the heated oil until soft and transparent, about 5 to 10 minutes.
  4. When onions are done, add the meat, allspice, cinnamon, mixed herbs, salt and pepper and cook until all meat cooked through. Make sure that the meat mixture is quite dry. Mix in the tomato paste thoroughly and set aside. Let cool slightly.
  5. Now to make the Sfiha, get the dough slices and put into an oiled oven dish next to each other. Press each slice in the centre with your fingers (this is where you will put the meat mixture).
  6. Spoon the mixture in the centre of the dough slices leaving some space from the end of the slice (just like a pizza).
  7. Sprinkle some pine nuts on each Sfiha and put into the oven for about 15 minutes or until cooked.
Note: You can always make a large one or a couple of medium sized ones, It is entirely up to you.

Enjoy!!
R&A


Thursday, 23 May 2013

Gujarati Potato Curry ગુજરાતી બટાટા કરી

This recipe comes from Gujarat, India which is a state in western India. Gujarat cuisine is mostly vegetarian even if there is an extensive coastline from which lot of seafood is harvested. This dish is completely vegetarian andcan be served on its own as a main dish or as a side dish with a pulse dish and rice. Amanda & I enjoyed this with warm naan bread and natural yogurt to contrast the fieriness of the chillies. Obviously, you can adjust the amount of chillies in the recipe to your own taste but do try to find and use all the ingredients so as the produce a genuine Gujarati taste!! Give it a go and your taste buds will definitely come alive!! For 4 people (as a side dish) you will need...


  • 450g potatoes, cut in 1 inch cubes
  • 2 tbsp vegetable oil
  • 1/2 tsp cumin seeds
  • 1/2 tsp black mustard seeds
  • 1/4 tsp asafoetida
  • 1/2 tsp ground turmeric
  • 1/2 tsp ground cumin
  • 1/2 tsp ground coriander
  • 1 tsp fine sea salt
  • 1 tsp red chilli powder
  • 3 fresh red chillies, chopped
  • 2 tsp tomato paste
  • 450ml water
To serve
  • Fresh coriander leaves, chopped
  • Naan bread
  • Natural yoghurt
Method

  1. Heat the oil on high heat in a wok or large pan and add the cumin seeds, black mustard seeds and asafoetida. Cook for a few seconds until fragrant and mustard seeds start popping.
  2. Add the potatoes, turmeric, ground cumin, ground coriander, salt, chilli powder, chopped chillies and tomato paste. Stir continuosly and cook for around 5 minutes.
  3. Add the water and bring to the boil. Lower the heat and simmer gently for around 20 minutes.
  4. Slowly tip the curry in a warm serving dish, garnish with the coriander leaves and serve.
  5. Add the yoghurt to taste after plating. Warm the Naan breads and enjoy!!
Enjoy!!
R&A

Saturday, 18 May 2013

Salmon Burger served with Fried Onion

I got this recipe from a magazine in Spain last summer. We tried it and it is now a must every other week :) The result was a simply, delicious, succulent burger that was clearly out of the norm. So easy to prepare and unfortunately so fast to disappear from our plates :) We used the freshest salmon fillets that we could find, which here in Britain is not that hard to find as Scottish salmon is absolutely wonderful. If cannot find fresh you can still use frozen salmon fillets, you will still obtain good results. If you do not like gherkins you can use 1 tablespoon capers instead. The secret is not to overcook the salmon as it tends to dry out. We served it with a side of wild rocket leaves, to add some crunch!! So give it a go...you will certainly do it again...for 4 salmon burgers you will need...


  • 4 burger buns
  • 250g fresh salmon fillet
  • 2 gherkins, finely chopped
  • Juice of 1/2 lemon
  • 1 onion, sliced & fried in olive oil
  • Olive oil
  • Mayonnaise
  • Salt, to taste
  • Wild rocket leaves, to serve

Method


  1. Make sure the salmon fillet is cleaned from all bones and mince with a knife.
  2. Put the salmon mince in a bowl, add the chopped gherkins (or chopped capers), salt, lemon juice and mix well.
  3. Shape the mixture into 4 patties and in a frying pan on low heat fry in olive oil until brown on both sides. Make sure they are on low heat so they do not dry out.
  4. Split the buns in half and toast slightly under a grill.
  5. To prepare you juicy salmon burger, put a dollop of mayo, a salmon burger, some fried onion. Serve warm!
Enjoy!!
R&A

Tuesday, 14 May 2013

Fried Eggs with Garlic and Sumac البيض المقلي مع الثوم والسماق

Whoever knows me knows that I am not a big fan of bland and common food. So even when I fry my eggs for a quick brunch I prefer to experiment or find a recipe!! This recipe is a quick Arabic recipe in which I use the spice Sumac. Sumac is the berry of a bush that grows in the Mediterranean region, mostly East Mediterranean  It has a Burgundy red colour and a citrus flavour. It really gives dishes a distinct delicious flavour...it goes well with fish dishes and indeed eggs! I buy mine from Asda but it is easily available to buy online. Obviously, this recipe is as easy as frying an egg, so go on give it a go, best served warm with some bread with which you can dunk into those beautiful, delicious and tasty egg yolks. For 2 persons you will need...

  • 4 large eggs
  • 8 garlic cloves, sliced
  • 2 tbsp olive oil
  • Sea salt, to taste
  • 2 heaped tsp ground sumac
  • 1 tsp ground cumin
Method

  1. In a shallow frying pan heat the oil on low heat and when hot, add the garlic. When the garlic is golden, lower the heat even more and crack the eggs in the pan.
  2. Add the sumac and salt and when the egg sets, turn off the heat and sprinkle with the ground cumin. 
  3. Serve warm with some nice crusty bread.
Enjoy!!
R&A 

Saturday, 11 May 2013

Simple Lentil Curry with yoghurt दाल के साथ करी

I do love Indian food but I do not cook enough of it which is a shame as I am obsessed with spices. Spices just bring your taste buds to life! This lentil curry is very simple and fast to prepare. It is completely vegetarian, after all most of Indian cuisine is vegetarian! We used canned lentils as they are delicious and most of all it will reduce the preparation time. The natural yogurt gives this dish a very creamy texture but it is very important to add the yogurt at the end of the cooking time as this will separate if you heat it for a long time! If there is a base that every Indian curry starts with, this is onion paste and garlic paste and in this curry I use slices onions instead but I do mash my garlic cloves in my awesome mortar and pestle :) We served it with warm chapattis but you can also serve it with pilau rice or plain basmati rice instead. So give it a go!! For 4 people you will need...


  • 2 onions, sliced
  • 6-8 garlic cloves, mashed into a paste or finely chopped
  • 4 tbsp ghee or vegetable oil
  • 2 tsp turmeric powder
  • 2 tsp ground cumin
  • 2 tsp medium curry powder
  • 8 green cardamon pods
  • 4 tbsp tomato paste
  • 2 large cans green lentils, rinsed and drained
  • 200ml vegetable stock, boiling hot
  • 100ml natural yoghurt
  • Chapattis, to serve
Method

  1. Heat the ghee or oil in a wok or frying pan on medium heat. Add the onions and garlic and fry until soft and transparent.
  2. Add the spices and cook until fragrant, this takes approximately 5 minues. (Make sure you stir frequently).
  3. Now add the tomato paste, lentils and the stock. Bring it to the boil and simmer for 15 minutes or so. Make sure the mixture is not too dry.
  4. Take off the heat and stir in the yoghurt.
  5. Ladle into bowls and serve with warm chapattis.
Enjoy!!
R&A

Super Moist Apple Pudding

Who doesn't love a moist cake? This was definitely one of my favourite desserts/puddings when I was younger. My mum used to do this and I obviously always went back for more :) It's just gorgeous, the secret for its moistness is the use of vegetable oil instead of butter and also the fact that you shake the 'wet' ingredients vigourously before then adding them to the 'dry' ingredients. We had it warm with whipped cream and sprinkles but this pudding can be served warm or cold with whatever topping you prefer. So give it a go and am quite sure you will do it again!! You will need...


  • 6 medium sized apples, cored and sliced
  • 1 teaspoon ground cinnamon
  • 1 cup (about 200g) sugar + 1 extra tablespoon
  • 2 cups (about 260g) plain flour
  • 1 teaspoon baking powder
  • 1 cup (about 250ml) vegetable oil
  • 2 medium eggs
  • 1 teaspoon vanilla essence
  • Whipped cream & sprinkles, to serve
  1. Preheat the oven to 180°C.
  2. Put the apples in a large mixing bowl and sprinkle with the cinnamon and the 1 tablespoon of sugar. Add the flour and baking powder to the apples. Give the apple mixture a quick turn with a wooden spoon.
  3. In a shaker (one of those plastic container that bodybuilders use to prepare their protein shake in) or if not available you can use a large glass jar with lid, put the oil, 2 eggs, vanilla essence, 1 cup (about 200g) sugar and shake well to incorporate the ingredients well. 
  4. Add the oil/sugar mixture to the apple mixture and stir well with the wooden spoon. Make sure you stir well so as you mike the dry mixture with the wet mixture. You can always put everything in a large plastic bowl with a lid and shake everything in there!!!
  5. When mixed well, pour the mixture in a 23cm cake tin and put in the centre of the oven for around 30 minutes.
  6. To test if it is cooked through insert a metal skewer or knife in the centre part of the cake and if it comes out clean it is done! Leave to set for about 10 minutes and serve with cream and sprinkles!
Enjoy!!
R&A

Friday, 10 May 2013

Wild Rocket & Feta Cheese Salad with a kick!!

Hello all, we are back :) It might be old age [I am 34 years old you know] but lately I am getting very fond of salads. In fact, I created this simple salad as a quick lunch to take with me to work. It turned out so delicious that I wanted to share the recipe with you. It is incredibly tasty and very easy to prepare. It is basically made up of ingredients that you can find in the Mediterranean diet like olives, rocket etc. You can even add some dry fried diced bacon with it! I chose some delicious Balsamic vinegar from Modena as dressing but feel free to dress it with whatever you like. A drizzle of good quality extra-virgin olive oil will definitely make it even tastier!! I enjoyed it with some crusty bread...loved mopping up the balsamic vinegar!! So if you need a quick lunch or use it as an accompaniment to a meat dish, give this a go...for 1 person you will need...

  • 35g Wild rocket leaves, washed
  • 8 small plum tomatoes or cherry tomatoes
  • 100g feta cheese, diced
  • 2 gherkins, sliced
  • 8 large Olives
  • 1 fresh red chilli pepper, sliced (optional)
  • Pimentón [Spanish paprika], to taste (if not available, regular paprika would do)
  • Oregano, to taste
  • 4 Basil leaves, hand torn
  • Balsamic vinegar, for the dressing


NB: If you do not like it that spicy, devein and deseed the chilli before adding to the salad.

Method

  1. Just put all the ingredients (apart from the balsamic vinegar) in a bowl and toss well to mix them up well.
  2. Plate up and dress with the balsamic vinegar just before eating.
  3. Serve with some crusty bread or even breadsticks (grissini).
Enjoy!!
R&A


Saturday, 29 December 2012

African Beef & Peanut Stew


Hello all...Hope you had a very good and bountiful Christmas. Sorry for not posting anything for a while but we have been very busy for a couple of months (still am). I was asked to share this recipe and I am so glad they did as this is one our favourite stews EVER!! I have inherited this recipe from my mum...she has been doing it since the 70's..oh the taste of peanuts and the hint of spice mmmmm!!!No wonder it has been a favourite in our family for ages. Mum always cooked it traditionally, that is, in a casserole. I always cooked it in a casserole as well until we got our slow cooker...it is very easy to prepare...you need (HAVE) to serve this with mashed potatoes!!! We are quite sure that once you have tasted this stew you will definitely ask for a second helping :) So, give it a go and do not worry if you do not have a slow cooker, we will tell you the cooking times for both. You will need...

  • 800g diced stewing beef
  • 2 large onions, chopped
  • 4 medium carrots, sliced
  • 1 clove garlic, finely chopped or crushed
  • 25g butter + 1 tbsp olive oil, for frying
  • 2 level tablespoons tomato puree 
  • 1 large bay leaf
  • Pinch ground ginger
  • Pinch ground cloves (NOT TOO MUCH as it will ruin the dish)
  • 1/8 teaspoon  cayenne pepper (or to taste)
  • Salt & pepper
  • 1 tablespoon red wine vinegar (any other vinegar will do)
  • 400ml beef stock (or 2 cubes in boiling water)
  • 2 or 3 tablespoons crunchy peanut butter
Method
  1. In a large pot heat the butter and olive oil together until sizzling. Add the beef and vegetables (onions, carrots and garlic) and fry for a few minutes, stirring frequently.
  2. Add the tomato puree, ginger, cloves, cayenne pepper, salt & pepper, bay leaf, vinegar and stock and give it a good stir to blend all the ingredients.
  3. That's it!! Now transfer to your casserole or slow cooker. So, if you are cooking it in a traditional oven, this has to be preheated to 180°C and then cook the stew for 2 or 2 and a half hours. If using a slow cooker just transfer everything in the slow cooker and cook on high for 5 hours or on low for 8-9 hours.
  4. When done, take out of the oven or remove slow cooker lid and stir in the peanut butter, at this point it is up to you how much peanut butter you add...we always add 3 tablespoons as we love it taste and crunchy texture that it gives the stew. Make sure you stir it in well.
  5. DONE!! Now serve with mashed potatoes and maybe some peas!!
Enjoy!!
R&A

Sunday, 11 November 2012

Pumpkin Ravioli with Sage Butter - Ravioli alla Zucca con Burro e Salvia


During pumpkin season, I am always looking for new recipes as it is always so cheap. It is delicious, you can use it in both sweet and savoury dishes. This time I made these ravioli from scratch (you can always buy some sheets of fresh pasta if you are not so adventurous or short of time). I also utilized a ravioli making gadget thingy that my dad used to use in the 1970's. They are very easy to prepare and they are served with sage butter...nothing else...simple as you like! So, try them out as they are delicious...for about 24-30 ravioli you will need...


For the pasta dough
  • 300g ''00'' plain flour
  • 3 free range eggs
  • Some semolina flour
For the filling
  • 450g pumpkin, deseeded, peeled, cut into cubes
  • Pinch of mixed spice
  • 1/2 teaspoon ground ginger
  • 1/4 teaspoon ground nutmeg
  • Salt & pepper, to taste
  • Olive oil
For the sage butter
  • 75g unsalted butter
  • 15/20 small sage leaves (or 2 teaspoons dried sage)
  • 1 tablespoon lemon juice
  • Salt & pepper, to taste
How to...
  1. Start by preparing the dough. Put the flour in a large mixing bowl and make a well in the middle, add the eggs and mix well with a fork. Tip the bowl contents on a well floured surface and knead the dough well for a few minutes. If too dry add a bit of olive oil. When you get a smooth elastic dough, wrap in cling film and put in the fridge for about 30 minutes.
  2. In the meantime, preheat the oven to about 200°C. Put the pumpkin cubes in an oven tray drizzle with olive oil and sprinkle with salt, pepper and some extra nutmeg if you wish. Bake into a preheated oven for about 20 minutes or until soft. Take them out and let them cool down.
  3. When the pumpkin has cooled down, put into a food processor with salt, pepper, nutmeg, ginger, mixed spice and blend until you get a fine puree. 
  4. Now, to remove excess moisture from the puree, put it into a pan and heat gently. Leave to cool again. The filling has to be completely cold to make the ravioli.
  5. Prepare the pasta sheets by rolling the pasta very thinly, preferably use a pasta machine or do it like the old Italian ladies (& me) do...by hand :)
  6. To make the ravioli, place the sheet of pasta dough onto a floured work surface and cut into a 40cm x 6cm rectangle. Cut equal-sized squares from the rectangle, about 6cm wide.
  7. Put a teaspoonful of filling onto a pasta square (make sure the filling is in the centre) cover with another pasta square and seal (using some water) onto the other square. Repeat until you use all the puree/pasta or whichever finishes first :)
  8. When the ravioli are done, toss them in semolina flour to avoid them from sticking to each other. Set aside when done.
  9. To prepare the sage butter, melt the butter until foaming and add the sage and fry for a few seconds. Remove from the heat and add the lemon juice and some salt & pepper.
  10. Cook the ravioli in boiling water for about 3 minutes and serve with the warm sage butter. Alternatively, you can freeze the ravioli.
Enjoy
R&A