Showing posts with label delicious. Show all posts

Wednesday, 14 October 2015

Pastel Tres Leches - Three Milk Sponge Cake

We first had a piece of this cake when our friend Nancy, she is from Ecuador, prepared it for a dinner party and it was a hit. I must admit that the first we had a piece of this cake, Amanda and myself fell instantly in love with it. This type of moist cake is very famous in Central & South America and there are many ways to prepare this cake but our favourite is the Mexican style. In fact I followed the recipe that I found on All Recipes México and it came out perfect. In this recipe I have done everything from scratch and was very proud of myself that I managed to cook the perfect sponge cake. 
I previously made this cake using premade sponge or even premade sponge mixture from a bag, but to be honest, the amount of chemicals, additives and glucose-fructose syrup made me make my own sponge from scratch. The sponge for this cake does not contain any fat at all [fat meaning butter or oil], reason being the cake needs to be light and fluffy so as it can soak all the milky goodness without becoming a stodgy and heavy cake that sticks to your mouth. 
I decided to make this cake for a dinner party to celebrate Canadian Thanksgiving, it was a potluck dinner party and there was so much food and desserts and we had so much fun. Anyway, everyone loved our Tres Leches and when I went back for seconds I only found a sliver left. I was happy, that meant only one thing...our friends loved it!! Yay! 
It is very easy and quick to prepare and all you need is a hand held electric mixer and 2 large mixing bowls, well apart from the ingredients obviously! :) This is what you will need...
  • 1 cup [225g] caster sugar
  • 5 eggs, yolks and whites separated
  • 1/3 cup [80ml] whole milk
  • 1 teaspoon vanilla extract
  • 1 cup [125g] plain flour
  • 1 ½  teaspoons baking powder
  • 1 can (397 grams) sweetened condensed milk
  • 1 can (410 grams) evaporated milk
  • 1 ¼ cups [300ml] double or whipping cream
  • 8 fresh strawberries, to decorate
How to...
  1. Preheat oven to 175°C. Grease a 23cm cake tin and dust with flour, remove any excess flour.
  2. In a medium bowl place the egg yolks with ¾ cup sugar and beat with an electric mixer until fluffy and whitish in colour. Add the milk, vanilla, flour and baking powder and mix all until well blended. Set aside.
  3. In another bowl, beat the egg whites until stiff and they form peaks. Whilst beating, gradually add the remaining sugar. 
  4. Now gently fold the egg whites into the batter. Do not over mix. Pour into the cake tin.
  5. Bake in the preheated oven for 45 minutes. Test with a skewer to see if it is done.
  6. Take out of the oven and let cool in the tin for 10 minutes. After 10 minutes, remove the sponge from the tin, use a knife to help you. Transfer on a wire rack to cool completely.
  7. Whilst the cake is cooling down make the milk mixture by mixing the condensed milk, evaporated milk and ¼ cup [60ml] of the cream into a bowl using a hand whisk. Take a cup of the mixture and set aside. [You can use this later or in a smoothie], you can also add this in too if you want your cake to be extra moist. Put the sponge cake into the serving tin or back into the cake tin. Prick the sponge with a fork in various places and pour the milk mixture and leave it to soak for about 20 minutes until the milk is soaked up by the sponge.
  8. In the meantime, whip up the rest of the cream and cover the cake with it. Decorate with the strawberries. Put in the fridge for about an hour before serving.
Enjoy!!
R&A


Saturday, 25 April 2015

Gołąbki - Polish cabbage rolls


Polish food is one of the most famous foods in the Western world. Along with Pierogi - Polish dumplings, Gołąbki - Polish cabbage rolls are a favourite not just with people of Polish origin but with anyone that has the honour of biting into these tasty traditional dishes. Once eaten, you will come back for more, guaranteed. These cabbage rolls are well worth boiling and separating the cabbage leaves (the tricky bit). I can vouch that once cooked these cabbage rolls are addictive. I used a mixture of minced beef and pork and the result was some really delicious, tasty and juicy cabbage rolls. If you find it you can also add some minced veal as well. The accompanying tomato sauce gives it the Eastern European taste, the tanginess of the tomato sauce, the sweetness of the caraway seeds, the herbiness of the marjoram and parsley...oh, heaven! Give them a go, you will not be disappointed. You will need...

For the Gołąbki - cabbage rolls
  • 1 large cabbage head
  • 750g minced beef & pork
  • 1 large carrot, grated
  • 2 eggs
  • 1 cup cooked rice, cold
  • 250ml (1 cup) tomato passata + ½ cup tomato passata
  • 1 onion, finely chopped
  • 2 garlic cloves, finely chopped
  • 1 ½ teaspoons salt
  • Fresh ground black pepper, to taste
  • A knob of butter, for frying
For the tomato sauce
  • 300ml (1 ½ cups) beef stock
  • 1 heaped tablespoon tomato paste
  • 175ml (¾ cup) tomato passata
  • ½ teaspoon dried marjoram
  • 2 teaspoons dried parsley
  • ½ teaspoon caraway seeds
  • 1 teaspoon sugar
  • Fresh ground black pepper, to taste
  • 30g butter
  • 30g plain flour

How to...
  1. Start by boiling a very large pot of salty water. Now put the cabbage core end up and using a paring knife remove the hard core. Put the cabbage in the boiling water and boil for about 10 minutes. At this point some of the leaves will start to come off, that is what we want. After 10 minutes, carefully take the cabbage out of the boiling water, be very very careful as it will be very hot. Use 2 large spatulas or ladles when doing this process. Leave to cool slightly. When slightly cool, start peeling off the cabbage leaves with extreme care (remember they are the star ingredient of the dish). Separate them and put them flat on a platter and set aside to cool further.
  2. Now it is time to prepare the filling. Start by frying the onions and garlic in the butter until brown (about 5 minutes on medium heat). Set aside to cool. In a large bowl add the minced meat, cooked rice, grated carrot, passata, eggs, cold fried onion/garlic mixture and salt & pepper. Put a pair of gloves on (optional) and mix by hand until all ingredients are incorporated, do not mix too much or else the meat will toughen. 
  3. Preheat the oven to 180°C/350°F.
  4. Now here comes the fun part, firstly if the spine of the leaf is too tough carefully trim it with a sharp knife). Now spread the cabbage leaves end bit away from you, put some filling (about a tablespoon or more...this depends on the size of the leaf), now roll the sides first and roll up all the way up to the stalk/spine part. Stack them up into a casserole next to each other (see picture).
    Keep going until all the filling is used up. If you have spare leaves or torn leaves save them so you can cover the rolls in the end. 
  5. Now fill the casserole with water half way up to the rolls and add the half cup of passata. Spread the torn/spare leaves on top, cover and put into the preheated oven for 30 minutes.
  6. Whilst they are cooking away, start the tomato sauce by melting 30g butter, add the flour and cook stirring constantly for about 2-3 minutes. Add all the other sauce ingredients and stir until thickened, lower the heat and simmer for about 10 minutes, make sure you keep on stirring or it will stick to the bottom of the pot. Turn off the heat and remove from the heat.
  7. After 30 minutes take the cabbage rolls out of the oven and pour the tomato sauce on top, cover again and put in the oven for another 30 minutes.
  8. Take out of the oven, let stand for about 10 minutes and serve hot with a couple of spoonfuls of tomato sauce on top. Gołąbki can also be enjoyed cold as appetizers...an absolute delight!!
Enjoy!!

R&A

Thursday, 19 March 2015

Turkey & Cumin Burgers

We found a version of this recipe online and decided to adapt it and we instantly fell in love with these wonderful tasty burgers. We discovered that turkey mince is so lean, delicious and surprisingly light!! Apart from turkey obviously these burgers have cumin as one of the main ingredients and it goes really well with the tasty turkey mince. This time I had my burgers with Danish blue cheese instead or regular cheese and it turned out to be a match made in heaven but feel free to use any cheese you prefer such as Cheddar, Edam, Emmental or Maasdam, We also made a refreshing raw carrot & tomato salad to go with it. I will post the recipe of this salad in my next blogpost. In the meantime do give these burgers a go. For 6 burgers you will need...
  • 1 egg
  • 2 cloves garlic, minced
  • 3 tablespoons light soy sauce
  • 3 tablespoons Worcestershire sauce
  • 2 teaspoons ground cumin
  • 1 teaspoon Dijon mustard
  • 1 teaspoon paprika
  • ¼ teaspoon hot paprika
  • ¼ teaspoon sea salt
  • 4 tablespoons dried breadcrumbs (we used Panko)
  • 500g minced turkey

To serve

  • 6 burger buns, split and toasted
  • 30g Danish blue cheese, crumbled

How to...
  1. In a large mixing bowl, mix all the burger ingredients well. (I use my hand so all the flavours infuse equally into the meat. (Always make sure your hands are clean, alternatively you can wear disposable gloves or use a spoon).
  2. Shape into 6 equally shaped burger patties.
  3. Cook on a hot grill or BBQ for about 5 minutes on each side or until there is no pink in the middle anymore.
  4. Serve on the toasted buns, sprinkle some crumbled Danish blue cheese. Our carrot & tomato salad will go very well with these burgers...definitely tried and tested. :)

Enjoy!!
R&A

Saturday, 14 March 2015

Marmitako Euskera - Basque Fresh Tuna Stew

Marmitako in Basque means 'from the pot' and is also the name for this tuna and potato based stew. Using the freshest tuna possible this stew will turn into a gorgeous unique stew. In this recipe I use Choricero peppers which are dried red Spanish peppers that come from Spain but if you do not have them do not worry just omit them. I also made my own fish stock but you can use any fish stock cubes or stock pots you have available. I must admit that both Amanda and myself loved this recipe and will definitely give it another go. Fresh tuna is one of my favourites when it comes to fish and being the main ingredient in this wonderful dish made this an instant favourite!! Just because I love flags, here is the Basque flag :) For six people you will need...

  • 500g fresh tuna, cut into chunks
  • 500g potatoes cut into chunks
  • 1 red or yellow pepper, diced
  • 1 green pepper, diced
  • 2 choricero peppers, soaked in boiling water for 1 hour, flesh scraped (optional)
  • 2 tomatoes, peeled, deseeded and chopped
  • 3 garlic cloves, finely chopped
  • 2 small onions, finely chopped
  • 1.5 litres fish stock
  • A pinch of cayenne pepper
  • 75ml white wine
  • 240ml (1 cup) tomato passata
  • Salt & pepper, to taste
  • Olive oil, to serve

For the fish stock...
  • 2 litres water
  • 1 large fish head or 2 small ones
  • 1 onion, sliced
  • 1 spring onion, chopped
  • 1 tsp dried parsley
  • A pinch dried thyme
  • 1 bay leaf

How to...
  1. If making your own stock, put all the ingredients in a pot and bring to a boil. When it boils, skim the foam that will float on top of the stock. Simmer for 20-25 minutes. Turn off the heat and strain through a fine sieve.
  2. Now onto the stew. In a saucepan, add onions, garlic, red pepper, green pepper and tomatoes, cook until soft about 10-15 minutes on medium high heat stirring occasionally. Now add the wine and when the wine has evaporated, add the passata and choricero pepper flesh (if using). Turn off the heat and blend with a stick blender or in a blender and set aside.
  3. In the meantime, in a large pan add the strained stock, cayenne pepper and salt & pepper. Bring to boil and add the potatoes. Cook for 15 minutes. Add tomato/pepper mixture and stir well. Simmer for a further 10 minutes.  Add tuna chunks, stir once and simmer for about 5 minutes. Do not overcook the tuna as it will crumble and ruin the stew. Turn off heat and set aside to sit for about 15 minutes before serving.
  4. Serve warm with crusty bread.
Enjoy!!
R&A


Saturday, 7 February 2015

Reduced Sugar Ovaltine & Dates Cake

Hello all hope you are all well!! So, after a sabbatical month of not blogging, here we are with a new recipe for you all. Apparently Ovaltine cake is a wartime classic here in Britain and here is our take on this cake recipe. I reduced the amount of sugar and increased the amount of dried fruit. I also used rice milk instead of dairy milk and the cake turned out surprisingly light. You can, of course, use cow's milk. It turned out so good and because it is not overly sweet I cheekily spread some proper butter on a slice of this tasty cake whilst it was still warm. Heaven!! The ingredients down here are for a small cake so feel free to double the amounts for a larger cake.  Give it a go...very easy to prepare. For a small cake you will need...
  • 170g self-raising flour
  • 40g caster sugar
  • 70g chopped dried dates
  • 3 tablespoons Ovaltine
  • Pinch of salt
  • ½ teaspoon baking powder
  • ½ teaspoon bicarbonate of soda
  • 1 cup (240ml) rice milk (or cow's milk)

How to...
  1. Pre-heat oven to 180°C/350°F.
  2. In a medium sized mixing bowl sieve the flour, baking powder, bicarb, salt, Ovaltine and sugar. Mix them well with a wooden spoon.
  3. Add the chopped dates and rice milk and mix well until you get a runny batter.
  4. Pour into a silicon mould or a lightly greased small loaf tin.
  5. Bake into the preheated oven for 50 minutes.
  6. Serve warm with or without butter.

Enjoy!!
R&A

Monday, 22 December 2014

Spaghetti al Nero di Seppia - Spaghetti with Cuttlefish

Hello all, I know I have not blogged any recipes lately but I was quite busy working towards a career change! Oh yes...quite happy and excited about the new job starting in January but until then I have two weeks off and hopefully I will post some delicious recipes that we have prepared lately. One recipe that we made and loved is the classic Italian recipe Spaghetti al Nero di Seppia which basically is spaghetti in a black sauce!! Yes a black sauce which is the result of the addition of the cuttlefish's ink to the cuttlefish sauce. Try it out, if you have not got a fishmonger close-by, you can buy sachets of cuttlefish ink online...I do! They are very cheap as well. This pasta sauce is very fast and easy to prepare...just make sure that cuttlefish you are using is fresh. So for 2-3 people you will need...
  • 200g spaghetti
  • 600g cleaned cuttlefish (including tentacles), cut into small pieces
  • 2 garlic cloves, finely chopped
  • 100ml (½ cup) white wine
  • 2 sachets cuttlefish ink or 1 fresh cuttlefish ink sac
  • 2 tablespoons chopped fresh parsley (or 1 tablespoon dried parsley)
  • Extra virgin olive oil
How to...
  1. Heat about 2 tablespoons of extra virgin olive oil together with the garlic in a small pan. Cook until the garlic is aromatic and golden.
  2. Now add the cuttlefish and parsley and stir well. Cook on medium heat for about 15 minutes. Increase the heat on high and add the wine and cook until the wine has evaporated (at this point you can cook the pasta and drain it). Reduce the heat to medium again and add the cuttlefish ink sachets. Stir well. If using the fresh cuttlefish ink sac, add the whole and break it carefully with a wooden spoon. Heat thoroughly.
  3. Add the sauce to the pasta and serve with extra chopped parsley and extra virgin olive oil.
Enjoy!!
R&A


Saturday, 8 November 2014

Ottini - Maltese Number 8 Shaped Biscuits

These Maltese biscuits were one of my favourites whilst growing up and to be honest they still are as I grew to miss them whilst living here in England. So obviously I had to make them. The recipe is very similar to Qagħaq tal-Ġunġlien (Maltese Biscuit Rings with Sesame Seeds) with some ingredient changes and also, this time I used a food processor. Needless to say there was less mess in the kitchen and took less time to prepare!! It is quite easy to shape a number 8, actually easier than you had thought. Also, when I bake my OCD kicks in and I always have to weigh the prepared dough and divide its weight into equal and even shapes haha. Using this method I always get equally shaped (well approximately) finished products. So if you miss these biscuits like I do, here is how I made 10 of them first thing on a Saturday morning. You can dunk these in hot tea or coffee, that's how we like them :) You will need...
  • 250g plain flour
  • 85g caster sugar
  • 1 ½  teaspoons baking powder
  • 1 egg
  • ½  teaspoon ground aniseed
  • Pinch ground cloves
  • 90g salted butter, at room temperature, cut into cubes
  • 1 tablespoon vegetable oil
  • 2 tablespoons water
  • 1 tablespoon orange flower water - Ilma zahar (if not available add another tablespoon of water)
  • Grated zest of 1 orange
  • Sesame seeds
How to...
  1. Preheat the oven to 180°C.
  2. If you are using a food processor, start by adding the flour, sugar, spices and baking powder into the food processor and pulse for a few minutes. If not using a processor add the dry ingredients in a large bowl and mix well. Add the butter and blend until all butter has been incorporated into the flour. If using your hands, mix the butter in with your fingertips until mixture resembles fine breadcrumbs.
  3. In a small bowl beat the egg and mix in the orange zest, water, orange flower water and oil. Mix well. Add to the dry ingredients whilst food processor is running and blend until the dough comes together. Again if using your hands, add the wet ingredients to the dry ingredients mix well until you get a soft dough.
  4. Divide the dough into 10 equal sized balls (about 50g each), a bit bigger than golf balls and roll into thin long sausage like shapes, about 30cm long. Shape into a number 8 and carefully transfer into a plate with sesame seeds turning over to cover both sides with the seeds. Place on a tray lined with greaseproof paper and bake in the preheated oven for about 20-22 minutes.
  5. Let cool down and serve with tea or coffee.
Enjoy!! 
R&A


Thursday, 30 October 2014

Egg Fried Rice with Lap Cheong 腊肠 (Chinese Sausage)

We invented this dish when we were introduced to Lap Cheong aka Chinese sausage by our friends. Chinese sausage is so delicious, so sweet, meaty and juicy...we fell in love with it. Stir-fried rice is quite famous with everyone and is very easy to prepare and indeed, since this dish is a stir-fried rice based dish it is quite easy to prepare. It always makes me laugh whenever I cook this dish as I'll be like, so, some of this some of that and voilà...dinner is served!! I must admit that I could eat as much as I can of this dish and I do find it hard to stop! We prefer to use Basmati or Jasmine rice instead of plain rice as it is more fragrant and adds further flavour to the dish. Also the secret to perfect fried rice is to cook the fried rice into batches. I cook ours in two batches. Use a bowl to measure the amount. We usually do a bowl of cooked rice per person. To serve this dish as main course for 2-4 people you will need...
  • 250g uncooked rice (we use Basmati or Jasmine but plain rice will do)
  • 500ml boiling water
  • 4 Lap Cheong (Chinese sausages)
  • Half a leek or 2 spring onions, cleaned and cut into Julienne strips
  • 2 small carrots, cut into Julienne strips
  • Handful of frozen peas, defrosted
  • Handful canned sweetcorn
  • 2 eggs
  • 4 tablespoons vegetable oil
  • 1 teaspoon Chinese five spice powder
  • Oyster sauce, to taste
  • Dark soy sauce, to taste
  • Sesame oil, to taste
How to...
  1. Cook the rice either in a rice steamer or on the hob. To cook the perfect rice on the hob, add the rice to a medium sized heavy based pan and add the boiling water. Stir with a fork and bring to a boil. When it boils, lower the heat to low and simmer covered for 10-12 minutes. Do not open the lid. This is called the absorption method. When rice is cooked, wash with cold water, drain and set aside.
  2. Meanwhile, steam the sausages for 20 minutes, slice into bite size pieces and set aside. Do not throw away the boiling water used to steam the sausages. Add the leeks and carrots to the boiling water from underneath the sausages and blanch for about 2 minutes. Drain and set aside.
  3. Prepare the egg omelettes. Beat one egg and pour it in a hot small non stick frying pan (we use a 6-7 inch pan), turning gently so as to cover the bottom of the pan. Cook for a few minutes and turn over to cook the other side. Remove from the pan, roll into a roll and cut into strips. Repeat with the other egg.  You can do them both in one go if you have a larger pan obviously. 
  4. Heat  2 tablespoons of vegetable oil in a wok or frying pan until hot. Add 2 sausages (cut into pieces), half of the blanched veg and stir well. Add a bowl of cooked rice, keep stirring frequently or else the rice will stick. Cook for about 3-5 minutes. Add the peas, half a teaspoon of Chinese five spice powder, soy sauce and sesame oil to taste and stir well.Cook for a further 3 minutes. Now add the egg omelette strips, give it one last stir and serve hot maybe with some more soy sauce or sesame oil.
  5. Repeat until you use all the rice and ingredients.

Enjoy!!
R&A


Thursday, 16 October 2014

Baby Pumpkins Stuffed with Camembert, Vegetables & Bacon

I was at the supermarket and came across these cute baby pumpkins that were called Munchkin pumpkins. I could not resist buying a couple of them and I started thinking instantly on how am I going to cook them. After doing some research I came up with this idea. It turned out incredibly tasty, creamy, salty, sweet, crunchy, crispy...just wonderful. As we were cooking this on a week night I obviously relied on Amanda to help us with the preparation. In fact, to make sure that everything is cooked evenly, everything should be chopped finely and basically the same size. If you want to turn this recipe into a vegetarian one omit the bacon and to turn it vegan, omit the bacon and cheese and use vegetable oil instead of butter. So, Halloween is upon us once again and pumpkin recipes are on high demand, so I will try and come up with a couple more before the spooky night!! Give this a go and you will definitely not be sorry, they are delicious! For two baby pumpkins you will need...
  • 2 Baby pumpkins or small Butternut squash
  • 6 mushrooms, finely sliced
  • 1 carrot, finely diced
  • 1 small onion, finely diced
  • 1 red pepper, finely diced
  • 1 green chilli, finely diced
  • 1 celery stick, finely diced
  • Some pumpkin/butternut squash flesh, finely diced
  • 3 fresh sage leaves
  • Vegetable oil or butter
  • Salt & pepper
  • 175g bacon, finely diced
  • 150g Camembert, sliced
  • Dry sherry

 How to...
  1. Heat oil or butter together with the sage leaves,
  2. Add vegetables and cook covered on medium heat until soft, 
  3. Now remove sage leaves, add bacon and mushrooms and cook on higher heat until mushrooms are wilted and all liquid has disappeared. Add salt, pepper and some dry sherry. Cook, stirring frequently until all alcohol has evaporated. Turn off heat.
  4. Add Camembert slices at the bottom of the pumpkin/squash and top with the filling. Add some extra Camembert on top of the filling, cover with pumpkin lid and bake at 180 deg for 50 minutes to an hour.
  5. Serve hot!!
Enjoy!!
R&A


Sunday, 12 October 2014

Lamb Liver Risotto with Sage & Marsala

This was our second time cooking risotto and as the first time it was a success! It turned out delicious. I love liver and the combination with fresh sage and the Marsala wine that it is cooked with made this recipe taste wonderful. If you do not have Marsala use red wine, the taste will change but will definitely turn out as good. All you need for a perfect risotto is patience, it takes between 20-30 minutes to cook a good risotto and you have to keep stirring all the way to make sure the rice soaks up all the stock. So do have a go at the recipe. For 4 people you will need...
  • 1.5 litres boiling water
  • 2 vegetable stock pots (or cubes)
  • 300g Arborio rice
  • 250g lamb liver, cut into small pieces
  • 6 fresh sage leaves
  • 1 carrot, finely chopped
  • 1 celery stick, finely chopped
  • 1 onion, finely chopped
  • 100ml Marsala wine
  • 2 tablespoons olive oil
  • 60g (½ cup/½ stick) butter
  • 60g grated Parmigiano Reggiano
  • Salt & freshly ground black pepper
How to...
  1. Start by preparing the stock. In a large pan dissolve the stock pots or cubes in the boiling water, bring back to the boil and turn off the heat.
  2. In an other small pan put 50g of the butter and the sage leaves and heat up until the butter has melted. Add the chopped liver, season with salt & pepper, stir well and cook for about 5 minutes stirring occasionally. 
  3. Now add the Marsala to the liver and cook on high heat until all liquid has disappeared. Remove from heat, remove the sage leaves and set aside.
  4. In a large heavy based frying pan or pan (I prefer a frying pan because it spreads the heat evenly during cooking), add the olive oil, carrot, onion and celery and cooked covered on low to medium heat until soft, about 10-15 minutes. 
  5. Now add the rice turn the heat to medium and toast the rice for a couple of minutes stirring continuously
  6. Add a cup of the vegetable stock whilst constantly stirring until all stock has been absorbed by the rice, this takes about 2 minutes. 
  7. From now on, keep adding the remaining stock ½ cup at a time, always adding the next one when the previous one has been completely absorbed by the rice.
  8. After you have used half of the stock, stir in the cooked livers and continue adding the remainder of the stock until all stock has been used. This process took me about 25-30 minutes.
  9. After all the stock is absorbed, stir in the grated parmesan and the last 10g of butter. Serve immediately!!
Enjoy!!
R&A

Monday, 29 September 2014

Mujaddara - Arabic Lentils, Rice & Onions - مجدرة

Well what can we say, I made this dish as a quick and cheap end of the month dinner and we fell in love with it....wow...sooo tasty!!! Simple, easy and quick to make I just hope you do try it. Obviously I added some spices to it but they are optional as this dish is quite simple as I said. This recipe is quite old and in fact, the first recorded recipe for Mujaddara appears in Kitab al-Tabikh, a cookbook compiled in 1226 by al-Baghdadi in Iraq. It was indeed known as a dish for the poor and there is a saying in the Eastern Arab world which says, "A hungry man would be willing to sell his soul for a dish of Mujaddara." I added Advieh (which is not an Arabic spice mix but Persian) but you can add Baharat a very popular Arabic spice mix or none at all. It is completely up to your taste! It is vegetarian, although some variations are served with meat but not this one. You can also make it vegan by omitting the yoghurt at the end. So for 3-4 people you will need...
  • 3 onions, chopped
  • 1 onion, sliced
  • 1 cup brown or green lentils
  • 1 cup long grain rice
  • ½ cups cold water
  • 3 tablespoons vegetable oil
  • 2 teaspoons salt
  • 1 teaspoon Advieh* or Baharat** spice mixture (optional) 
  • 1 teaspoon Harissa paste (optional)
  • Sesame seeds, to garnish
  • Greek (thick) yoghurt, to serve
*To make Advieh spice mixture : Mix 1 teaspoon ground cinnamon, 1 teaspoon ground nutmeg, 1 teaspoon ground rose petals, 1 teaspoon ground cardamom, 1/2 teaspoon ground cumin in an airtight glass jar and store in a dry cupboard.

**To make Baharat spice mixture : Mix 2 teaspoons paprika, 2 teaspoons ground cumin, 1 teaspoon black pepper, 1 teaspoon ground coriander, ½  teaspoon ground cinnamon, ½ teaspoon ground nutmeg, ¼ teaspoon ground cardamom, ¼ teaspoon ground cloves in an airtight glass jar and store in a dry cupboard.

How to...
  1. In a small pan heat 2 tablespoons of oil and fry the chopped onions together with the Advieh or Baharat if using on medium heat stirring occasionally until soft and brown. Set aside.
  2. In a medium (5 litre) pot add the lentils and water, bring to the boil, lower heat and simmer covered for 15 minutes.
  3. Now add the cooked onions, rice, salt and Harissa paste. Stir well and simmer covered on medium heat for 20 minutes, stirring frequently to avoid rice from sticking to the pot. 
  4. In the meantime, heat the remaining oil in the same pan that you cooked the chopped onions in and cook the sliced onion until caramelized (stirring frequently).
  5. When everything is cooked, serve the lentil/rice/onions mixture hot, some caramelised onions on top, sprinkle some sesame seeds and a couple of spoonfuls of yoghurt.

Enjoy!!
R&A


Saturday, 30 August 2014

Shiitake Mushroom & Asparagus Risotto

"Well, that was worth the lifetime wait" That is what I said as soon as I finished my last spoonful of this risotto. The reason behind that saying was the fact that I never had a proper risotto before and also I had never cooked one before yesterday. For some strange reason I never felt confident enough to cook a risotto, always thinking that I'm going to mess it up. But hey, as they say, I nailed it!! I was browsing as usual and found this recipe which I adapted to our own taste. The recipe says to use dry white wine but we used a good Spanish dry sherry, which has the same colour and dryness as white wine but a fruitier crisper taste, in my opinion, but if you do not have it feel free to use a dry white wine. This recipe is completely vegetarian as well. I actually found out that the secret to the perfect risotto is patience, in fact you have stir calmly for nearly 20 minutes but do not be put off by this, it is certainly worth the effort. So here it goes, for 4 people you will need...
  • 1.5 litres boiling water
  • 2 vegetable stock pots (or cubes)
  • 250g (1 ½ cups) Arborio rice
  • 150g asparagus, ends discarded and chopped into 3 pieces
  • 60g dried Shiitake mushrooms, soaked in boiling water for about an hour
  • 1 onion, finely chopped
  • 120ml (½ cup) Spanish dry Sherry
  • 1 tablespoon olive oil
  • 60g (½ cup/½ stick) butter
  • 50g grated Parmigiano Reggiano
How to...
  1. In a pan add the boiling water and vegetable stock pots. Bring to the boil and throw in the asparagus and simmer for 4 minutes. Take out of the stock and put into ice cold water to stop the cooking process completely. Drain and set aside.
  2. Now prepare the mushrooms. Start by discarding the steams and slicing the mushroom caps thinly. Heat the olive oil in a small pan and add the mushrooms, sauté for 5 minutes stirring frequently. Set aside. 
  3. In a large heavy based frying pan or pan (I prefer a frying pan because it spreads the heat evenly during cooking) heat up half the butter and add the onion and cook covered on medium to low heat until soft and transparent. When onion is cooked, increase the heat to medium, add the rice and cook, stirring frequently for about a minute. 
  4. Now add the sherry and simmer whilst stirring until it is absorbed, this will only take about a minute. Now add a cup of the vegetable stock whilst constantly stirring until all stock has been absorbed by the rice, this takes about 2 minutes.
  5. From now on, keep adding the remaining stock ½ cup at a time, always adding the next one when the previous one has been completely absorbed by the rice. Keep doing this until you used all the stock or until rice is looking creamy. It is very important that you keep stirring the rice constantly to ensure an even absorption. This will take about 20 minutes. 
  6. When done, take off the heat, stir in slowly the remaining butter and half the cheese. Now stir in carefully the cooked asparagus and Shiitake mushrooms. Serve immediately with extra grated Parmigiano.
Enjoy!!
R&A


Monday, 11 August 2014

Pineapple & Coconut Kebabs

Watching afternoon TV, I felt like a sweet treat but remembered that I did actually promise myself not to have sugary treats during weekdays and so far I have stuck to it. So, we had a giant pineapple sat on the kitchen floor (that is where we leave it to ripen) and thought that is quite sweet. Obviously, for myself munching on just freshly chopped pineapple is not enough so I came up with these sweet and delicious kebabs. Very quick and easy to prepare and cook you will have a great healthy, sweet treat in minutes. You can used canned pineapple chunks if you like but believe me fresh ripe pineapple is so so good, so do try and get your hands on a fresh pineapple. They are also great to grill on the BBQ to finish a great meal. Give them a go...for 8 kebabs you will need...

  • 32 large pieces fresh ripe pineapple
  • 6 tablespoons desiccated coconut
  • ¼ teaspoon mixed spice
  • ¼ teaspoon ground cinnamon
  • 8 bamboo skewers

How to... 
  1. In a bowl or plate mix the coconut, mixed spice and cinnamon well. 
  2. Roll the pineapple pieces in the coconut/spice mixture and put 4 pineapple pieces on every skewers.
  3. Grill on a hot grill pan or BBQ for a couple of minutes on each side until slightly charred.
  4. Serve.
Enjoy!!
R&A


Saturday, 2 August 2014

Summery Millet Salad

I made this salad to take with me at work as my lunch and I must say it was wonderful and so tasty. You can also do this with quinoa or couscous if you like. It is super-easy and super-quick to rustle up, cooking the millet grain is the longest cooking time for this recipe (about 20 minutes). This recipe is vegetarian but for a vegan version just omit the eggs. I adore eggs so I did put 2 hard boiled eggs in my salad but feel free to do one instead or none as I said before none. Anyway, do give it a go and if you have not tried millet grain before do try it, it is so good and I love its fluffy texture. You can do this for a light lunch or even as a side for your dinner (maybe a good steak). You can also take it with you to a BBQ. The following amounts are for one portion so double or quadruple the ingredients for a larger serving. For one portion you will need...
  • 60g millet grain, washed
  • 1 or 2 hard boiled eggs, chopped (optional)
  • 1 tomato, diced
  • 1tbsp sliced jalapenos
  • 6 green olives
  • 2 tsp capers, drained
  • 3 sundried tomatoes, chopped (optional)
  • ½ teaspoon dried mint
  • A couple of fresh basil leaves
  • Salt & pepper, to taste
  • Sweet paprika, to taste
  • Extra virgin olive oil, to taste
How to..
  1. Start by cooking the millet by just adding it in plenty of boiling water. Simmer for 20 minutes and drain in a sieve. Whilst still in the sieve rinse the cooked millet grain under a running cold water tap to cool it down. 
  2. When cool enough add all the other ingredients, including the salt, pepper, sweet paprika and olive oil to your taste and stir carefully to combine. 
  3. This is now ready to serve.

Enjoy!!
R&A

Saturday, 19 July 2014

Meatloaf

Meatloaf needs no introduction whatsoever. According to Wikipedia, meatloaf originated in Europe, mainly in Germany and Belgium and is also closely related to Dutch meatball. Although, in the 5th century Roman cookery collection called Apiciusas, minced meat was mentioned. The infamous American meatloaf has its origins in scrapple, a mixture of ground pork and cornmeal served by German-Americans in Pennsylvania since Colonial times. Actually, the contemporary version of the American meatloaf has been a must on every American cookbook since the late 19th century. In our version we used only beef but feel free to mix two or three types of meat like lamb or even pork. We found this recipe when we got married in one of Amanda's cookbooks and we adapted it and made it our own ever since. Just give our version a try and you will love it. We serve it with a kind of sweet and sour tomato sauce. So for a loaf you will need...

  • 1 medium onion, finely chopped
  • 1 green pepper, finely diced [optional]
  • 2 garlic cloves, crushed
  • 1 tbsp butter
  • 1kg minced beef
  • 1/2 cup breadcrumbs [we used Panko]
  • 1 egg, beaten
  • 2 tbsp Worcestershire sauce
  • 1 tsp dried oregano
  • Freshly ground pepper


  • 1 cup tomato passata
  • 1 tbsp light brown sugar
  • 1 tsp Dijon mustard
  • 1 tsp vinegar
  • About 4-5 baby onions, boiled, to serve

How to...
  1. Preheat the oven to 180°C. 
  2. In a small pan heat the butter and fry the onion, green pepper [if using] and garlic until soft. When done set aside to cool a bit.
  3. In a large mixing bowl put the beef, cooked onion, pepper & garlic, beaten egg, breadcrumbs, Worcestershire sauce, oregano and black pepper. Mix well with your hands until well mixed (if you do not like messing your hands up use a wooden spoon) but I believe using your hands will infuse the meat with all the flavours.
  4. Now transfer the meat mixture into a loaf pan and press down with your hands. Bake in the preheated oven for about an hour and 15 minutes.. 
  5. In the meantime, put the passata, vinegar, sugar and mustard in a small pan and heat through. Set aside.
  6. When the loaf is done, drain all the excess fat and carefully invert upside down on a serving plate, top with the tomato sauce and onions. Serve hot!!

Enjoy!!
R&A


Sunday, 4 May 2014

Kawlata bix-Xikel tal-Majjal - Maltese Vegetable Soup with Pork Shank

For the majority of Maltese people, this is heaven in a bowl. It is a simple dish made out of the freshest vegetables and meat. If you are not so keen on the meat bit, just eliminate the pork shank, although this has now turned into another recipe as a Kawlata  without meat is called Minestra. Anyway, I could not resist when we got our vegetables box delivered and saw all that colourful and fresh produce in front of me, I had to prepare a good old Maltese vegetable soup. When we do this, we do a huge pot of it and in fact the amount of ingredients that we prepared for it were enough to fill a very large pot. After we just freeze what is left in portions, although if eating during the following days just store it in the fridge for a couple of days and reheat as necessary. In Malta it is traditional to serve it with grated cheese and Maltese crusty bread. The best thing about this soup is that when I chop the vegetables I chop them roughly to give the soup a very rustic look :) Also, slow cooking makes sure that all the flavours infuse together. We use the a cured pork shank for this soup, this can also be found labelled Ham Hock or Ham Shank here in England. It gives the soup a delicious flavour and when the soup is cooked, you can flake the meat it in the soup as Amanda likes it or else after having a bowlful [or two] of soup, eating it on the side with some bread. Heaven!! Well, enjoy making it, the ingredients list is very versatile and the amounts can be changed depending on the size of the pot. For a huge pot you will need...
  • 1 Pork/Ham shank
  • 3 large Potatoes, roughly diced
  • ½ butternut squash or 500g pumpkin, diced
  • 1 small Cabbage, chopped
  • 1 courgette or Marrow, diced
  • 4 small Onions, split into 4 pieces
  • 1 small Cauliflower, split into florets
  • 4 Carrots, diced
  • 1 Turnip or ½ a swede, diced
  • 100g Pulse mix or yellow split peas (pre-soaked overnight or longer)
  • 3 tbsp tomato paste
  • 2 vegetable or pork stock cubes or stockpots 
  • 75g of small shaped pasta such as ditalini
  • Salt & pepper
  • 2 litres of water

How to...
  1. To start with, put the pulse mix or yellow split peas in a small pan cover with water, bring to the boil and simmer for 5-10 minutes. Drain and set aside. 
  2. At the bottom of the large pot, put the shank, skin part down and then add all the other ingredients, apart from the pasta. Give the pot a stir with a wooden spoon. 
  3. Bring to the boil on a medium heat and then turn heat to low and simmer for 3-4 hours, stirring occasionally. About 10-15 min before turning off heat, add the pasta and cook until pasta is done. Serve with grated cheese and some crusty bread!

Enjoy!!
R&A

Friday, 21 June 2013

Mango Delight

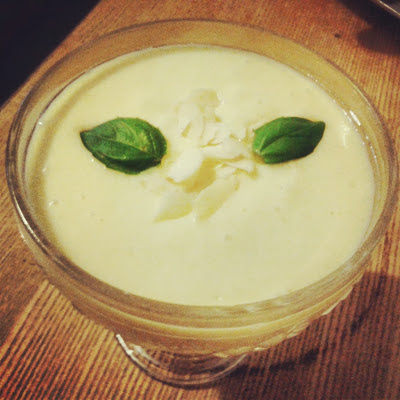
We absolutely love exotic fruit and mango is gorgeous with its distinctive flavour. This dessert is very quick to prepare and it is delicious. Mango is a native fruit from South Asia and is the national fruit of India, Pakistan and  The Philippines. When ripe, it is a very refreshing fruit and is used as an ingredient of cool summer drinks such as Mango lassi and Panha. This quick and delicious concoction turned out to be delicious and so refreshing. So do give it a go, maybe to finish off a great summer BBQ. For 6 people you will need...
  • Flesh of 2 large ripe mangoes, chopped into pieces
  • 300ml sour cream or fromage frais, straight from the fridge
  • 70g caster sugar [optional]
  • 1 tsp vanilla essence
  • 1/4 tsp ground cinnamon
  • Fresh basil leaves, to serve
  • Flaked almonds, to serve
How to...
  1. Blend all ingredients apart from basil leaves and almonds in a blender until smooth.
  2. Pour into serving glasses and decorate with the basil leaves and flaked almonds.
  3. Serve super chilled!
Enjoy!!
R&A

Sunday, 11 November 2012

Pumpkin Ravioli with Sage Butter - Ravioli alla Zucca con Burro e Salvia


During pumpkin season, I am always looking for new recipes as it is always so cheap. It is delicious, you can use it in both sweet and savoury dishes. This time I made these ravioli from scratch (you can always buy some sheets of fresh pasta if you are not so adventurous or short of time). I also utilized a ravioli making gadget thingy that my dad used to use in the 1970's. They are very easy to prepare and they are served with sage butter...nothing else...simple as you like! So, try them out as they are delicious...for about 24-30 ravioli you will need...


For the pasta dough
  • 300g ''00'' plain flour
  • 3 free range eggs
  • Some semolina flour
For the filling
  • 450g pumpkin, deseeded, peeled, cut into cubes
  • Pinch of mixed spice
  • 1/2 teaspoon ground ginger
  • 1/4 teaspoon ground nutmeg
  • Salt & pepper, to taste
  • Olive oil
For the sage butter
  • 75g unsalted butter
  • 15/20 small sage leaves (or 2 teaspoons dried sage)
  • 1 tablespoon lemon juice
  • Salt & pepper, to taste
How to...
  1. Start by preparing the dough. Put the flour in a large mixing bowl and make a well in the middle, add the eggs and mix well with a fork. Tip the bowl contents on a well floured surface and knead the dough well for a few minutes. If too dry add a bit of olive oil. When you get a smooth elastic dough, wrap in cling film and put in the fridge for about 30 minutes.
  2. In the meantime, preheat the oven to about 200°C. Put the pumpkin cubes in an oven tray drizzle with olive oil and sprinkle with salt, pepper and some extra nutmeg if you wish. Bake into a preheated oven for about 20 minutes or until soft. Take them out and let them cool down.
  3. When the pumpkin has cooled down, put into a food processor with salt, pepper, nutmeg, ginger, mixed spice and blend until you get a fine puree. 
  4. Now, to remove excess moisture from the puree, put it into a pan and heat gently. Leave to cool again. The filling has to be completely cold to make the ravioli.
  5. Prepare the pasta sheets by rolling the pasta very thinly, preferably use a pasta machine or do it like the old Italian ladies (& me) do...by hand :)
  6. To make the ravioli, place the sheet of pasta dough onto a floured work surface and cut into a 40cm x 6cm rectangle. Cut equal-sized squares from the rectangle, about 6cm wide.
  7. Put a teaspoonful of filling onto a pasta square (make sure the filling is in the centre) cover with another pasta square and seal (using some water) onto the other square. Repeat until you use all the puree/pasta or whichever finishes first :)
  8. When the ravioli are done, toss them in semolina flour to avoid them from sticking to each other. Set aside when done.
  9. To prepare the sage butter, melt the butter until foaming and add the sage and fry for a few seconds. Remove from the heat and add the lemon juice and some salt & pepper.
  10. Cook the ravioli in boiling water for about 3 minutes and serve with the warm sage butter. Alternatively, you can freeze the ravioli.
Enjoy
R&A